Ubiquiti Unifi Mini Networking Rack
prusaprinters
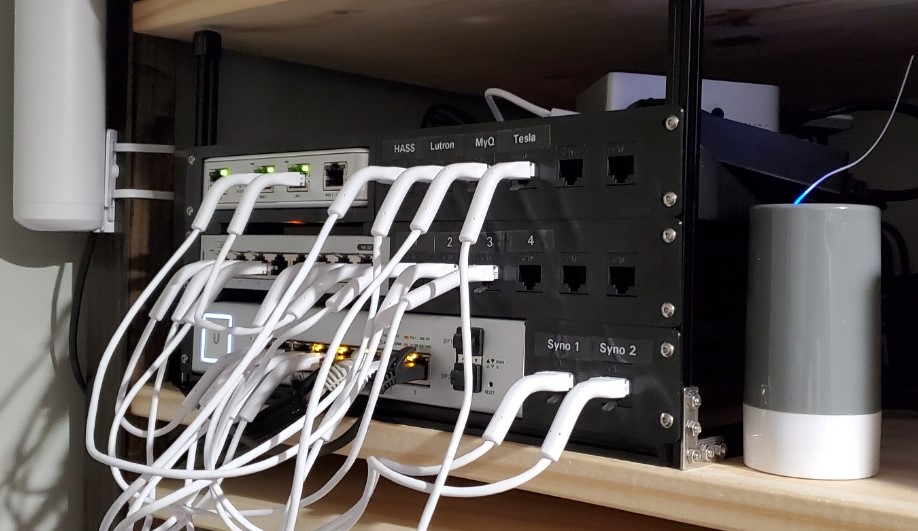
<p>Organize your networking gear compactly and cleanly, without taking up the space of a full size 19" rack.</p> <p>There are mounts included for:</p> <ul> <li><a href="https://www.ui.com/unifi-switching/unifi-switch-8/">US-8</a> Switches</li> <li><a href="https://www.ui.com/unifi-switching/unifi-switch-8-150w/">US-8 150w</a> POE Switch</li> <li><a href="https://www.ui.com/unifi-routing/usg/">USG Gateway</a></li> </ul> <p>All mounts have openings for standard keystone ethernet jacks.</p> <p>The USG mount also includes an accessory tray to hold a cloud key, raspberry pi, or any other IOT devices.</p> <p>It is designed to mount to Makerbeam 10mm aluminum extrusion, but I have also included printable rack ears if you want to only use 3D printed parts. Note that I haven't personally printed or tested the rack ears, since I built mine with Makerbeam.</p> <p>Everything is sized to be printable on the Prusa Mini.</p> <h3>Print instructions</h3><p>Print everything flat side down, as oriented in the STLs.</p> <p><h3>Assembly Instructions</h3></p> <h5>USG Gateway</h5> - 6x <a href="https://www.amazon.com/VANDESAIL-Keystone-Coupler-Female-20Pack/dp/B07KK5CSJY/ref=sxts_sxwds-bia-wc-rsf-lq2a1_0">Standard Ethernet Keystone Jacks</a> The two halves of these brackets can either be glued together or attached with an M3x4mm orM3x6mm countersunk screw and an M3 nut. The USG friction fits into place. <h5>US-8 POE Switch</h5> - 2x <a href="https://www.amazon.com/VANDESAIL-Keystone-Coupler-Female-20Pack/dp/B07KK5CSJY/ref=sxts_sxwds-bia-wc-rsf-lq2a1_0">Standard Ethernet Keystone Jacks</a> These brackets attach to the side of the Switch using the mounting hardware that comes with the switch. I believe they are m4 screws. <h5>US-8 Switch</h5> - 6x <a href="https://www.amazon.com/VANDESAIL-Keystone-Coupler-Female-20Pack/dp/B07KK5CSJY/ref=sxts_sxwds-bia-wc-rsf-lq2a1_0">Standard Ethernet Keystone Jacks</a> The two brackets friction fit on each side of the switch. <h5>3D Printed Rack Frame - Optional</h5><p>Print two of the part Printable_Rack.stl. Attach rackmount items using M3 screws.</p> <p><h5>Makerbeam Frame - Optional</h5></p> <ul> <li> 1x <a href="https://www.amazon.com/MakerBeam-300mm-beam-black-anodised/dp/B00G2DNU4M/ref=sr_1_1?dchild=1">Makerbeam 300mm</a></li> <li>4x Makerbeam, length depends on how many devices you have</li> <li>2x <a href="https://www.amazon.com/Makerbeam-Openbeam-designed-MakerBeam-diameter/dp/B00HUOJPUU/ref=pd_sbs_7">90degree L Bracket</a></li> <li>2x <a href="https://www.amazon.com/MakerBeam-Corner-brackets-pack-12/dp/B00G2DNVFU/ref=sr_1_5">Corner Bracket</a></li> <li><a href="https://www.amazon.com/MakerBeam-square-designed-10x10mm-diameter/dp/B00G2DNW3G/ref=sr_1_5">18x M3x6mm Square head screws</a></li> <li>18x M3 Nuts</li> </ul><p>Assemble with whatever lengths you'd like. The <i>inside</i> width of the rack should be 300mm. Outer width is 320mm, and the screw centers are 310mm apart.</p> <p>Note, you can get a pretty nice starter pack of makerbeam <a href="https://www.amazon.com/MakerBeam-anodized-including-diameter-brackets/dp/B00G3J6GDM/ref=sr_1_1_sspa">here</a>.</p>
With this file you will be able to print Ubiquiti Unifi Mini Networking Rack with your 3D printer. Click on the button and save the file on your computer to work, edit or customize your design. You can also find more 3D designs for printers on Ubiquiti Unifi Mini Networking Rack.