uBITX Case
thingiverse
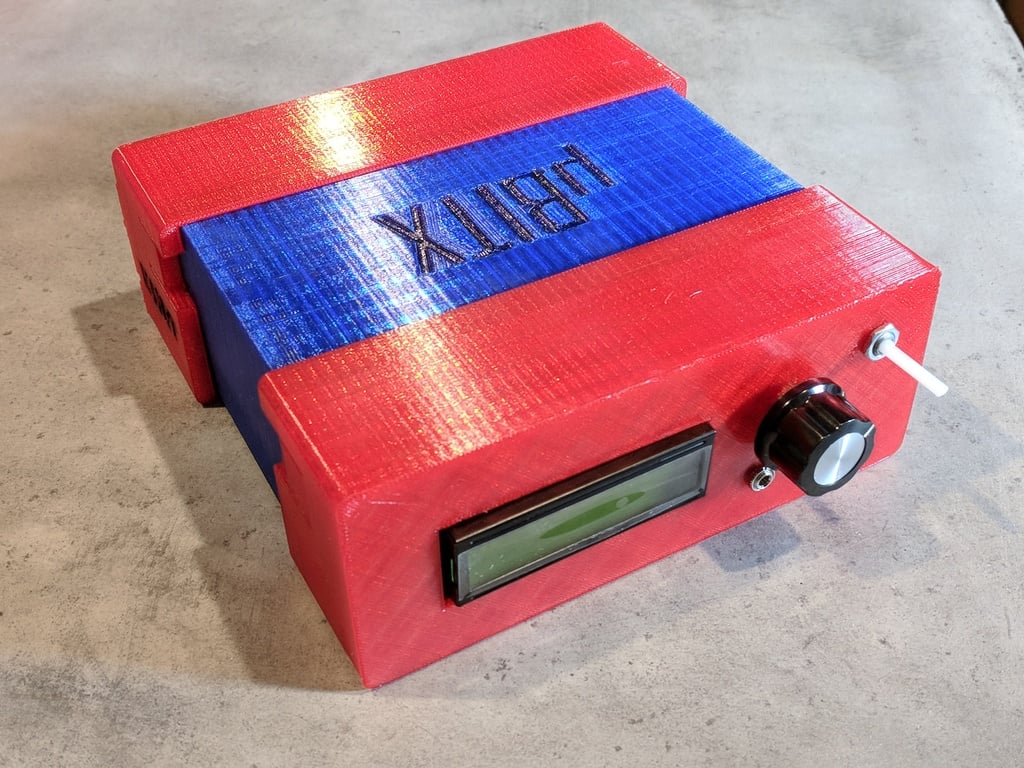
This is a case for the uBITX transceiver, a general coverage ham radio transceiver designed by VU2ESE. This case is meant to be printed in three parts and assembled using the included hardware with the uBITX. It is designed to print on smaller volume printers such as the MakerBot or the FlashForge Creator. The custom knobs are also available for purchase on Shapeways: Encoder knob, Volume knob. Revisions (v1.0): Adjusted location of volume knob, internally recessed audio/key jacks to allow the nut to get more 'bite' into the jack, filleted corners of front/back to make printing a bit easier and sharpen up the appearance, signature moved to back left of chassis where it is mostly out of sight. Front/back modified to be more robust - previous version was particularly vulnerable to breaking at the base of the snap tabs. Time will tell on this one! v1.01: Added custom-printed knobs! v1.02: Added a pen cap microphone case - now all parts for full assembly are included. The microphone fits neatly as a replacement pen cap to a uni-ball micro-point pen. Some tips: I printed in PETG - other materials should be possible, but the snap-together case may not work as well with more rigid or less robust plastics. Before case assembly, file the ridges on the face/back tabs to smooth them out just a bit and remove any printing irregularities. Print the front/back with a wide brim (I go 10 wide, 2 high) - that will help prevent warping. These parts are a bit of a worst-case scenario for warping. The body does not require this and is very easy to print. If you don't like (or break off) the snap tabs, it should be no problem to drill a hole somewhere where the parts overlap and secure with self-tapping screws. Assembly: Wire up uBITX and attach all front/back parts. I used 1" copper tape on the front audio jacks to provide a common ground between them (pictured). A more extensive lining of copper tape could easily be used, if desired. Slide main board into grooves on face part. Plug in the audio/digital jacks onto the uBITX board. You will need to bend U3 to get it out of the way a bit. Slide the "main" part onto the uBITX main board from the rear, and then one side at a time, push the side tab inward while applying a bit of force to the "main" part and allow it to move forward and snap into place. Repeat for the other tab. Plug in rear connections. Slide "back" part into place and snap it in the same way you did the front face. Knobs are just friction-fit - the volume knob will need to be cut down to fit the included knob. Microphone element goes in the 'Body' part, and the switch goes in the rectangular hole on the 'Switch' part, with leads bent 90 degrees downwards (it's a tight fit). There is a divider to keep the leads from shorting out. Pass the wires from the microphone and switch down through the hole in the side, or alternatively through the bottom, if you prefer. I wired a 3.5mm TRS jack very close to the microphone, and use a 3.5mm M-M shielded cable to connect to the uBITX. Connect up, and make QSOs!
With this file you will be able to print uBITX Case with your 3D printer. Click on the button and save the file on your computer to work, edit or customize your design. You can also find more 3D designs for printers on uBITX Case.