UFO Light Up Christas Tree Topper
thingiverse
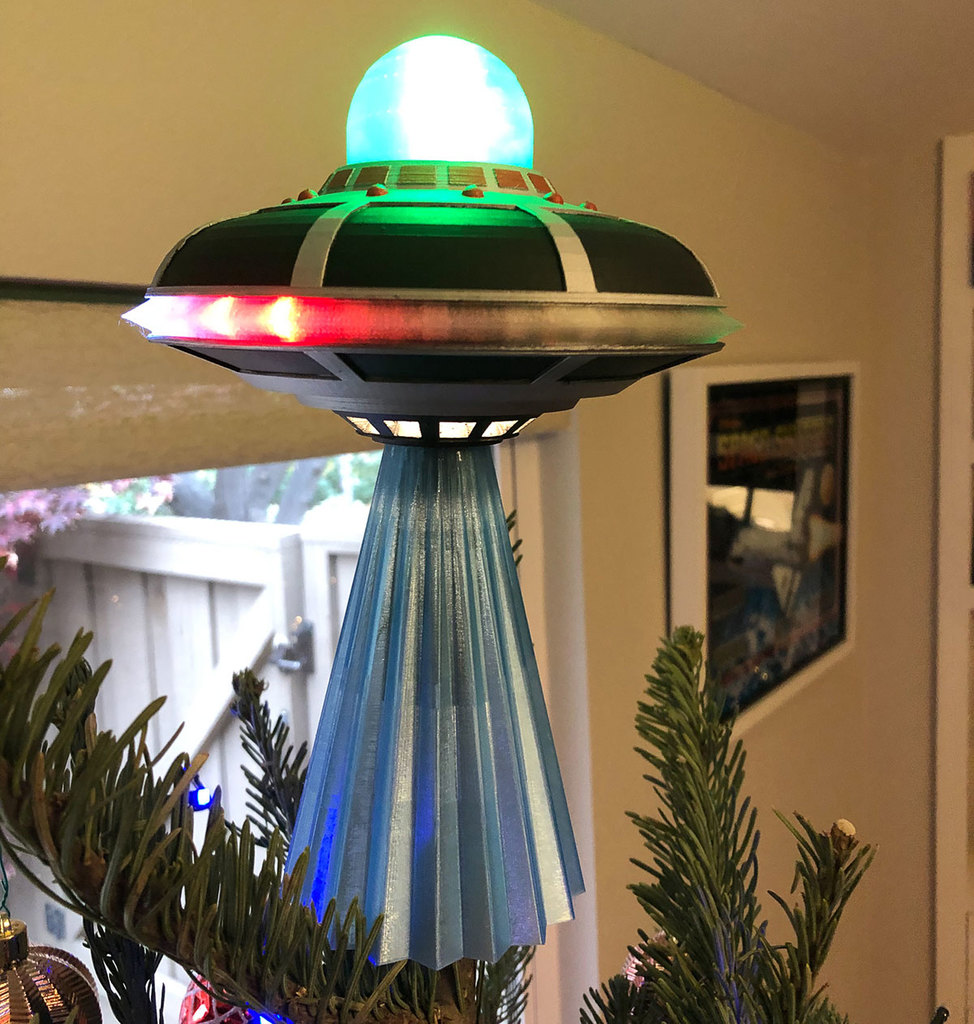
## The UFO Tree Topper! Hey Folks! Well I needed a Christmas Tree topper and decided to design something fun. I came up with this UFO that utilized an Arduino Nano, Addressable LEDS, and two additional lights for the dome, and the windows on the bottom of the UFO. This is printed in multiple parts and fits together nicely as its a clamshell design of sorts that press fits together, and can easily be opened to access the Arduino, lights etc... I painted mine with Acrylics, but it would still look plenty good with a nice grey or silver Filament! ## Parts List - PLA - any color if you are going to paint it, otherwise I would reccomend a [Silver](https://www.amazon.com/Filament-Aluminium-Printing-Compatible-TTYT3D/dp/B07J3ZLK66/ref=sr_1_2_sspa?keywords=silver%2BPLA&qid=1638815989&s=industrial&sr=1-2-spons&spLa=ZW5jcnlwdGVkUXVhbGlmaWVyPUE3RkhSU1RNUE1MSEcmZW5jcnlwdGVkSWQ9QTA4MjUxNzQxREs2Vk1NWkFKNUtXJmVuY3J5cHRlZEFkSWQ9QTA3NTMzMTUyVE4xN0UwTllHMVVKJndpZGdldE5hbWU9c3BfYXRmJmFjdGlvbj1jbGlja1JlZGlyZWN0JmRvTm90TG9nQ2xpY2s9dHJ1ZQ&th=1) or [Grey Color](https://www.amazon.com/Overture-Filament-Consumables-Dimensional-Accuracy/dp/B07PDW8QWJ/ref=sr_1_1_sspa?crid=AGXJMA321IJ3&keywords=silver%2Bpla%2Bfilament%2B1.75&qid=1638815904&s=industrial&sprefix=silver%2B%2Cindustrial%2C235&sr=1-1-spons&spLa=ZW5jcnlwdGVkUXVhbGlmaWVyPUEyNENGTjBGRDFYUFY4JmVuY3J5cHRlZElkPUEwODUzMTU5MkJYT0pLWTlSVFJQSiZlbmNyeXB0ZWRBZElkPUEwOTE0ODM2SFpZQ0sxMEpQUkZOJndpZGdldE5hbWU9c3BfYXRmJmFjdGlvbj1jbGlja1JlZGlyZWN0JmRvTm90TG9nQ2xpY2s9dHJ1ZQ&th=1) - [Transparent PLA](https://www.amazon.com/SUNLU-Filament-Transparent-Dimensional-Accuracy/dp/B07ZNG4L9P/ref=sxts_rp_s1_0?cv_ct_cx=clear%2BPLA&keywords=clear%2BPLA&pd_rd_i=B07ZNG4L9P&pd_rd_r=79ba6287-0a91-4c7d-ad97-f94dcb7dc82c&pd_rd_w=EXnTG&pd_rd_wg=NHvMG&pf_rd_p=29dcfc78-5030-4047-b3bb-fd095cf7aa8a&pf_rd_r=X5MRDTNBCTEJ13EZT8E4&qid=1638815847&sr=1-1-f0029781-b79b-4b60-9cb0-eeda4dea34d6&th=1) - this is for the Diffusion, dome and windows - [Wire: roughly 22AWG](https://www.amazon.com/gp/product/B07Q3G1VG2/ref=ppx_yo_dt_b_search_asin_title?ie=UTF8&th=1) - [5V Power Supply](https://www.amazon.com/Adapter-100V-240V-Charger-Recorder-Bluetooth/dp/B08C4MVLZ1/ref=sr_1_2_sspa?keywords=5v+power+supply&qid=1638816142&s=industrial&sr=1-2-spons&psc=1&spLa=ZW5jcnlwdGVkUXVhbGlmaWVyPUExSVg5WDZGTk5JVEhBJmVuY3J5cHRlZElkPUEwNTY4OTA1MUlLSVY5VkJRMVIwVyZlbmNyeXB0ZWRBZElkPUEwOTc1OTQzT0M2Qk5ENUNDNENUJndpZGdldE5hbWU9c3BfYXRmJmFjdGlvbj1jbGlja1JlZGlyZWN0JmRvTm90TG9nQ2xpY2s9dHJ1ZQ==) - I had one lying around that I repurposed. If you dont have one they are fairly affordable. You could also use a USB cord and a USB power block. - [CRI LED strip:](https://www.amazon.com/gp/product/B08HD3ZSQV/ref=ppx_yo_dt_b_search_asin_title?ie=UTF8&th=1) This is for the dome, bottom window, and main ring if not using an Arduino. These strips are super dense so they emit wonderful diffuse light. For the main ring, you could use green, blue, or whatever. - [5 Min Epoxy](https://www.amazon.com/Gorilla-Epoxy-Minute-ounce-Syringe/dp/B01M7VD07W/ref=sxin_14_ac_d_bv?ac_md=0-0-QmVzdCBWYWx1ZQ%3D%3D-ac_d_bv_bv_bv&crid=2CDX9CI5S91VT&cv_ct_cx=5%2Bmin%2Bepoxy%2Bclear&keywords=5%2Bmin%2Bepoxy%2Bclear&pd_rd_i=B01M7VD07W&pd_rd_r=df354c38-5047-4c54-b4eb-3448c0ee0fa5&pd_rd_w=CuGFi&pd_rd_wg=xhfFA&pf_rd_p=148e9898-1bed-4a70-9840-46f32e4185bd&pf_rd_r=D5AY4SNHTDXB0TGM32CW&qid=1638820069&sprefix=5min%2Bepo%2Caps%2C226&sr=1-1-f4ff053e-b1e8-4d31-8f95-56d755c862ba&th=1) - for gluing various parts, Super glue may work as well. ***These are Optional parts if you want to use addressable LEDs for the main ring of the UFO*** - [Arduino Nano](https://www.amazon.com/ELEGOO-Arduino-ATmega328P-Without-Compatible/dp/B0713XK923/ref=sr_1_1_sspa?keywords=arduino+nano&qid=1638816039&s=industrial&sr=1-1-spons&psc=1&spLa=ZW5jcnlwdGVkUXVhbGlmaWVyPUFPNVMyR0U2RDROM1QmZW5jcnlwdGVkSWQ9QTA0MTQ1OTAyTklQVTMyOEpVOEJSJmVuY3J5cHRlZEFkSWQ9QTA2NjkyODkxN1hJSjdRU1JQNlpVJndpZGdldE5hbWU9c3BfYXRmJmFjdGlvbj1jbGlja1JlZGlyZWN0JmRvTm90TG9nQ2xpY2s9dHJ1ZQ==) Optional if if want to use Addressable LEDs for the main ring. - [WS2812 Addressable LED Strip](https://www.amazon.com/gp/product/B01CDTEE5W/ref=ppx_yo_dt_b_asin_title_o00_s00?ie=UTF8&th=1) - This model uses a strip of 27 LEDS and they fit perfectly. The more dense the LED strip the better. I went with 60. ## Printing I suggest printing each part individually, I trid a batch and it failed. Just a heads up the top and bottom do use a bit of filament as they both need supports. - **The top and bottom Shells:** - Use supports. - Infil 15% layer height .1mm, though if you don't care about print lines could go all the way up to .2mm, this obviously will speed up the time as well. - **Dome, Window, beam and Diffusor:** - No supports. - 15% infill. - .2mm layer height ## Assembly **UFO-Bottom Shell** 1. After trimming all the support material and layout out the parts Start with the bottom Shell 2. Attach the led strip to the bottom shells inner rim, and run wires through the hole for the Addressable Strip 3. Glue ( I used 5 min Epoxy) the window into the bottom shell. 4. Measure and cut a strip of the White LED strip and run around the inside of the bottom shell right above the clear window insert you just glued in. 5. Glue the UFO-Beam to the bottom of the bottom shell using super glue or 5min Epoxy. 6. Run your power wires through the holes in the bottom shell. **UFO-Top Shell** 1. Glue the diffusor rim to the Top shell. Again I used 5min Epoxy and I also put a heavy book on top so it gets glued really solid. 2. **UFO Cabin**: Run an led Strip around the inside base of the UFO-Cabin dome. The UFO-Cabin slides into the UFO-Top shell no need to glue unless you really want to. Run your 5v and ground wires through the opening. **Arduino** Grab your Arduino and start soldering the connections per the diagram to the board. [Here is the code I used](https://github.com/s-marley/FastLED-basics/tree/main/5.%20Multiple%20patterns/crossfadeTimer), you will need the [FastLED Library](https://github.com/FastLED/FastLED/wiki/Overview), which you can install via the Arduino IDE. I suggest playing with some of the out-of-the-box options as they are pretty rad.
With this file you will be able to print UFO Light Up Christas Tree Topper with your 3D printer. Click on the button and save the file on your computer to work, edit or customize your design. You can also find more 3D designs for printers on UFO Light Up Christas Tree Topper.