Ukulele nut intonation fixer
thingiverse
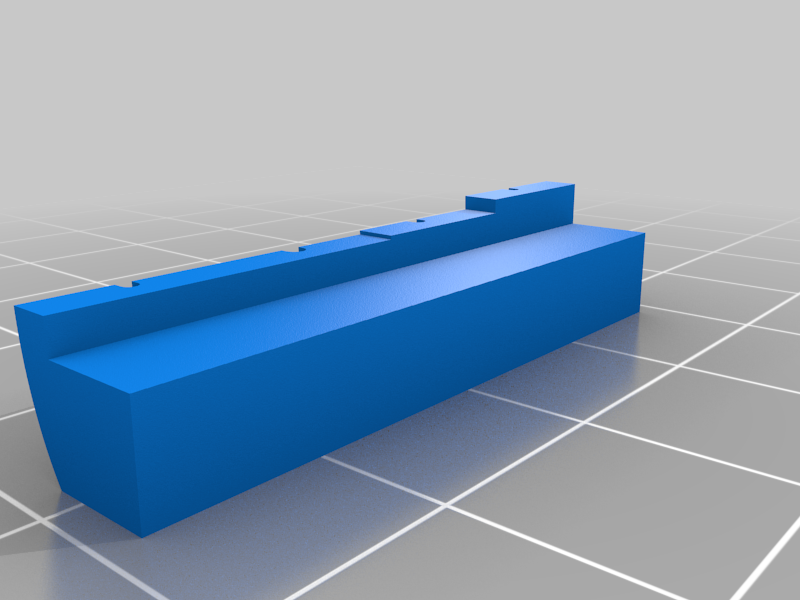
Bought a cheap Ukulele that doesn't sound in tune after tuning it? There are lots of reasons that could happen, but this replacement nut will fix one of the reasons. Intonation is the accuracy of the pitch of the instrument, by the way. First to know if this will help, tune the ukulele while pressing a fret, instead of on and open string. If most of the fretted notes are in tune within a couple of cents, but the open string is out of tune, this will fix that problem. My first exposure to a fix was a [blog post](http://nyarlathotim.blogspot.com/2012/12/fixing-intonation-on-crappy-ukulele.html) suggesting jamming a toothpick next to the nut. That does a surprisingly good job, but this is a step better because by the time you're done, each string can be customized to perfect tuning. Tools ===== This was done in OpenSCAD and you will have best results if you just install it, rather than trying to use the thingiverse customizer. Open the file, edit the parameters as directed below, and then press F6 to render, and F7 to export to STL. Then slice away! Customizing the nut =============== First off, the odds of this fitting your ukulele and fixing everything is slim. The concert uke I have is the [Cordoba Protege U100CM](https://amzn.to/3bqYsZ4), and the soprano is the super popular [Mahalo Rainbow Series](https://amzn.to/2UO5e4e), so if you have one of those models, it *might* be that these will just work for you. However, I'm guessing this is a per ukulele problem (maybe even per string manufacturer?) otherwise it wouldn't be necessary and they would ship with good intonation. Also, you'll need to remove the old nut (obviously?), and in the case of the Cordoba Uke that involved prying it off with a utility knife because they glued it on. When prying, try to prefer damaging the nut over the wood, since you will be replacing the nut. Please be careful, and don't do any damage you'll regret. String tension is enough to hold the replacement in place, and the Mahalo came unglued. It will really help to have [calipers](https://amzn.to/2UJlJP9) for this step, though a good ruler with mm markings can work well enough. All measurements are in millimeters. X is across the neck, Y is along the neck, and Z is vertical out of the neck. Measure the base of the nut: * `nut_x` is the long dimension * `nut_y` is the short dimension of the base (along the neck) Measure the fretboard height, which is the thickness of the fretboard in the z direction. Another way to say it is the distance that part of the nut is covered by the fretboard. This is `fret_z`. Now measure the distance of each string from the "G" side of the fretboard, which is the top of the fretboard when holding the uke in normal right-handed direction. Find the distance of each string from that edge to the center of the string cutout and record those in the `x_` values: `x_g`, `x_c`, `x_e`, `x_a`. Be careful not to get turned around on which side you are measuring. If you want extra credit, you can also measure the diameter of each string. Otherwise make them all 0.9 or something. These are the `th_` values. Finally, the part that you will need to experiment with. The overlap value (meaning how much this new nut will overlap the fretboard) is how intonation is fixed. These are the `off_` values. A couple of tips: * For extra precision, round these numbers to multiples of your layer thickness when printing. I printed at 0.2mm for prototype and 0.1mm for final, so I kept things multiples of 0.2mm. * Start with a constant number across all the strings, maybe 2mm is a good start point. Print this as a prototype. * When figuring out the final values of the overlap measurements, install the newly printed nut. This can be done without loosening the strings, just lift them up and push them off the side. * Tune the string open (unfretted). Now you'll play a fretted note higher up the neck anywhere from the 5th to the 12th fret. Observe the tuning difference between fretting and open. * If the note is flatter when fretted, make the overlap shorter. * If the note is sharper when fretted, make the overlap longer. (there's a 50% chance those instructions are backwards ;) ) * The amount you adjust it will just be a guess. The ranges I found valid on my ukes were between 1.4 mm and 3.2 mm. You are done adjusting when the open fret is within a couple of cents of a fretted note. I was able to get it nearly perfect on both my ukes. Extra variables ---------------- The string height is determined by `str_z`. The default value of 1.27 mm is good for both my ukes and comes from a quick search for ukulele setup. The `cut_slope` is the angle the strings go down, so that the string is held taut at the edge of the nut. Finally `string_ff` is some fudge added to the string diameter to make sure the cutout is large enough to actually hold the strings. Printing ====== This is a really short print. It is oriented so that the greatest accuracy (x/y) is in applied to the string grooves. This means the overlap section of the nut is only as accurate as the layer size. A finer layer size will give more accuracy (though 0.2mm was enough accuracy for me) and also make a smoother curve, which is why I printed at 0.1mm for the final version.
With this file you will be able to print Ukulele nut intonation fixer with your 3D printer. Click on the button and save the file on your computer to work, edit or customize your design. You can also find more 3D designs for printers on Ukulele nut intonation fixer.