Ukulele Stand from Scraps (upright)
thingiverse
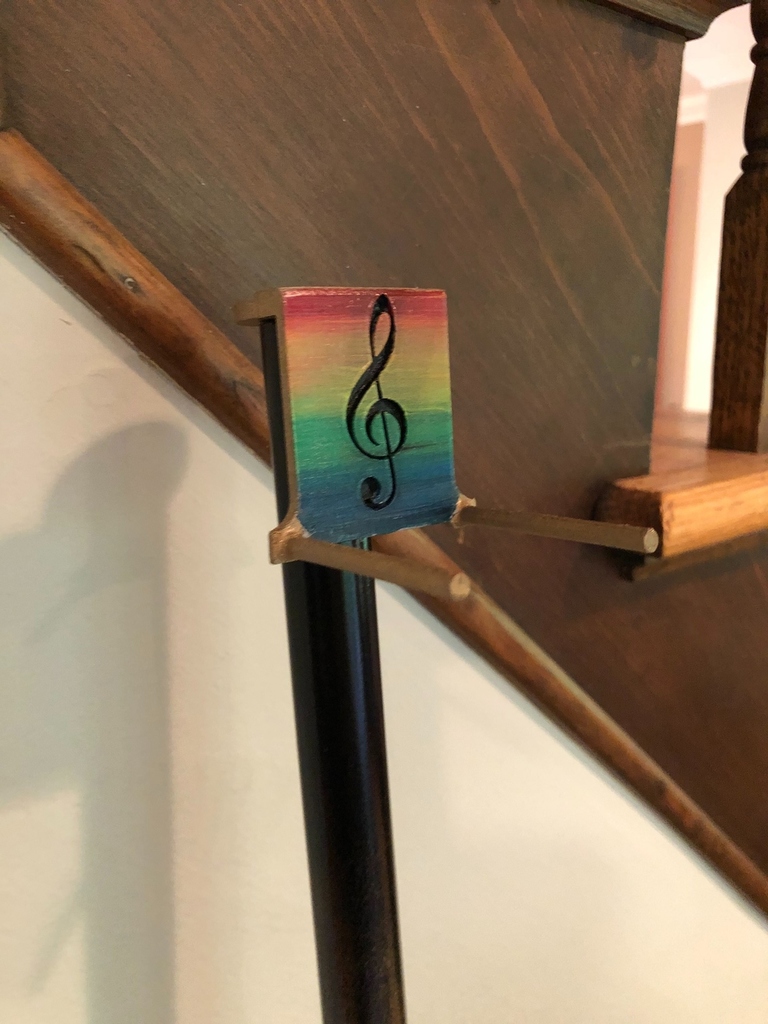
# Upright Ukulele Stand from Scraps I built an upright ukulele stand using scraps and a custom designed 3D printed topper. Below are step-by-step instructions on how to build it, and the STL for the "topper" is included here. Hopefully this will inspire some ideas. Please do let me know if you try it and any ideas/comments/feedback! A quick search on amazon shows stands from $9-$149. Hopefully for the cost of some glue and about 15cents in PLA you'll be off and running! *uke is short for ukulele, measurements are in inches (double-quotes ["] means inches)* **All items I used were scrap. You don't have to be exact with materials or measurements I'm just providing detailed instructions to show how I did it** **Materials** 1. 1"x4" wood (~1ft. length, but shorter will work depending on the depth of your uke) 2. 1/2" PVC Pipe (about the same height as your uke) 3. Wood Glue 4. 3D Printed Topper (from STL file provided) 5. Soft foam (my foam was left over from my 3d printer box). Rags, or anything soft would work *Optional materials* 1. Self-adhesive rubber pads 2. Spray Primer 3. Spray Paint (I used gold and black) 4. Paint (I used acrylic opaque airbrush primary colors) 4. Sand paper 5. Spray Varnish or similar protectant 6. Painter's tape or similar masking film or tape **Tools** 1. Saw (I used a miter saw, but a hand saw will work fine) 2. Wood clamps (if you don't have clamps, you can use a brick, books, or a gallon of water) 3. Drill (I used a drill press, but hand drill will work fine, even a chisel -- if you're good -- would work, or a router). 4. Fostner bit (or any bit that is the same size as the outer dimension of your PVC tube) 5. XActo Knife or similar blade # Steps **Assemble the main body** First cut the 1x4 wood to sizes: A. 1"x4"x9" B. 1"x4"x2" If you wish, sand the edges and surfaces. Remember to wipe off the dust if you sand it, otherwise your paint/stain won't take well. Next glue the smaller piece to the top piece, leaving about 1-2" from one end. You can see the last picture in the attached thumbnails to get an idea. Clamp the piece (or place heavy objects on it) and leave it to sit overnight. I used Titebond II wood glue. If you have not done a wood glue-up and want to learn the best technique watch this awesome [video from Steve Ramsey](https://youtu.be/Esvb64fUQ10) Once the wood glue has properly set and the piece are perfectly joined, you need to drill a hole where the PVC pipe will sit. I wanted the stand to tilt back a little, instead of being straight up and down. This is not necessary as there's plenty of room to angle the uke on the stand. But, I liked the idea of the stand tilting back a little instead of a 90degree straight up and down. To get the tilted effect, I used a drill press. I placed a 1/2" plywood just under the tip of the base so that when the drill came down it would enter the wood at an angle. I setup the drill press so that the bit would stop about 1/4" from the bottom making sure that the hole did NOT go through the base. This is VERY IMPORTANT otherwise if you lift the stand the pipe can slide out if it's not tight. You can decide how you want to do this, but if you have scraps lying around test on the scrap before you do it in the final piece. This will let you tell if your PVC and bit are the right size for each other. Of course you can add glue or Liquid Nails to the hole at the end if your hole is too big. If it's too small you can sand down the PVC or sand the hole to make it bigger. Once the glue is dry and the hole is drilled, you can now use wood filler on the edges or sand as you see fit and sand and paint or stain. I went with the primer and some filler. I did this pretty messy, as you can see in the pictures, but it was fine for my purposes. I primed and sprayed with gold spray paint. With 2 coats of gold waiting about 1-2 hours between coats. When it was fully complete I coated with matte Krylon Kamar Spray Varnish. Finally, the front of your block to the front of the piece on top that you glued. I'll call this the platform. Cut your foam to the size of the platform. I went a 1/8" smaller on the sides so you could see the gold underneath, but that's just a preference thing. Next, tape off any sides you want to protect. Take the same wood-glue you used earlier and spread it on top in a nice small coating. Hopefully like you saw in the glue-up video from before. Take the foam and place it on the platform. I then took a piece of plywood (you can use a book) and clamped it down to press the foam into the glue. I let it sit overnight. **Print the topper** While your glue is drying print the topper. Use the STL provided. The print is pretty small. I printed this with the 2 "prongs" at the top using tree supports sliced in Cura 4.6. .4mm nozzle; .2mm layer-height with initial layer at .28mm; walls I increased a bit. I did 60% infill because I wanted a little extra strength. 60mm/s travel speed. 210C nozzle temp with 60C bed temp. It came out nice on the first try. Once the print is done and supports CAREFULLY removed, I used an Exacto knife to clean up the treble clef design. It didn't require any other smoothing, but I ran some 240grit sand paper over the prongs. I sprayed with the same primer. Once dry I examined it and cleaned up any extra dust or spots I saw with 400grit sand paper. I then used very low-tack painter's tape and taped off the front of the design. I sprayed the back the same gold I used for the base. Next, after the gold paint was dry, I used the smallest brush I could find and painted the treble clef in black, being careful not to get too much on the surface. You could mask off the top surface before you do this, but since the surface will be painted after just being careful and cleaning as you go will be fine. Let the black paint fully dry. Next I used a small, flat, dry-brush with opaque red, yellow, green, and blue acrylic paint. I used some airbrush paint I had. But any paint will do, especially if you're coating it with the Krylon. My daughter wanted a rainbow so I just brushed on a little of each color and blended them, keeping everything pretty dry so you can see the strokes. I did that because I liked this effect. Obviously you can decorate as you see fit. Finally touch up any black paint where the color got on it. You may want to mask off the front if your brush isn't super fine or you're worried about "messing up" the front face of the print. Once everything was dry, I realized I got some paint on the back so I masked off the front and did one more pass with the gold spray paint. **Prepare the PVC** This step will work best if your base and topper are completely finished. Measure your uke from the base to just under the head. Or to any height along the neck you want the support to be. At this point you want to leave several EXTRA inches. Cut the PVC to this "oversized" length. If you have access to a miter saw this is ideal so you get a nice clean cut. But anything will work as this cut doesn't have to be perfect as it can be hidden in the hole in the wood. As long as one side is good you should be OK. Now place the oversized PVC in the hole of the base. It should be a snug fit. If your hole is too small it will damage the paint on the base of the pipe, but this should not be noticeable once assembled. If it's too tight you can sand the PVC pipe to make it thinner, or you can sand the hole in the wood to make it larger. Or "kiss" the edge of the hole with a router or drill bit. Once the PVC sits properly in the hole take the topper you printed earlier and hold it to the pipe and decide what height you would like the topper to sit. Mark that with a pencil. Make the final cut the PVC where you marked. It's better to make it too big and cut again than go too small and make your stand too low to hold up the uke! Measure twice cut once, right? Once you have cut the PVC, if you're going to decorate/paint the stand do the following. Otherwise skip the rest of these steps. To make the surface nice and paintable. First take some sandpaper and rough up the PVC. I used 180grit. My PVC was left over from a wiring project, so it was grey and had writing on it so I sanded the writing off. Next, spray the tube with primer. I like to use the [Rust-Oleum 2:1 Fillable and Sandable](https://smile.amazon.com/dp/B006ZLQ4HQ/ref=cm_sw_em_r_mt_dp_DC4EFbSN6D9SG ) You can decide how precise (and smooth) you want your finish. If you want it really nice, after applying the primer you can sand again with 240. Then after the primer you can apply color. You can repeatedly spray color and sand with approximately double the grit at each step. So sand with 240, then 400, and then even higher if you want exceptional gloss. I wouldn't spray again after the 400 if you choose to get higher and higher values. But, you'll need to look and decide... Remember to wash and fully dry between sanding to remove all dust. When you get to 400grit sanding you likely want to wet sand anyway. I didn't bother with this step. Also, PVC dust and fine paint dust can't be good for you so make sure you have a good mask, or at least are outdoors and keeping it as wet as possible... You can obviously use any color you want. My daughter wanted it "gold going to black" so that's what I did. I painted the whole thing with 2 coats of gold (let it dry) then sprayed the top part black and pulled the can away and off as I went lower. I also did a mist of gold on top of the black. When it was fully dry I did one more pure black at the top. Finally, after everything was fully dry I hit it with the Krylon varnish. **FINAL ASSEMBLY** At this point you should have a block of wood with a hole in it, a pvc pipe (sized and finished), and the topper. If you want to add rubber self-adhesive pads to the bottom to protect the surface of whatever you put the stand on, attach it now to the underside of the base. The three items should all fit together easily. Put the PVC in the wood hole, put the topper on and you should be able to safely rest your uke on the stand!
With this file you will be able to print Ukulele Stand from Scraps (upright) with your 3D printer. Click on the button and save the file on your computer to work, edit or customize your design. You can also find more 3D designs for printers on Ukulele Stand from Scraps (upright).