Ull's Arrow (Upgraded Ice Staff)
myminifactory
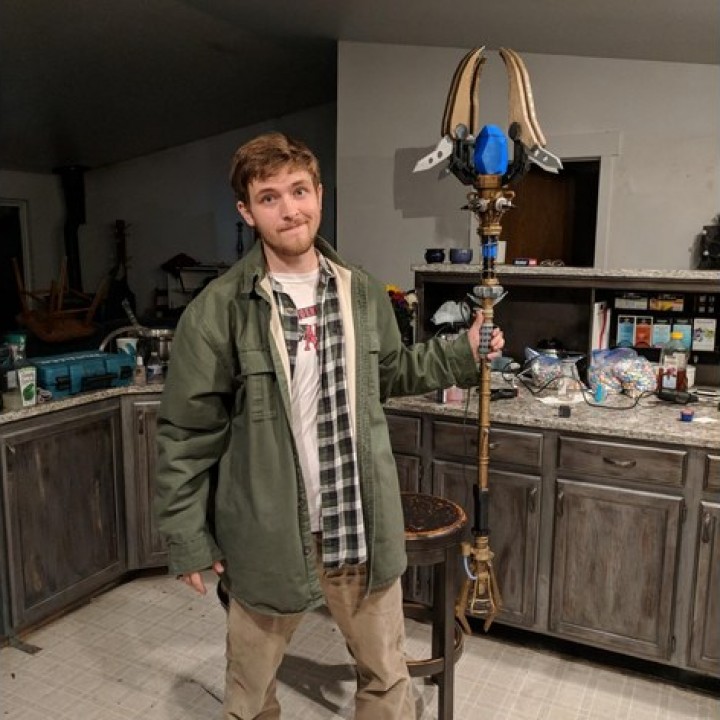
If you want to see what else I am making, follow my instagram! @wiseprints206 This is from Call of Duty Black Ops 2 (and 3) Zombies, from one of the best maps of all time, Origins. I tried to keep the staff as authentic to the staff in game as possible, and have put many hours of detail driven work into this project. Other parts needed: -About 10 feet (or less) of solid black #14 awg THHN wire. This is very standard wire. It is for design on the main shaft of the staff. - 1/2 in EMT rod, found at your local hardware store, very affortable, usually come in 10 foot sticks, you will need something to cut it with. -Around 2 or 3 feet of nylon tubing for the wires that hang loose. -2 zipties for tying the front wire to the shaft of the staff. -A drill with a 1/2 in step bit (or cad skills to modify my design). -Some brass rods found at your local hobby store or hardware store, and solder (for the wire cage around the blue core). -A dremel to fine tune pieces that may not align properly depending on your personal printer. -Propane torch. -*optional: there is space for an arduino and 9 volt battery in the top section of the staff, if you want to run LED's I tried to make it easy to do. I'm not going to do an in depth electrical tutorial on here, I assume only those that know how to use an arduino would want to actually include it.* To build: *Quick side note, the piece with a large hole in it that slides over the revive end of the staff should be sized up by a few percent, mine was a really tight fit! Also the black_core_complete_1 piece will need to be dremelled on the top a bit to fit inside the top portion of the staff.* 1. Print all pieces except the ones that say do not print. the one labeled fragile is optional, as it breaks easily (the other option would be to build it out of metal). 2. aside from the tail end of the staff, which can be drilled with the step bit and glued to the start of the EMT, each shaft piece is to be slid over the 1/2 in EMT rod. The cad picture should help If the order of pieces is confusing. Now this staff was made to add LED's into if you would like, thats why some parts dont have holes, as can be used as a holder for wires if you print with no infill. In any case, you will need to drill out a couple of the pieces with the 1/2 in step bit, or modify them in CAD if you don't want to drill them. 3. After everything but the head of the staff is on the EMT pipe (obviously glue them together with your favorite adhesive), in order to get a really solid connection for the heavy top, I used a propane torch to heat up the emt rod, and slide it into the top portion. I made the hole in the top piece smaller, just so I could fuse the plastic with the metal. 4. The bottom 2 wings around the flimsy piece, I drilled 2 holes where they connect to the shaft, and stuck leftover metal rods through them and glued to keep them in place and it worked great. 5. Paint unless you printed in the proper colors. 6. The tubes have respective bump outs in the staff where they enter the plastic, just dremel the plastic, insert, and glue. 7. The CAD picture will give you a really good idea of where to glue the wires on the shaft of the staff. The round sections on the shaft will probably have to be dremelled or have the wires cut in order to get the look of the wires going through the circular bump outs. 8. The last step is assembling the top section, as it is the most delecate part of the staff, doing this earlier would be difficult. EDIT: The file top_ice_staff_complete is a duplicate of the arduino holder file, that fixed an issue with a small hole in the side of the piece. You can either use the arduino piece or the top_ice_staff_compete in place of eachother. See comments for further explination.
With this file you will be able to print Ull's Arrow (Upgraded Ice Staff) with your 3D printer. Click on the button and save the file on your computer to work, edit or customize your design. You can also find more 3D designs for printers on Ull's Arrow (Upgraded Ice Staff).