Ultimaker 2 Airflow Optimized Cooler for Olsson Block
thingiverse
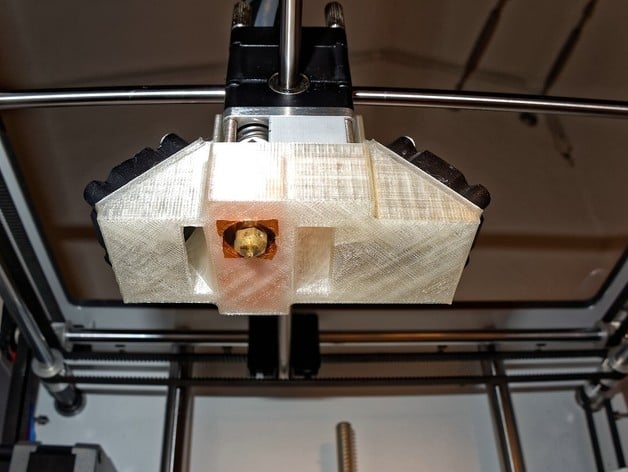
Aim: Design a 3D printable cooling air flow guide for the Ultimaker 2 with an Olsson hotend. I got inspired by other designs and started to analyze them in terms of mechanics and airflow. All designs known to me were really tough to print or lacked an air flow guidance. So I decided to optimize both issues. This is designed to be printed with a 0.4mm nozzle with a layer height of 0.1mm. 15-20% Infill, 2 perimeters, 0.5mm of layers for the bottom (10.2mm and 30.1mm), 5 top layers depending on your printer. Design and software based evaluation: 1) Base design of printhead for analysis and fit 2) First rough design for print to validate fit with basic simulation 3) Added .5mm heat shield 4) Increase size of right outlet by 2mm to reduce airspeed 5) Decrease size to half of 4), add air director to right outlet and add air guides to both outlets 6) Fine resolution simulation to verify the coarse results from 5) afterwards minor adaptions to the main air inlet and another high resolution run 7) Simulation with "real fans" - counter pressure related air flow with spin from the fan. 8) ... print, assemble and test Required parts for assembly: 4* M3x8 screw Selfadhesive copper and Kapton tape or any other isolator Assembly: Print the design. Add at the inner sides (facing to the heater block and hotend) 1-3 layers of each one layer of self adhesive copper tape covered by a layer of Kapton tape. Keep copper slices as big as possible as it is the heat conductor to keep the air guide material as cool as possible. You can also use other heat blocking composites. Just be sure to keep a little air gap between the heater block and the isolator to keep some air flowing through. To make it easy: Take a copper tape with a width of 5cm. Glue the Kapton tape on it, glue another layer of copper tape above and cover with another lay of Kapton tape. Print out the cut layout, lay above and cut with a scalpel or a sharp knife. Now glue the parts inside the cooler and cut out the holes with a scalpel. Results: I can run the fan at 80-90% where a 40-50% was a maximum before without a heater error. The material cools faster than before. Bridges and overhangs work much better. Cooler (PLA) does not melt or deform with a 225° Hotend temperature. Further longterm results will follow as I'll keep it mounted „smile“-Emoticon Interesting points: While investigating the design I found a major flaw in other designs. They placed the nozzle in the center of the airflow. This leads into a zero horizontal flow (if balanced) but it maximizes the pressure at the point of the nozzle and causing a maximum back flow of air around the nozzle to the heater block and around it cooling it down. Other design use no air guides to direct the airflow. This leads into a maximum pressure at the nozzle with almost no airflow and no cooling of the hot material below the nozzle. Thanks! Many thanks to the friend investing this much time to teach me how to run flow analysis and who allowed me to use his environment for my simulations! Also many thanks to all the people providing feedback and ideas while the design phase. And also many thanks to all giving me feedback in the future to improve the design Printer Settings Printer Brand: Ultimaker Printer: Ultimaker 2 Rafts: No Supports: No Resolution: 0.4mm nozzle @0.1mm layer Infill: 15-20%
With this file you will be able to print Ultimaker 2 Airflow Optimized Cooler for Olsson Block with your 3D printer. Click on the button and save the file on your computer to work, edit or customize your design. You can also find more 3D designs for printers on Ultimaker 2 Airflow Optimized Cooler for Olsson Block.