Ultimaker 2 temperature torture calibration test
thingiverse
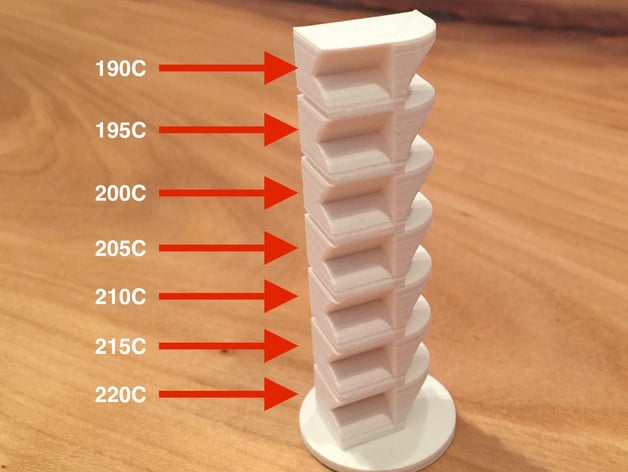
If you print this test, please comment below with what material and gcode you used and what the best temperature was. Description: 3 + 3 different GCODE files for Ultimaker 2 made with the default CURA settings and temperature range from 220C tot 190C in steps of 5C. Printing features: Straight wall Overhang (circular) Overhang (45 degrees) Curved surface Flat surface Hole (for small bridge test) Rounded corner Fast Print (FP): 0H45, 0.15mm layers Normal Print (NP): 2H01, 0.10mm layers High Quality (HQ): 3H21, 0.06mm layers I left the buildplate on 60C because the base was warping with the buildplate heating off. I also included files where the buildplate temperature is set to 0. This is obviously more accurate for the test, but well, if the base of the print comes loose you sort of have nothing. You can try for yourself. If you want to make the gcode yourself or for a different printer, you'll have to insert the temperature commands yourself at the appropriate layer. The base is 2mm high, the rest is 10mm per piece. Commands: Set bed temp to 0: M140 S0 Set nozzle temperature: M104 S200 (where 200 is the temperature). USE THESE GCODE FILES AT YOUR OWN RISK AND ONLY ON ULTIMAKER 2 Instructions Load the gcode in your UM 2 to start the test. Look at the results and decide what temperature works best for your material. Different layer heights result in different extrusion rates, so optimal temperatures might be different for the differtent cura print presets. If you want to print using Cura Fast Print, you need to do the fast print test.
With this file you will be able to print Ultimaker 2 temperature torture calibration test with your 3D printer. Click on the button and save the file on your computer to work, edit or customize your design. You can also find more 3D designs for printers on Ultimaker 2 temperature torture calibration test.