Ultimaker 3 Spool Holder
prusaprinters
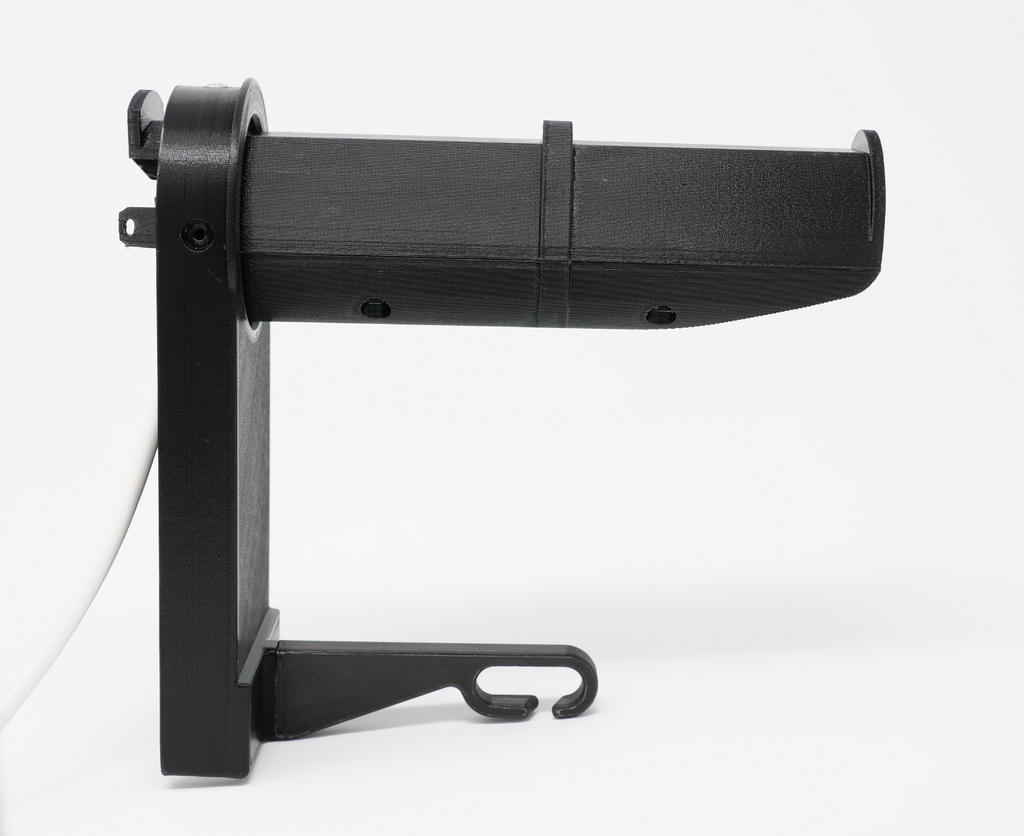
<p>Love your Ultimaker 3 but hate the poorly designed spool holder it came with? Then give this re-engineered spool holder a try! Link to the source files can be found under the "Design Files" heading.</p> <p>WARNINGS:<br/> 1) Be sure to read "Print Settings" before printing (scaling is critical).<br/> 2) Read "Post-Printing" for assembly instructions and additional parts list before starting.</p> <p>UPDATE (VERIFIED): User junetaylor has confirmed this spool holder will fit a standard height UM3.</p> <p>NOTE: On the standard height version, you will most likely not be able to use the cord cover (the white metal piece that snaps on and covers the RFID cord).</p> <p>This spool holder was designed to address issues associated with the stock Ultimaker 3 spool holder. It is large enough to fit two 1 kg spools and can still be used with Ultimaker spools. It also completely rethinks the filament guide, making it far easier to use. No more taking it on and off to change spools and you can insert the filament into the guide after it has been loaded into the extruder.</p> <p>Spools with a center hub diameter of 52 mm or larger will work. Tested spools include (1 kg spools unless otherwise noted:<br/> MatterHackers<br/> Hatchbox<br/> Ultimaker 350 g<br/> Inland<br/> eSun (all fit on outside position, some cannot be used on inside position)<br/> MeltInk (verified by junetaylor)<br/> Innofil3D 750 g (verified by MathyV)<br/> Matteforge (verified by blobworks)<br/> <a href="https://www.amazon.com?linkCode=ll2&tag=thingiverse09-20&linkId=e4759bff1fa9a55a0f897d801ce2d765&language=en_US&ref_=as_li_ss_tl"> </a><a href="https://www.amazon.com?linkCode=ll2&tag=thingiverse09-20&linkId=e4759bff1fa9a55a0f897d801ce2d765&language=en_US&ref_=as_li_ss_tl"> Amazon</a> Basics PET-G (can use one or one with a smaller spool, it is too wide use two)</p> <p>Why I made this spool holder:<br/> When it comes to 3D printers, Ultimaker has a reputation for making quality machines that work out of the box. But this is their first venture into dual extrusion, and it shows. Most of the issues are small annoyances; bugs that will be worked out. But the spool holder leaves a lot of room for improvement. The most common complaint is that you cannot fit two 1 kilogram spools of filament on it. The filament guide that hooks onto the spool holder has a series of issues all by itself. It is awkward to use as it never wants to set right, it's too big for Ultimaker filament spools and too small for 1-kilogram spools, it hangs on the outside so you have to take it off every time you change spools, and you have to make sure to thread the filament through it before feeding into the extruder. Forget to thread the filament and you have to unload the filament and start over.</p> <h3> Print Settings</h3> <p><strong>Printer Brand:</strong></p> <p>Ultimaker</p> <p><strong>Printer:</strong></p> <p>Ultimaker 3 Extended</p> <p><strong>Rafts:</strong></p> <p>No</p> <p><strong>Supports:</strong></p> <p>Yes</p> <p><strong>Resolution:</strong></p> <p>0.2-0.3</p> <p><strong>Infill:</strong></p> <p>30</p> <p><strong>Notes:</strong></p> <p>It is EXTREMELY important your printer be properly calibrated for this spool holder to work. If you do not get the scaling correct, the RFID reader circuit board will not fit into the slot inside of the spool holder.rnrnSince it is for an Ultimaker 3 and you are likely printing with the UM, the most probable source of error is going to be an unleveled bed or loose belts or screws.rnrnBe sure to MANUALLY level the bed. The automatic bed leveling system built into the UM3 is not really a bed leveling system. It's a software correction for an unlevel bed. However, the correction introduces errors into the print's dimensions.rnrnI recommend printing the Mounting Bracket as solid or nearly solid. It has to carry the most force.</p> <h3> Post-Printing</h3> <p><strong>Additional Parts and Tools</strong></p> <p>Parts:rn(4) M3x8 screwsrn(5) M3x14 screwsrn(9) M3 washersrnrnOptional: User junetaylor used a wire instead of the retaining pins. This is stronger and likely easier to use. The wire should be very near to 2.0 mm in diameter.rnrnTools:rn- Screwdriverrn- Utility knife / box cutterrn- 2.0 mm drill bitrn- 2.5 mm drill bitrn- M3 tap</p> <p><strong>Step 1 - Ream Holes for Threads</strong></p> <p>Use the 2.5 mm drill bit to ream the holes that will later be taped. It is best to use a hand drill as power drills usually spin so fast they melt the plastic.rnrnThe locations to ream are listed below.rnrnSpool Holder (7)rn - 4 go into the underside of the spool holder top. These are used for screwing together the two halves of the spool holder.rn - 3 go into the top and sides near the rear of the spool holder. These are used to hold the mounting bracket in place.rnrnrnFilament Guide (2)rn- 2 go into the back of the filament guide. These are used to connect the filament guide to the filament guide mounting bracket.</p> <p><strong>Step 2 - Tap Holes</strong></p> <p>Use the M3 tap to tap all the holes reamed out in the previous step.rnrnAlternate: User junetaylor used self-tapping screws.</p> <p><strong>Step 3 - Ream Holes for Retaining Pins</strong></p> <p>Use a 2.0 mm (a 5/64th or #47 should also work) drill bit to ream the holes for the retaining pins at the back of the spool holder. It is recommended to use a hand-turned drill and not a power drill.rnrnThe retaining pins are thin, so it is best to try not to force them into the holes until they have been reamed out. Once the holes are reamed, check the fit. If the pins still will not fit, do not force them. Doing so could break them. Carefully use a knife to trim any excess material off of the pins until they fit.rnrnAlternate: User junetaylor used a piece of wire instead of the retaining pins.</p> <p><strong>Step 4 - Assemble Spool Holder</strong></p> <p>Disassemble the original spool holder that came with your Ultimaker and remove the RFID reader.rnrnPut the RFID reader into the bottom of the spool holder. Ensure it is set all the way in.rnrnTuck the RFID reader cord into the cord channel and out the bottom at the rear.rnrnSlide the spool holder top down over the RFID reader taking care not to damage the reader. If the top and bottom of the spool holder do not touch at the middle seam, do not force it. Take the spool holder back apart, look for any support material in the RFID channel. Ensure the spool holder printed to the proper dimensions (properly calibrated).rnrnUse 4 M3x8 screws and 4 M3 washers to attach the bottom to the top. Snug the screws down. They only have to touch. Do not over tighten and risk stripping the threads.</p> <p><strong>Step 5 - Mount Filament Guide</strong></p> <p>Use 2 M3x14 screws and 2 M3 washers to mount the Filament Guide to the Filament Guide Mounting Plate. Tighten the screws down but be careful not to strip the threads.</p> <p><strong>Step 6 - Mount and Final Assembly</strong></p> <p>Place the assembled spool holder onto the Ultimaker using the same technique used to mount the original spool holder.rnrnPlug the RFID cord into the bottom of the UM.rnrnReplace the RFID cord cover that came with the UM (extended version only, do not use for standard height UM).rnrnSlide the Filament Guide and Mounting Bracket Assembly over the front of the spool holder.rnrnUse 3 M3x14 screws and 3 M3 washers to screw the Mounting Bracket into place. Be sure to tighten the screws adequately but be careful not to strip the threads.</p> <h3> How I Designed This</h3> <p><strong>Design</strong></p> <p>I designed this in Fusion 360. I am making the design files available to encourage further innovations, improvements, or variations.rnrnIf you do modify these files, please credit the source when publishing any changes.rnrnSome things to consider before starting with the design files:rnrn1) It took a lot of time and thought to get this spool holder to fit and work. If you wish to make changes I encourage you to contact me and run your ideas by me. I can point out potential issues and save you some headache and time.rnrn2) The design envelope around the RFID reader is extremely small. This locks in the size of the middle separator (hump in the middle of the spool holder that holds RFID reader). It cannot be made smaller without removing the RFID reader. So if you wish to adapt the design to hold spools with smaller hubs, you will most likely lose the RFID reading ability. If you do not use Ultimaker brand filament, this may be an acceptable trade-off.</p> <p><strong> Design Files</strong></p> <p>UPDATE:rnIt looks like Autodesk now prohibits other people from downloading files unless you are a subscriber. I have downloaded the files and added them to the rest of the files above. As a result, they might not get updated with every revision. However, the design is fairly static nowadays anyway.rnrnI'll leave the link below for viewing the model or in the unlikely case Autodesk reverses their policy.rnrnORIGINAL POST:rnrn<a href="https://a360.co/2pR4sEjrnrnYou">https://a360.co/2pR4sEjrnrnYou</a> can download them in a variety of formats. Be aware that formats besides Fusion 360 will most likely lose the design history and only contain the geometry.</p> <h3> Using the Spool Holder</h3> <p><strong>Filament Guide</strong></p> <p>The filament guide is for the outside roll of filament only. Do not use the filament guide for the inside roll. Hook the filament from the outisde roll into the filament guide.rnrnThe filament guide's purpose (as with the stock guide) is to keep the outside filament strand from interfering with the inside roll.rnrnThe outside roll typically goes to feeder/extruder number 1. However, with this spool holder, either the outside or inside position can be used for feeder/extruder number 1. Just remember, it is always the outside spool's filament that goes through the filament guide, regardless if it is used for feeder/extruder number 1 or 2.</p> <p><strong>Use the filament guide for the outside spool only.</strong></p> Category: 3D Printer Parts
With this file you will be able to print Ultimaker 3 Spool Holder with your 3D printer. Click on the button and save the file on your computer to work, edit or customize your design. You can also find more 3D designs for printers on Ultimaker 3 Spool Holder.