Ultimaker2 rail system (U2RS)
thingiverse
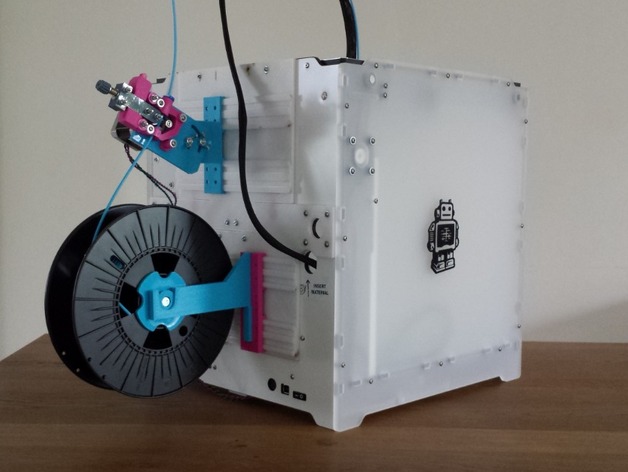
Ultimaker2 rail system (U2RS) , if you ever publish something compatible with these rails please TAG it with "U2RS". A printable back plate to mount onto your UM2, so you'll have 4 rails to mount stuff on. The aim is to provide some flexibility in positioning your feeder(s), spool(s) and whatever you want to experiment with... For some more background on this idea please read here http://umforum.ultimaker.com/index.php?/topic/4393-ultimaker2-feeder-system-improvements-and-ideas/?p=61867*** No irriversable changes are required to your machine (-no drilling-), but it's designed for external use of your feeder motor(s). The 3 main parts of the backplate mount to your left and right feeder motor holes (use any M3 bolts you have, exesive length will disapear behind your motor covers), in the middle they mount to the "U2RS_MiddleScrewPlate" which you put into the holes of the original spool holder, the top mounts to 2 existing mounting screws WARNING: There is VERY little space behind the Z-stage. Make sure when you mount the "U2RS_MiddleScrewPlate" you'll place the screws from the inside of the printer to the outside (so screwhead inside, nut on outside) and only use screws with a thin head. To be sure you're ok check by rising your bed manually (power of, turn the Z-stage screw)... this is not like in the main picture ... For this first "starter kit" I made mounts for your feeder (which ever you use .. roberts, mine, the UM2 original, or whatever you prefer) and spools. The "low friction compact spool holder" hangs loos into the brackets, for super quick changing. You can move stuff horizontally on the rails, and vertically in the brackeds by using the little spacers (I provided 20mm spacers, but you can adjust to whatever you need to keep things a bit organised i've published the "compact low friction spool holder" separately here ; https://www.youmagine.com/designs/compact-low-friction-spool-holder The brackets for the spool holder come in 2 types, the left/right is the basic version, the "middle" is a few mm wider for when you when you want to use 2 spools next to each other on 1 backet. The single and double mounts have build in support, use a small plier to remove it (see picture), the backplates also have supports already build into the holes for the connectors. I printed my back plate in colorfabb XT at 255c / 70c buildplate / 50 speed, butt it may be better to print a little cooler. When printing in higher room temperatures (it was around 30c when I did this) the glass plate may not cool down enough for your print to let go of the glass plate (it needs to cool till 20c), a few minutes in the fridge will do the job. edit 1/2015 ; some minor changes, cleaned up the design of the brackets and spacers, changed the plate that mounts into the original spoolholder so screws will sink a bit deeper. All updates have v2 in the filename. The design file in design spark mechanical format is only available on www.youmagine.com
With this file you will be able to print Ultimaker2 rail system (U2RS) with your 3D printer. Click on the button and save the file on your computer to work, edit or customize your design. You can also find more 3D designs for printers on Ultimaker2 rail system (U2RS).