Ultimate Creality MGN12H Linear Rail X Axis Modificaton
thingiverse
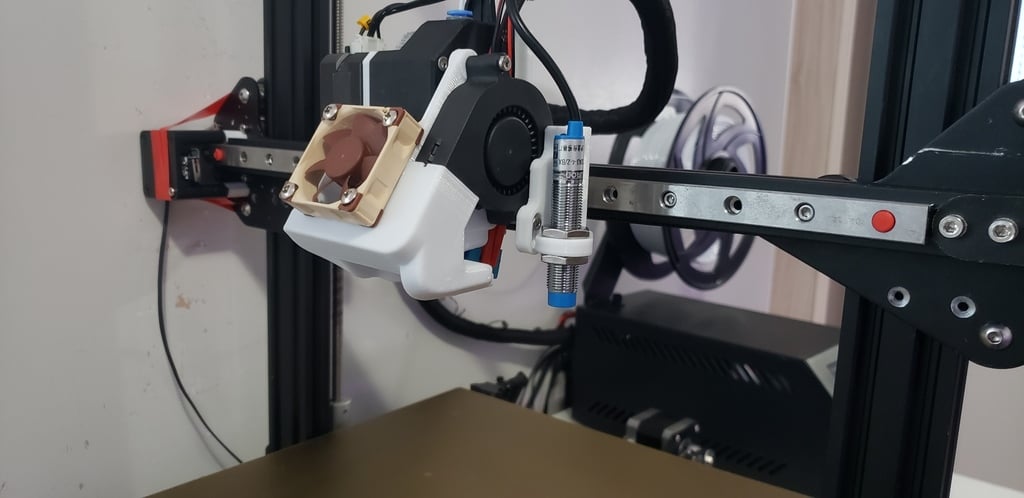
This modification allows you to use an MGN12H linear rail instead of V-wheels on the X axis of **ANY MACHINE** which uses the Creality style X carriage. Differences between this design and others: - No drilling required at all - this adapter simply snaps and screws in place - Minimal equipment - no need for threadlocker, taps, drills, whatever - Even load on carriage - other designs offset the carriage which causes your hotend to skew - Retains stock carriage - you can keep within the Creality ecosystem for hotend designs ## **Materials required:** **Rails:** - 1x MGN12H carriage - 1x MGN12H linear rail **Fasteners** - 4x M3x6 countersunk screw - 4x M3x55 countersunk screw - M3x8 socket head cap screws - T-nuts NOTE: To determine how many t-nuts and M3x8 socket head cap screws you need, take the number of screw holes in your linear rail and divide it by two. You will need to screw the linear rail to the extrusion on every other hole. Place the screws in the holes and attach the t-nuts. I recommend using this style as opposed to the hammerhead nuts that come with these machines. This is due to the fact that they do not require to be locked in place and will make installation a lot easier. https://www.aliexpress.com/item/32825357262.html **Printed Parts - PETG OR ABS ONLY** - 1x MGN12H mount adapter - 1x limit switch spacer (top) - 1x limit switch spacer (bottom left) - 1x limit switch spacer (bottom right) - 4x MGN12H to 2020 alignment guide ## **Build instructions:** 1. Print the parts as listed above. Use PETG or ABS only as the bed temperature may cause a PLA part to deform. Any other material with high tensile strength and a high glass transition temperature will be perfect. 2. Release tension on the X belt, disassemble your X carriage, X motor and limit switch assembly. 3. Screw the printed adapter to the MGN12H carriage using the 4 M3x6 screws. 4. Slide the metal Creality X carriage onto the adapter. 5. Using the M4 locknuts and screws which were previously used to secure the V wheels, fasten the X carriage to the printed part. Your X carriage is now complete. 6. Attach the linear rail to the 2020 extrusion. Ensure there is enough clearance for the X belt tensioner. 7. Clip on the MGN12H to 2020 alignment guides equally spaced on the 2020 extrusion. 8. Snug the M3x8 socket head cap screws to secure the linear rail to the 2020 extrusion. 9. Remove the alignment guides from the assembly. 10. Reassemble the motor/limit switch assembly. Use the limit switch spacers in the correct positions to maintain a stock appearance. 11. Secure the entire assembly using M3x55 countersunk screws instead of the stock M3x38 black screws. 12. Attach the belt and tension it in the normal fashion. 13. Done! Included are the .STEP files. Feel free to make whatever modifications and remixes you feel fit. Enjoy! If you have questions or need help, you can comment on this Thing or find me: Discord: AgentL3r#0333 Reddit: u/AgentL3r or message me here on Thingiverse. Enjoy!
With this file you will be able to print Ultimate Creality MGN12H Linear Rail X Axis Modificaton with your 3D printer. Click on the button and save the file on your computer to work, edit or customize your design. You can also find more 3D designs for printers on Ultimate Creality MGN12H Linear Rail X Axis Modificaton.