Ultimate Pi Zero W emulator machine inside SNES Cartridge
thingiverse
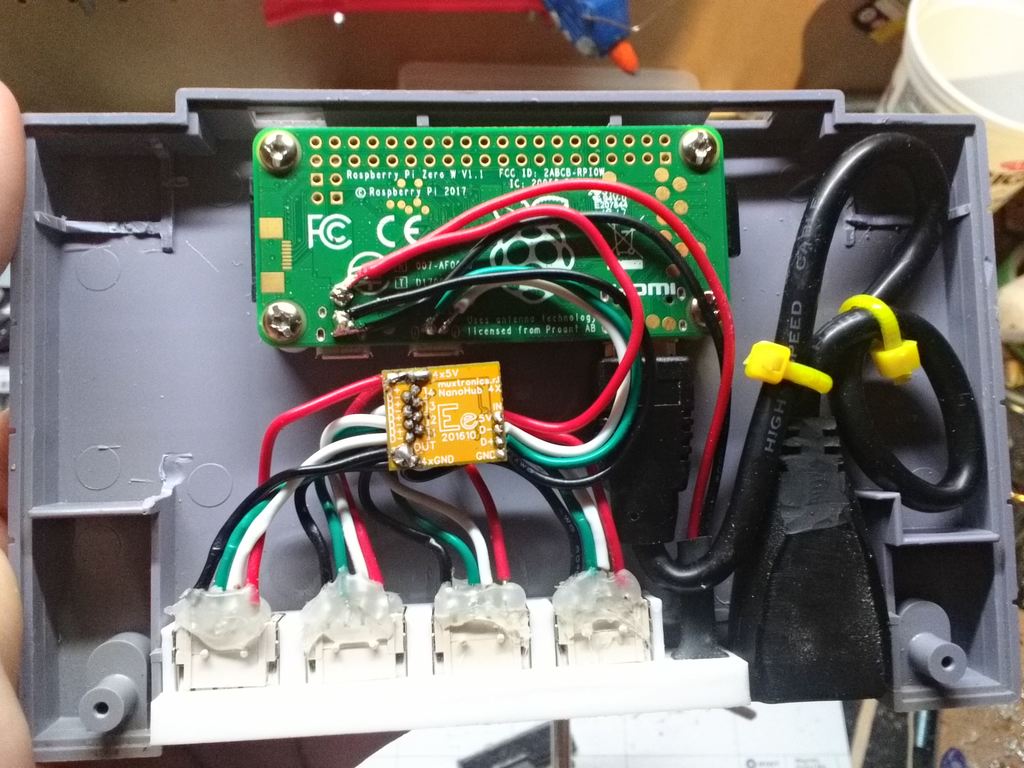
This was a 1-day project where I designed, printed, and assembled everything from scratch. By 10:30 PM, I was already playing games on the finished machine. If you're interested in building one for yourself, here's what you'll need: - MicroUsbBracket.stl - USBPortsBracket.stl - PiZeroBracket.stl (x2) - Raspberry Pi Zero W - Raspberry Pi Copper heatsink (look for a lower profile design) - Micro SD card (at least 8GB) - [RetroPie Image for Raspberry Pi Zero](https://retropie.org.uk/download/) - 4 M2 Threaded brass metal inserts (scavenge from old laptops or purchase separately) - 4 M2 Screws, at least 5mm long and no longer than 7mm - Mini-HDMI to HDMI cable adapter, ideally under a foot in length - 2 Small cable ties - 4 USB type A ports - 1 USB micro port (also include heatshrink for secure fitting) - 1 [4-port NanoHub](https://www.tindie.com/products/mux/4-port-nanohub-tiny-usb-hub-for-hacking-projects/) - SNES cartridge of your choice (available on eBay at varying prices) - SNES replacement game stickers (in case the original gets damaged) - Assorted 22AWG wires in red, black, green, and white - Solder and soldering iron - Utility knife or rotary tool for cartridge modification - Solder sucker (optional but recommended) Be prepared to invest a lot of patience, as this project requires precision soldering on extremely small pads. Additional notes: * The HDMI adapter might need trimming to fit inside the cartridge. * Modify the SNES cartridge by cutting away support structures, removing connector walls, and removing corner supports. This will allow for easier assembly. * Use super glue to secure 3D printed pieces in place. Reinforce USB ports with hot glue from within and apply super glue to the HDMI adapter's female end after flattening its surface. Threaded brass inserts can be inserted into brackets using a soldering iron, which softens the PLA material, allowing for easy insertion. Secure cables to the Micro USB port, add heatshrink, and then insert the port through the bracket hole until it's flush with the wall. Ensure proper orientation when inserting the port, as removal can damage it. When handling the micro SD card, use tweezers to avoid breaking the Raspberry Pi board. I've deliberately omitted detailed wiring instructions for the USB hub and ports, assuming this project is best suited for those with a solid understanding of electronics and soldering. Research on Google will provide the necessary information for completion. If you need help or have questions, feel free to ask in the comments.
With this file you will be able to print Ultimate Pi Zero W emulator machine inside SNES Cartridge with your 3D printer. Click on the button and save the file on your computer to work, edit or customize your design. You can also find more 3D designs for printers on Ultimate Pi Zero W emulator machine inside SNES Cartridge.