Ultimate Retropie Joystick Controller
thingiverse
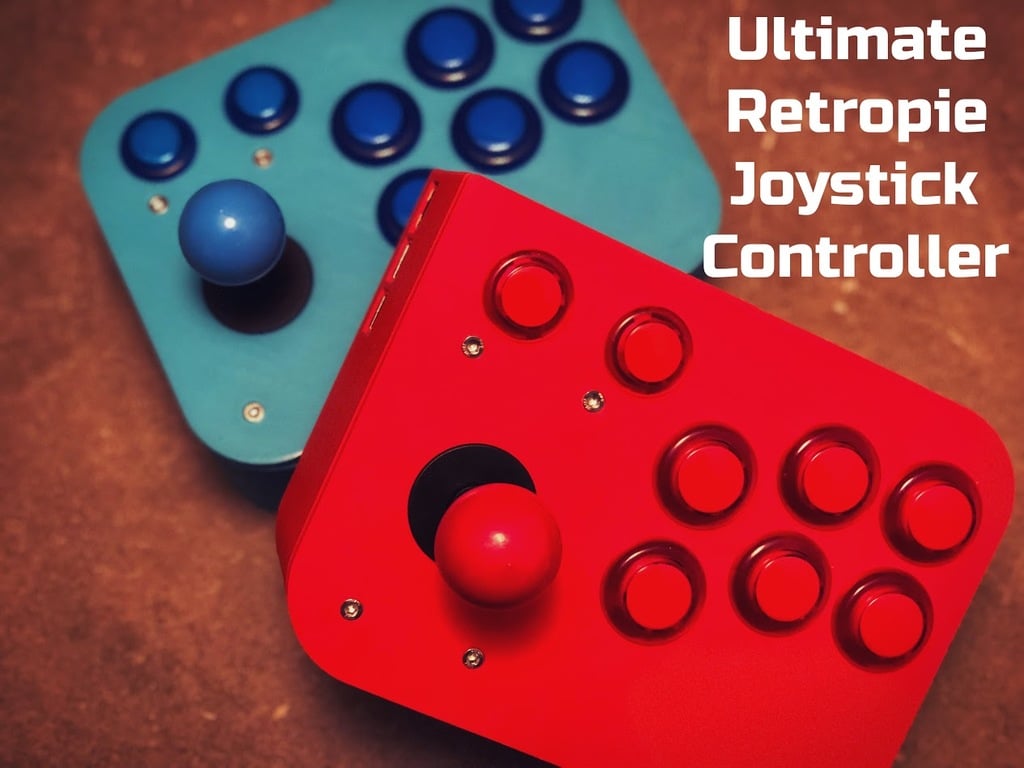
Build Video https://youtu.be/6UO4pLFuKMA If anyone would rather purchase an item instead of print it themselves feel free to support me at my Etsy shop. Thanks! https://www.etsy.com/UPPlastics/listing/685822413/ultimate-retropie-arcade-controller?utm_source=Copy&utm_medium=ListingManager&utm_campaign=Share&utm_term=so.lmsm&share_time=1551041021082 Project Goal: I really wanted to make a cheap joystick controller that would be high quality for retro gaming and easy to transport. After looking around on Thingiverse I never found quite what I wanted so I made my own. Requirements listed below. 1. Case must contain Raspberry Pi. 2. Case must include built in joystick and arcade buttons. 3. Case must allow for other joystick controllers to plug in to expand up to 4 players. 4. $100 or less for 2 player kit. 5. More portable than bartop arcades or cabinet. Using these requirements as a guideline I developed the Ultimate Retropie Joystick Controller! Bill of Materials QTY 4: M2.5x6 socket head cap screws QTY 4: M3x6 socket head cap screws QTY 4: M4x6 socket head cap screws QTY1: Roll of favorite filament QTY1: Arcade button and joystick kit. Easyget arcade set from Amazon. https://www.amazon.com/Easyget-Encoder-Joystick-Illuminated-Buttons/dp/B00WAY9848 QTY1: Raspberry Pi 2 or 3 QTY1: Raspberry Pi power supply QTY1: HDMI cable Build There are 2 different file sets. Player 1 files and Player 2 files. Player 1 files include the design that houses the Raspberry Pi. Player 2 files include the files for extra joystick controllers. I created a tutorial video so you can follow the build step by step. I did my best to explain everything but there is already so many good tutorials out there I recommend watching a bunch of other tutorials online as well to get a good feel for Retropie. The rest will come easy if you get used to it. The video should be a good help though. Moving Forward I included the Fusion 360 design so you can put the buttons in other locations or improve on the design. I simply ask that you please link to this build if you do and make a comment to help contribute to the learning of everyone! Enjoy!! Have fun and enjoy some awesome retro gaming!! _________________________________________________________________________ Update 1: I added some button sticker designs I made in Affinity Designer. I included the file if you want to edit it. There is also a 8.5 X 11 inch PDF with the sticker designs on them that you should be able to print out on some sticker paper then cut out and put underneath your buttons. Some sticker paper can be seen below. https://www.amazon.com/Avery-Sticker-Removable-Adhesive-53202/dp/B000XALDGM/ref=sr_1_3?s=office-products&ie=UTF8&qid=1517194229&sr=1-3&keywords=sticker+paper _________________________________________________________________________ Update 2: Included ArcadePlayer1_Top_28mmH.stl and ArcadePlayer2_Top_28mmH.stl courtesy of Twoods196 that have 28mm holes for the Start and Select buttons above the joystick if you have a set of buttons all the same larger size. Thanks Twoods196! Also added new Affinity Design and PDF for large button Select and Start stickers.
With this file you will be able to print Ultimate Retropie Joystick Controller with your 3D printer. Click on the button and save the file on your computer to work, edit or customize your design. You can also find more 3D designs for printers on Ultimate Retropie Joystick Controller.