Ultrasonic experiments 6: Michelson interferometer
thingiverse
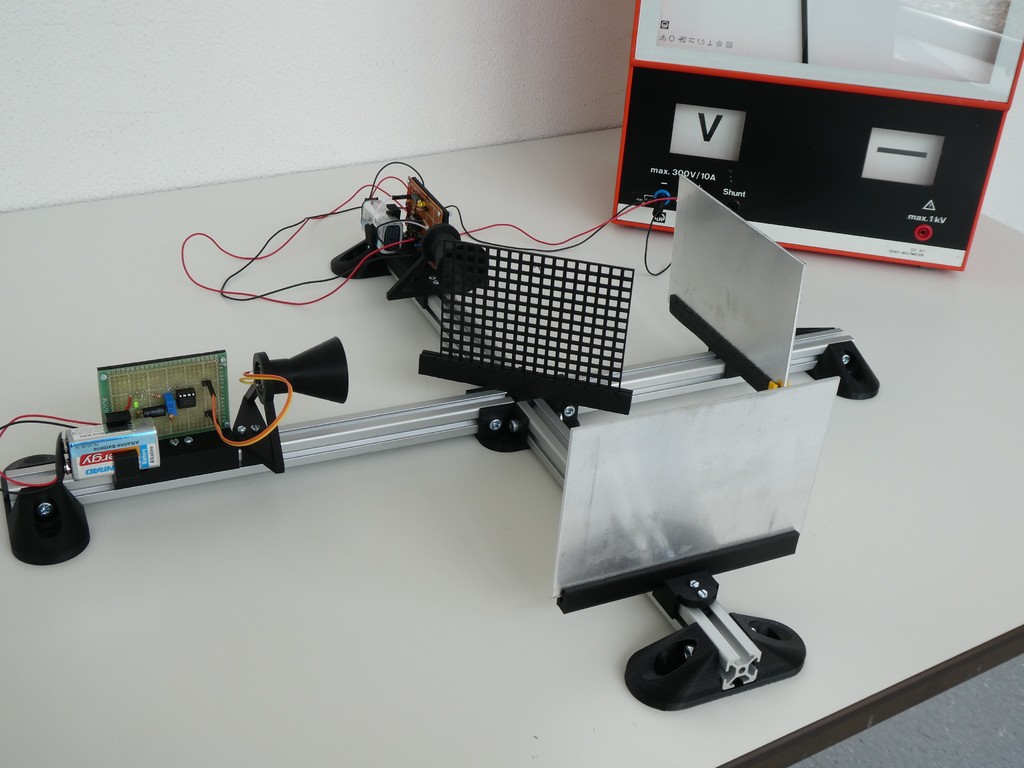
### Ultrasonic Experiments 6: Michelson Interferometer ### I have developed a series of experiments with ultrasound waves that students in upper-level physics lessons can conduct. The experiments will be presented in arbitrary order in the future. These experiments include: 1. Reflection and Absorption of Ultrasonic Waves 2. Standing Waves 3. Interference with Two Transmitters 4. Double-Slit Experiment 5. Effect of a Semipermeable Plate <b> 6: Michelson Interferometer </b> 7. Mach-Zehnder Interferometer 8. Distance Measurement with an Arduino #### Components #### <b> Circuit Board Mount: </b> I used a 5cm x 7cm board for the circuit, which is sufficient for the ultrasonic sound generator. I chose a standard circuit for the generator using the NE555. The electrical circuit is shown in a pdf file. The mount can be printed without support. <b> Mount for Horn: </b> This print is the mount for the transmitter horn and receiver horn. Support is not necessary. <b> Horn: </b> I chose an angle of approximately 20 degrees for this horn. Support is not necessary. <b> Base: </b> For this part, I used the excellent work of jandetlefsen and his thing http://www.thingiverse.com/thing:1412135. I could not find anything more suitable nor could I develop something better myself. Support is not necessary <b> Nut M3: </b> A generic nut for M3 for the 20x20 aluminium profile system: Five of these are needed for the experiment. <b> Mount for Reflection Plate: </b> The mount for the aluminium plates <b> Semipermeable Plate: </b> This semi-permeable plate consists of squares with a side length of 7mm (an area of 50mm²) with a square cutout with a side length of 5mm (an area of 25mm²) <b> Connector: </b> ... to connect four 20x20 aluminium profiles. Support is not necessary. <b> Mount for Connector: </b> With a screw M3, this part can be movably mounted on the connector. Support is necessary. <b> Pointer: </b> For an exact determination of the wavelength, this pointer is helpful. Clamp the pointer to one of the two screens and move the screen very slowly in one direction. #### Things You Need More #### <b> Aluminium Profiles: </b> I recommend four 30cm or 40cm long profiles for this experiment. <b> Screws and Nuts: </b> A lot of M3 screws for mounting on the profiles (M3 x 10mm, M3 x 16mm). Some M5 screws and nuts for the bases. <b> Aluminium Plates: </b> For the reflection screen, I recommend two plates of 100mm x 150mm. All plates have a thickness of 2mm. #### Results of the Experiment #### If you move one of the two reflectors very slowly in a direction, you can see that the signal shows a maximum (or a minimum) every 0.4mm. A hairdryer can now easily be used to display an ether wind.
With this file you will be able to print Ultrasonic experiments 6: Michelson interferometer with your 3D printer. Click on the button and save the file on your computer to work, edit or customize your design. You can also find more 3D designs for printers on Ultrasonic experiments 6: Michelson interferometer.