Ultrasonic Sensor Housing
thingiverse
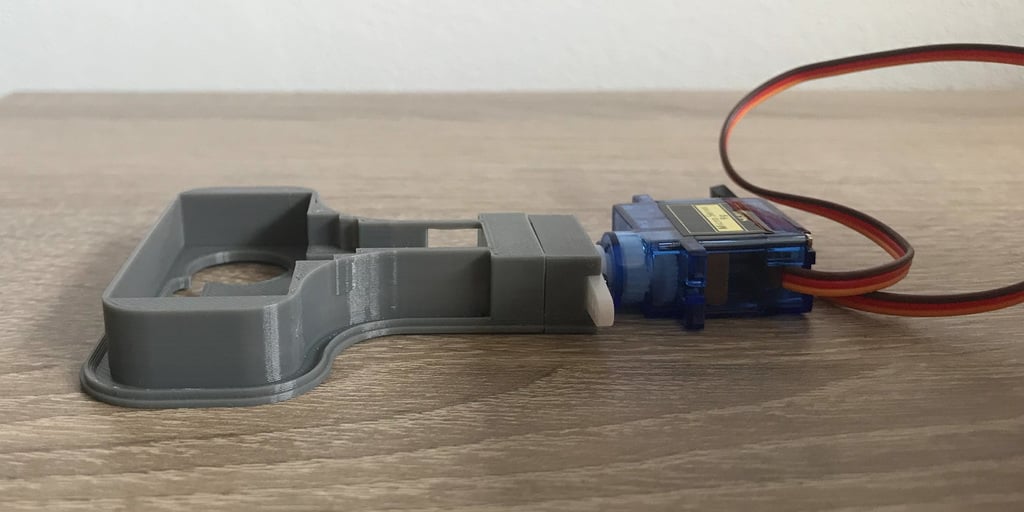
# Ultrasonic Sensor Housing ## Things you'll need: * [Ultrasonic Sensor](https://aliexpress.com/item/1005001621997017.html) * [Servomotor with levers](https://aliexpress.com/item/32898059654.html) * [Led strip](https://aliexpress.com/item/4000148759042.html) * 16 grams of pla filament ## Steps to assemble the housing: ### Step 1: * Download and print [these](https://github.com/pslib-cz/2022-p2a-mme-pppp-merta-pavel/tree/main/Parts/Parts_STL) parts on your 3d printer. ### Step 2: * After printing, attach the servo to the bracket: <img src="https://raw.githubusercontent.com/microbit-cz/PeeWee-Ultrasonic-LED2812b/main/Pictures/Attaching%20the%20servo.jpg" width="300" height="150"> ### Step 3: * Next, attach the bracket to the sensor: <img src="https://raw.githubusercontent.com/microbit-cz/PeeWee-Ultrasonic-LED2812b/main/Pictures/Attaching%20the%20block%20to%20the%20body.jpg" width="300" height="150"> ### Step 4: * Next, push the mount onto the sensor and don't be afraid to apply a little pressure: <img src="https://raw.githubusercontent.com/microbit-cz/PeeWee-Ultrasonic-LED2812b/main/Pictures/Example%20of%20attaching%20a%20block%20to%20the%20body.jpg" width="300" height="150"> ### Step 5: * Then we take the ultrasonic sensor: <img src="https://raw.githubusercontent.com/microbit-cz/PeeWee-Ultrasonic-LED2812b/main/Pictures/Ultrasonic%20sensor.jpg" width="300" height="200"> ### Step 6: * And attach the crimp cables to it: <img src="https://raw.githubusercontent.com/microbit-cz/PeeWee-Ultrasonic-LED2812b/main/Pictures/Connecting%20cables%20to%20the%20ultrasonic%20sensor.jpg" width="300" height="200"> ### Step 7: * The next step is to insert the ultrasonic sensor into the sensor section of the housing: <img src="https://raw.githubusercontent.com/microbit-cz/PeeWee-Ultrasonic-LED2812b/main/Pictures/Example%20of%20adding%20a%20sensor%20to%20the%20body.jpg" width="300" height="200"> ### Step 8: * The last major step is to put the led strips on the cover: <img src="https://raw.githubusercontent.com/microbit-cz/PeeWee-Ultrasonic-LED2812b/main/Pictures/Adding%20led%20tape%20to%20the%20body.jpg" width="300" height="200"> ### Step 9: * And now we cover everything with the lid and we're done: <img src="https://raw.githubusercontent.com/microbit-cz/PeeWee-Ultrasonic-LED2812b/main/Pictures/Covering%20the%20cover%20with%20a%20protrusion.jpg" width="300" height="225">
With this file you will be able to print Ultrasonic Sensor Housing with your 3D printer. Click on the button and save the file on your computer to work, edit or customize your design. You can also find more 3D designs for printers on Ultrasonic Sensor Housing.