UM2 Single- & Dual-Head Fan-Cages (CPv9-Final)
thingiverse
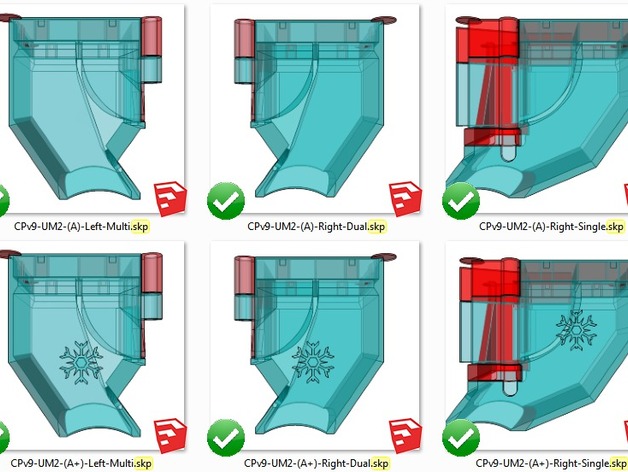
Short description: • CPv9 Type A...The very best alternative to the original fans-cage of the UM2 (...first design). Use Type B...For the somewhat more recent UM2 with the ~11mm shorter print-head. • I could not yet verify, but CPv9 is probably fit to: UM 2 Go, UM 2+ Go, UM 2+, UM 2 Extended, UM 2+ Extended. Description: • The final status CPv9 has been reached, no major updates will follow. • CPV 9 has been improved. The improved design reduces the accumulation of air close to the construction surface. The Hotend is now not so much influenced by the cooling, an engine stop due to the temperature-monitoring should not happen again. • CPV 9 simultaneously cools the entire printhead and your object to be printed. Two separate cooling channels each fan. The heated air from the printhead-cooling is carried away directly and does not affect the object-cooling. Are the side fans running close to 50%, then there is (... in direct comparison to the original setup) almost no risk of burns to the user from accidentally touching the printhead assembly. Even with a defect, or inactivity of the rear fan, never poses a risk to the success of your printed product. The ColdEnd will be cooled much more efficiently, this actually reduces premature wear. At the same time the object-cooling is much more targeted and therefore more powerful than before, because the cooling air stream passes much closer to the filament outlet of the nozzle. Go ahead, give it a try and experience for yourself the great difference! • As of today, they may all call me like an idiot, but please not before they've tried this upgrade itself. Of course I had spent before this announcement, many hours with experiments. And also I myself am very surprised with respect to the performance of this upgrade, which I had not expected. Let's talk about 12 screws: ...Because all Ultimaker 2 users should to be very attentive now...Than here comes a ultimate free upgrade for your machine...The future is now... • What happened if...I would say the following? • Twelve screws on Ultimaker 2 printhead will soon be obsolete! • You do not have to buy an additional upgrade and no other optional components, so that the Ultimaker 2 works more efficiently than before! • You will get the opportunity to produce an upgrade for your machine itself! • With the upgrade, you get the basic preconditions for successful dual extrusion! • You will be able to cool one or even two ColdEnds more than adequate! • With the same upgrade, you will also be able to cool the objects to be printed better than ever before! • With this upgrade you need for ordinary printing operations, never again the maximum fan-performance / speed! • Your Ultimaker 2 will be able to run more quietly! • Maintenance of the Ultimaker 2 printhead will be easier than before! Important information: • For more detailed information, please see (...here and in the download package) the pictures in original size. • Information regarding enhancements and bug fixes you will find in the "Comment" section. • Photos with the already assembled object does not show the latest design. • Again and again: My work for you lives solely by your feedback. If something is wrong or useless in my designs, I need more information from you so that I can ever change anything. Suggestions to improve or simplify my designs and descriptions are highly desirable. So if you use my designs and parts thereof, please take a few moments to convey a little feedback. Print Settings Printer Brand: Ultimaker Printer: Ultimaker 2 Resolution: 0.1mm Infill: 33% Notes: Bill of materials: Whatever you want to use :-) • If you work exclusively with PLA, it is quite enough if they also make the upgrade with this material...really! • If you also want to continue working with ABS and more specific materials, please make the upgrade, at least with ABS. • Take 5 mm wide Kapton film and insulate so the Hotend as much as possible. If you make it as suggested then you reduce external contamination on the Hotend effectively, and an improved temperature-stability is achieved. • The red marked areas in the design, these are necessary support elements. If you want This Design Print in PLA, then no further optimizations in the slicer are regularly required. You may want to print with very low temperatures, so that the support elements can be easily removed from the object later. For most PLA varieties I recommend a temperature in the range of ~ 195 °. How I Designed This Maximum Efficiency Maybe even as a layman with little technical understanding it can be seen very quickly, the setup of all currently available UM2's needs in many ways optimizations. That is why there is CPv9 and I'm glad to have done it :-)
With this file you will be able to print UM2 Single- & Dual-Head Fan-Cages (CPv9-Final) with your 3D printer. Click on the button and save the file on your computer to work, edit or customize your design. You can also find more 3D designs for printers on UM2 Single- & Dual-Head Fan-Cages (CPv9-Final).