Unlimited Axis Laser Engraver
thingiverse
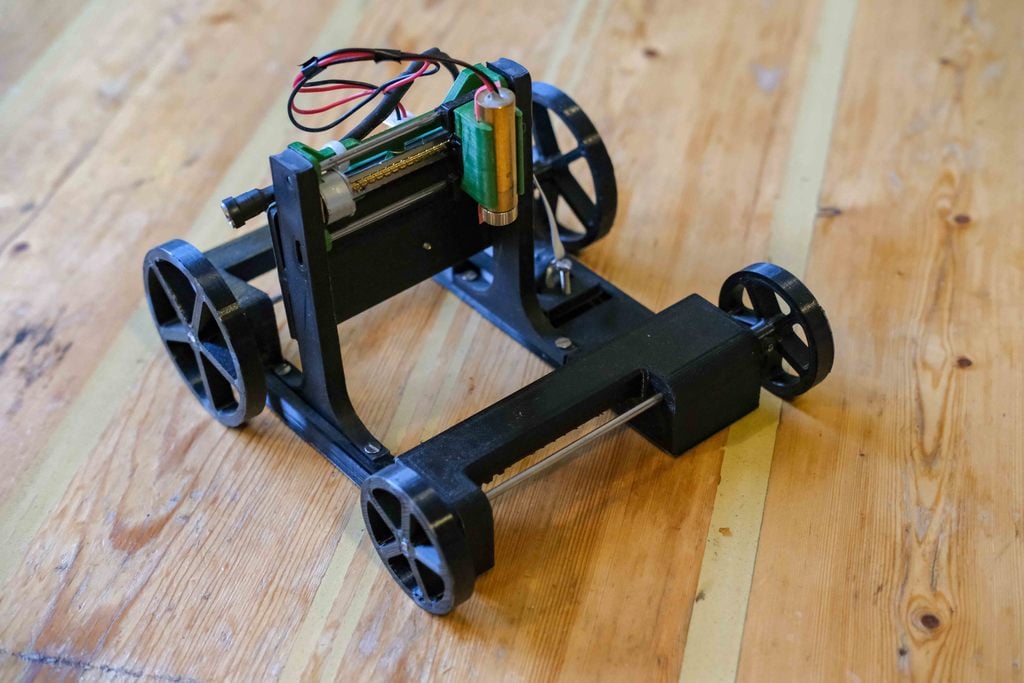
### Introduction This is an **add-on** for [maggie-shah's](https://www.thingiverse.com/maggie_shah/designs) laser engraver that converts it to an unlimited x or y-axis engraver (depending on your configuration). The original design with the moving bed can be easily interchanged with this "rolling base" depending on the engraving job. **Before** building this add-on, make sure to have maggie_shah's engraver up-and-running! ### Required parts: - 1x DVD-Drive stepper mechanism - 1x 4-wire flatcable or similar to connect stepper to driver-board - 1x dupont/berg connector to connect flatcable to pcb (or other connector you used to connect to the original engraver's bed stepper) - 32cm (2X16mm) Ø3mm stainless steel rod for the wheel axles - 4x M3x5mm bolt to fasten the stepper mechanism - 1x M3x45mm bolt to mount the stepper holder to the base - 4x M3x10 mm bolt to mount orininal engraver top to this "rolling base" - 1x M3x20mm bolt to adjust the pressure between the toothed wheel and the stepper worm gear - 2x M3 nut - 5x M3x5mm Helicoil/Recoil inserts. Screw or push inserts would probably also work after drilling the holes to the required size for these inserts (no guarentee) - 5x M3x5mm allen head set screw ###Printed parts - 1x Base - 1x Stepper_Housing **(requires support)** - 2x Front_Wheel - 2x Rear_Wheel - 1x Toothed_Wheel **(high resolution 0.25mm nozzle)** - 1x Spacer ### Assembly instructions 1. Cut the axles to size 2x 16cm 1. Drill the axle holes in the Base to 3.1mm with a drill-bit so the axles can spin smoothly 1. Drill the axle holes in the wheels and Spacer to 3mm to ensure a tight fit on the axles 1. Drill the bolting holes to connect the Stepper Holder to the Base (horizontal ones) to 3mm 1. Drill the stepper mounting holes in the Stepper Holder (vertical ones) to 2.5mm and tap M3 thread directly in the plactic 1. Drill the mounting holes in the Base (vertical ones to fit the top part of the engraver) to 2.5mm and tap M3 thread directly in the plastic 1. Drill the holes for the set screw inserts in all wheels to the required size for your type of insert and tap/screw/push in your insert. (I really am a fan of using inserts as is creates robust connections to the axles). If you dont want to use them, you can also tap M3 thread directly in the plactic or glue (--starts crying--) the wheels directly on the axles 1. Solder the cable to the stepper mechanism and crim on the connector on the other end 1. Mount the stepper mechnaism in the Stepper Holder with the four M3x5mm bolts. 1. Push fit a M3 nut on the bottom of the Stepper Housing and screw the M3x20mm bolt from the top in it so you don't loose the nut 1. Mount the stepper housing to the Base using the M3x45mm bolt and the last nut. 1. Fit the axles through the base and mount the wheels and lock them with the set-screws. Don't forget to put the Toothed Wheel and Spacer also on the axle 1. Place the top part of the original engrave on the base and fixate using the four M3x10mm bolts and connect the cable to the original pcb ### Configuration At this point, the stepper motor should spin using the original configuration. To drive the wheels, we need to tighten the "pressure bolt" to push the worm screw of the stepper onto the Toothed Wheel. You want to tighten the bolt to the point where the stepper cannot move anymore due to the increased friction and then go half a turn back. It is reccommended to put some grease/oil on the gears. The last configuration step is to set the right steps/mm for the y-axis in laser GRBL (or similar) as the gear ratio has changed radically with the new base. BEFORE you start configuring, SAVE/EXPORT your old configuration of the original engraver to a file called original_config.nc or something like that so that you can switch between configuration files when switching the base. For my engraver, I used 46 steps/mm but it can be different depending on the type of stepper you are utilizing. So you better check and if necessary calibrate it yourself. Future updates might include: - Wheels including a groove to fit O-rings for better traction - Hollow space in the beam above the driven axle to add lead ballast for increased traction - Holder for battery and ESP board to allow for wireless operation [Engraving Timelapse](https://youtu.be/V_Z16v9xDXE) ** Have fun engraving! ** ** --Always-- use eye protection when working with exposed laser light !!! **
With this file you will be able to print Unlimited Axis Laser Engraver with your 3D printer. Click on the button and save the file on your computer to work, edit or customize your design. You can also find more 3D designs for printers on Unlimited Axis Laser Engraver.