Update to Mark2 - Soldering Fume Extractor / Absorber
thingiverse
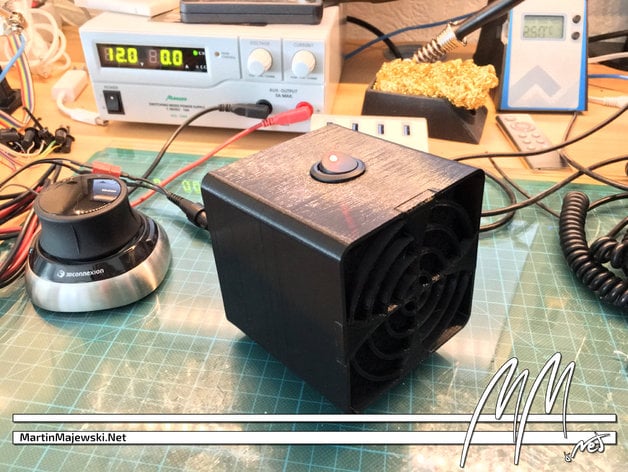
Update: Please read the update not down below! The most current files are marked "Mark2" I was looking for a commercial fume extractor but saw the price tag. So I searched for a DIY thing here at Thingiverse and found the fume extractors linked as remix sources. Though being nice, I thought of something more "complete," something with an on-off switch, something that one can quickly detach from a power supply. So this is the design I made from scratch. It features a switch on top with a LED indicator, has a metal fan grille on the back for safety reasons and a printed clip-in grille at the front to secure the activated carbon filter in place. Furthermore, it is a larger design: The 80mm 12V fan provides power to suck in all the bad things coming from the solder. Please also take a look at the print settings and post-processing section for more details. A detailed write-up in German will be available at http://www.martinmajewski.net https://youtu.be/veo-UWyFcx8https://www.youtube.com/watch?v=lA65kzdhVo8 Please also take a look at my other designs, printer parts, and tools. If you like to support me and my work, please consider following me on: Thingiverse MartinMajewski.net Twitter Instagram YouTube Sending a tip over Thingiverse is much appreciated and will provide me with coffee to stay productive. Please also consider buying your next gear via one of the affiliate links found inside my Thingiverse project pages or directly over the following links. Amazon.de Amazon.co.uk eBay Germany GearBest.com Print Settings Printer: MendelMax 3 from Makers Tool Works Rafts: No Supports: Doesn't Matter Resolution: 0.2 Infill: 10% to 20% Notes: I printed the body and the grille on my MendelMax 3 (http://goo.gl/93ys1Y) printer using a 0.4mm nozzle and 0.2mm layer height. There should be no infill needed for the body's walls. Just use enough perimeters. I used four. For the stand I used 20% rectangular infill, but much less should be also good enough to provide a sturdy build. Supports are optional. I used some for the switch hole and the cable hole (see picture), which I created with Simplify3D. My print time was about 6 hours for the body and one hour for the grille. The switch has a necessary hole diameter of 2.1mm and so has the 3D model. If you want to use a switch with another diameter, please let me know in the comment section. I will provide an additional STL file with this diameter for you asap! Post-Printing Required additional hardware To build this extractor you need, besides the provided STL files: 12V, 80mm PC fan (e.g. DE: http://amzn.to/2bW3Sin - UK: http://amzn.to/2bDMmm1) Some screws for the fan (e.g. DE: http://amzn.to/2bC6Nju - UK: http://amzn.to/2bXbj8U) 80mm fan grille (e.g DE: http://amzn.to/2bJYZbt - UK: http://amzn.to/2bLvHZX) 12V Switch from Hotsystems (DE: http://amzn.to/2bSuaVg - UK: http://amzn.to/2caVHxh) 2.1mm socket connector cable (e.g DE: http://amzn.to/2bJYm1v - UK: http://amzn.to/2bE8FCf) black and red wires (e.g. DE: http://amzn.to/2bCGIut - UK: http://amzn.to/2bUOrcA) Shrink tubing (DE: http://amzn.to/2bJYHRU - e.g. UK: http://amzn.to/2bXcMMr) Universal activated carbon filter (e.g. DE: http://amzn.to/2c9kTnU - UK: http://amzn.to/2bXcG7t) I am using an ersa i-CON Pico station (DE: http://amzn.to/2bC7ngS - UK: http://amzn.to/2bUODsi) This is a list with actual parts I bought from Amazon.de - some exclusively for this project (links without "e.g") and some equivalents (links with "e.g") that should do the job. The links have affiliate tags in them. So buying the things by using the links would buy me a coffee! A quick overview of the final result. Function Demo Project Updates Updated to Mark2 The Mark2 version of the fume absorber has some improvements and should also be easier to print. Changes in detail: Switch hole has now two notches so that the suggested switches can be snapped-in easier without any need to resize the hole after print. With the two notches, it is now possible to print the hole without the necessity of support material. I printed the new version with my Prusa i3 MK2, and it went perfectly. The stand/foot is now flat with the back of the body so that it gets printed directly onto the print bed. No support needed, no overhang artifacts. The stand/foot is now wider and the edges rounded, which makes the absorber stand more stable on the ground, and the roundings look better (IMHO) and are easier to print. The absorber is now about 5 mm taller because of the stand/foot changes, which make the fume absorption more effective. The cable hole is not 6 mm wide and is more nicely routed into the absorber's housing. The front grill has lips at the clip-in sides now, which prevents the housing from being pressed/squished inwards.
With this file you will be able to print Update to Mark2 - Soldering Fume Extractor / Absorber with your 3D printer. Click on the button and save the file on your computer to work, edit or customize your design. You can also find more 3D designs for printers on Update to Mark2 - Soldering Fume Extractor / Absorber.