UPDATED! Bezel for Fastbot BBP 1S LCD Cape
thingiverse
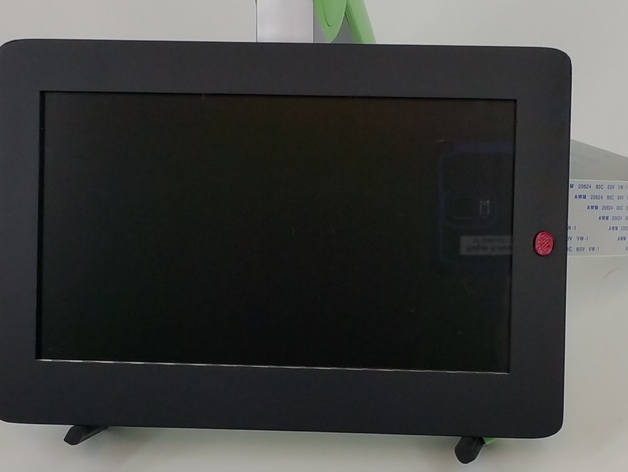
This thing was created because the LCD cape provided with the Fastbot BBP 1S LCD cape comes as a bare display mounted to a PCB. A little on this thing 160501 UPDATE: I enhanced a few items, There was another bezel on Thingiverse that allowed a "top hat" type switch cap, which I was inspired to create my own for this bezel. This required me to make the front panel just a bit thicker. Both bezel files are the same otherwise -- the new one then goes with the "new" cap. I also cleaned up the supports for the spanner. I moved the resting pads inboard which allow for full circles for the spanner screws - a much better idea. So if downloading the new bezel, download the new back spanner as it is sized accordingly. Finally I added two photos of my work. The bezel was painted in Rust-Oleum brand universal bonding primer" and top coated with Krylon brand semi-flat black paint. I didn't realize how difficult it would be to exactly size the hole that hold the pcb to the bezel and also align the LCD panel and the reset button. It took me several iterations to come up with a bezel that exactly fits the pcb. Note that while I did calibrate my printer before fine tuning, it took some efforts to align everything. I would suggest printing the front bezel first to confirm everything aligns with your printer setup. You can use the bezel alone, and mount it to a panel -- I plan to put the control board in a micro pc case, so I will just drill the 6 holes plus the slot for the ribbon cable. However, for extra protection, the plain back can be sandwiched between the bezel and the metal case. I also whipped up a go-pro style case using parts of another go pro mount -- the side that would normally be mounted to the camera. There are enough designs for the mating parts on thingiverse, you can choose one to fit your situation. I did not print the go-pro back yet. I would like some feedback on how everything fits. Since I used the other part as a guide, i would expect it fits as well as the plain back. I also made a middle support that bolts a plastic spanner piece close to the middle of the frame. Not so much to protect for flexing of the pcb as much as I did it to keep the bezel flush with the front of the lcd panel. I also made the front very thin on purpose, so that the lcd is as flush to the front as possible to make touching the edges easier. Print Settings Printer: wanhao duplicator I3 Rafts: No Supports: No Resolution: .2mm Infill: 40% Notes: I print almost exclusively in PETG because I find it nearly as tough as ABS but not brittle like PLA and without the lifting that often occurs with long thin items in ABS. I print with MicroCenter PETG at 260 degrees and a bed at 77 for nice hold and easy release. I also print on a glass plate with PEI glued to the top surface. I designed this with 3mm holes to accept #3 wood/plastic screws. The clearance holes on the back covers as well as the spanner are 4mm The push button mounts to the back side of the frame and the post going through the front can be glued to the knob on the front side. How I Designed This I designed it exclusively in tinkercad.
With this file you will be able to print UPDATED! Bezel for Fastbot BBP 1S LCD Cape with your 3D printer. Click on the button and save the file on your computer to work, edit or customize your design. You can also find more 3D designs for printers on UPDATED! Bezel for Fastbot BBP 1S LCD Cape.