Upgraded spring mounting plates for Emaker Huxley and nicrome rework

Upgraded spring mounting plates for Emaker Huxley and nicrome rework

thingiverse

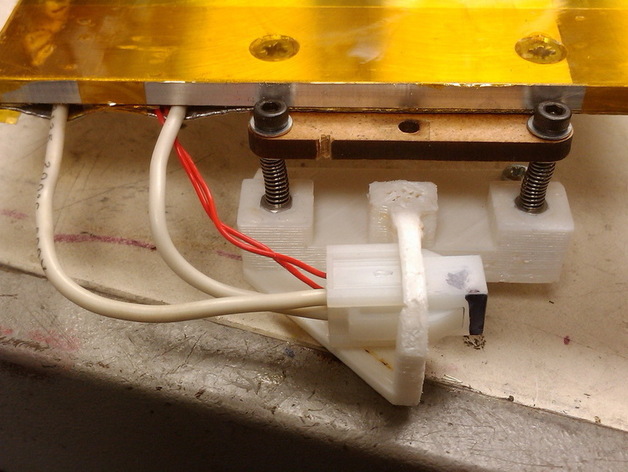
These two mounting plates replace the existing mounts on the Emaker Huxley. They eliminate the shaker in the three mounting screws and also provide a solid mount for the heated bed connector. There are photos of the heatbed with burnt off insulation and the whole process of re-doing it. Instructions After you print these two pieces, remove the supporting material and clean out the four holes to clear an M3 screw. Using an M3 screw, nut, and washer drag each threaded standoff into it's hexagonal socket. If you don't have the standoffs, screw three M3 nuts onto a screw, line up the hexes, and press the whole stack into the hexagonal socket. Once they are started in the hole you can finish pressing them in with a vise if you want. Install the wires and pins in the Molex connector before snapping it into position. When you screw your bed onto these mounts, I reccomend you leave the M3 nuts on the screws to lock the adjustement in position after you are happy with it. A little superglue doesen't hurt too... Here's how to do the ultimate nicrome connection: -Strip the Nicrome wire end. -Lightly sand the wire with fine sand paper; it will ONLY tin the part you sanded! -Immediately cover the sanded end with PLUMBING solder flux; this is Zinc Chloride based. -Using either lead free solder (see below) or 60/40 plumbing solder, tin the end of the wire; it will have to get quite hot to tin. You may also have to repeat the above steps more than once. -Wipe immediately with a paper towel. -Clean the wire end with rubbing alchohol and/or your favorite flux remover; this is CRUCIAL! Zinc Chloride flux will eat up your electronics if you leave it on! -Cut the terminal off of an un-insulated crimp on terminal (such as a ring terminal) that is a good fit for your wire; the wires should almost fill the barrel. You can double over either the Nicrome or the copper to get it full. -Crimp the terminal. -Tug on the wires; they MUST NOT pull out! -Solder the joint using lead free electronics solder (and conventional flux if you don't have flux cored solder). -Clean it again, carefully! Don't use the eutectic tin lead solder (Sn63Pb37) for this application; its service temperature is too low. Lead free silver tin solders will take 175C. The best choice is made of Tin (95 to 96.5%) with the balance Silver. Sn96.5Ag3.5 is going to do the best if you can find it; it does the best job wetting stainless steel. Solder labelled "Sillver Bearing Solder" is Sn96Ag4 and will work very well. The tin/silver/copper alloys should work OK here too. I STRONGLY reccomend using fiberglass tape between the bed and the nicrome wire; it gets HOT!!! Mine MELTED the Teflon insulation and burnt off the Kapton tape! A layer of fiberglass tape over the wire is a good idea too, followed by Kapton, and then the thermal insulation.

Download Model from thingiverse

With this file you will be able to print Upgraded spring mounting plates for Emaker Huxley and nicrome rework with your 3D printer. Click on the button and save the file on your computer to work, edit or customize your design. You can also find more 3D designs for printers on Upgraded spring mounting plates for Emaker Huxley and nicrome rework.