USB Buck Converter Case - Power OctoPi from your Printer Power Supply - Ender 3 - 4040
thingiverse
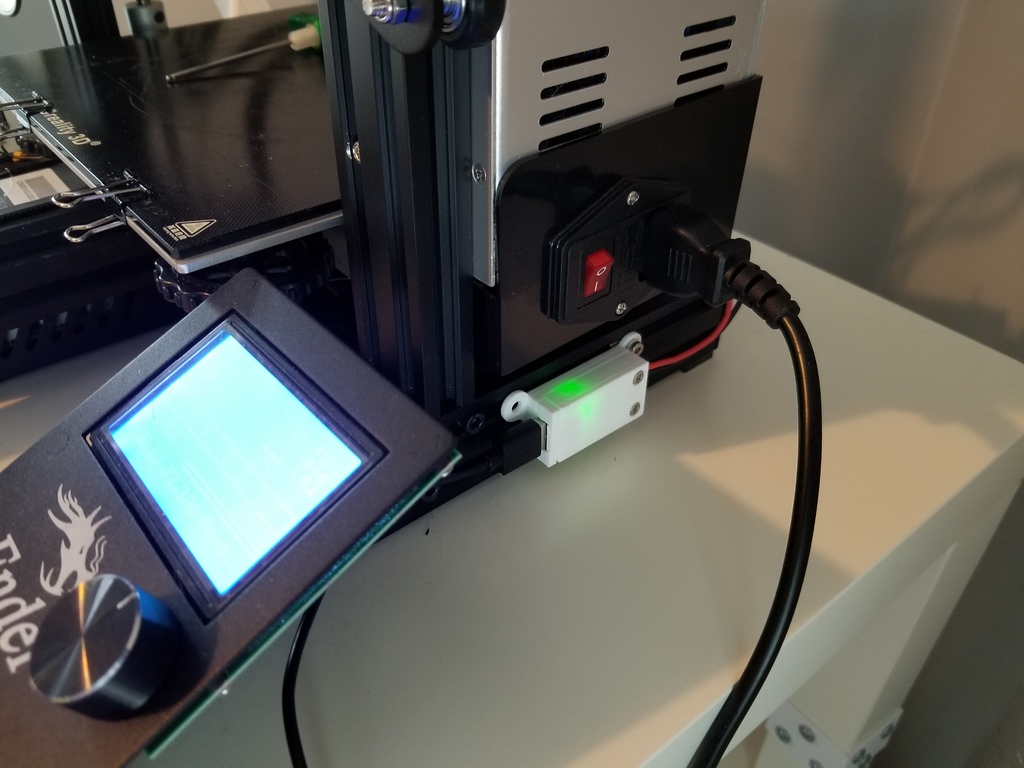
This is just a simple little case for a buck converter with a USB port - ideal for powering a Raspberry Pi off of your printer's power supply. This is the buck converter I used https://www.amazon.com/gp/product/B07121W7Q4/ref=ppx_yo_dt_b_asin_title_o01_s00?ie=UTF8&psc=1 Requires: (To hold the lid on the case) Two 3mm screws 10mm-12mm long Two 3mm nuts (To mount to the frame) Two to four screws 4mm 6mm-10mm long Two to four 4mm T-nuts Wire of an appropriate length. I used 18 gauge with a silicon insulator that is about 2.5mm OD. The lid acts as a bit of a strain relief on the wire, may need to be filed out for a larger OD wire insulator. On my Ender 3, mounting the buck right below the power supply (see pics) I only needed about 6 inches of wire. Two connectors to connect to you printer's power supply. Make sure you know what you're doing before fooling around with your printer's power supply. --- Both parts together took about 2.5 hours to print on my Ender 3 (using Cura 4.0 with Creawsome mod) at .2mm layer height. Flip the BUCKcaseLID part for minimal supports. In this orientation the only support needed is inside the holes for the recessed screw holes on the lid and on the recessed nut holes on the bottom of the tray part of the case - which popped right out using Cura's default support settings. Included file BUCKstandin-STL is a model of the buck converter which I used in designing this case. You can print it if you want to make sure your buck convertor is dimensionally identical to mine before printing the case. Or you can load it up in your favorite CAD program maybe and at least take measurements and compare it to your physical part. It is a tight secure fit, but should not require any force to get the buck converter seating in the tray. If yours requires forcing, something isn't right. --- I may update this at some point to make it a little more of a finished product, but it works fine as it is. EDIT 5/31/2019: Added two files. BUCKcase2TOPLESS-STL is the buck converter tray, modified to be used without the lid. It differs in that there is a bridge across the top of the USB port to help hold the buck converter in place. BUCKcaseSTRAINrelief1-STL is a strain relief to hold the wires. These two parts together should allow you to just use the base tray part and leave the top open. There's no other system for retaining the buck converter other than that bridge above the USB port and the strain relief, but there shouldn't be much strain on this once it is installed and the USB cable plugged in. The bridge above the USB port printed fine on my Ender 3 with no supports. These parts have not been tested. Use at your own risk.
With this file you will be able to print USB Buck Converter Case - Power OctoPi from your Printer Power Supply - Ender 3 - 4040 with your 3D printer. Click on the button and save the file on your computer to work, edit or customize your design. You can also find more 3D designs for printers on USB Buck Converter Case - Power OctoPi from your Printer Power Supply - Ender 3 - 4040.