USB-C conversion / stand / backlight mod for Govee H5177 thermometer
thingiverse
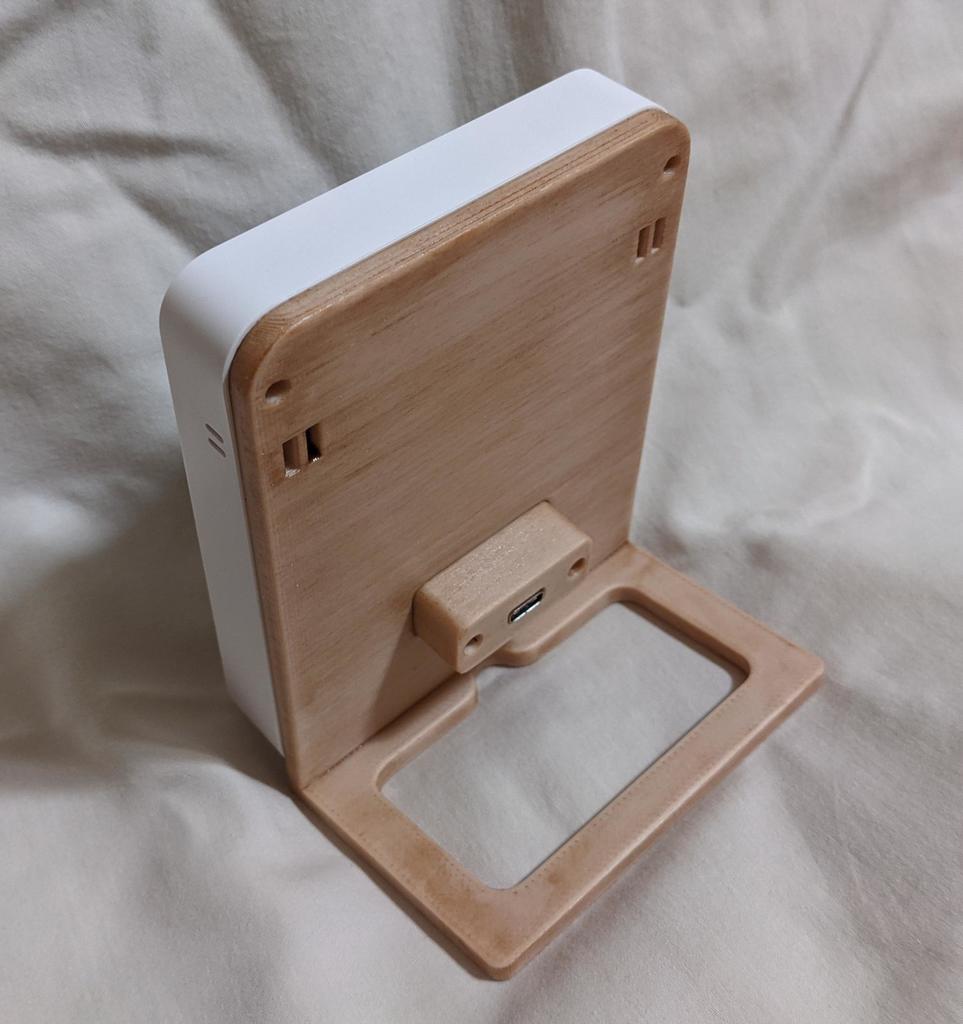
# Project overview This replaces the back panel of the popular H5177 Bluetooth thermometer, allowing it to be powered from a USB-C charger rather than disposable batteries. Optionally, the backlight can be permanently enabled. I printed mine on a Prusa MK3S+ with Sunlu low-temperature wood PLA, 0.6mm steel nozzle, 0.20mm layer height, 15% infill. Then I sanded it with 180 grit sandpaper and finished it with walnut stain+polyurethane. Standard PLA, 0.4mm nozzle, 0.20mm layers, 15% infill works fine as well. The Fusion 360 design file is attached in case you want to customize it. # Parts * H5177 Thermometer: https://www.amazon.com/dp/B08C9VYMHY * USB-C breakout board: https://www.amazon.com/dp/B096M2HQLK * \#2-56x5/8" screws + nuts (or similar): https://www.amazon.com/gp/product/B07BWBPV5G * 1.25mm JST plugs/jacks: https://www.amazon.com/dp/B013JRWCBU * 220 ohm resistor: https://www.amazon.com/dp/B07P3MFG5D (optional) You will also need a small screwdriver, a soldering iron, and a plastic wedge tool to disassemble the thermometer. # Base configuration (just replacing the power source + back panel) Note that the red/black wires on the Amazon JST connectors are *reversed* from what Govee uses, so in this project the positive wire will be black and the negative wire will be red. 1. Remove the 3 screws on the back of the Govee unit (one is under the pop-out stand) 2. Strip the red and black wires on a female JST connector using a 26 AWG stripper 3. Solder the red wire to GND on the USB-C breakout board and solder the black wire to VBUS 4. Unplug the Govee-provided female JST connector (left side) from the mainboard to disconnect the battery 5. Thread the JST cable through the hole in the newly printed stand 6. Insert the USB breakout board into its enclosure, then fasten it to the stand with the #2 screws and nuts 7. Plug in the JST connector soldered to the USB board 8. Mount the thermostat on the new stand using the 3 original screws # Always-on backlight (optional) Normally the backlight only illuminates for a couple of seconds after the user presses the leftmost button. If you want the backlight to remain illuminated 24/7 without user intervention, you can make the following additional change during step #3 above: 1. Take a male JST cable and cut the wires down to about 1 inch 2. Strip the wires 3. Solder the red wire to GND on the USB breakout board 4. Solder a 220 ohm resistor in series with the black wire, then connect the other side of the resistor to VBUS on the breakout board 5. Unplug the Govee-provided female JST connector (right side) from the mainboard to disconnect the backlight 6. Plug the backlight lead into your male JST cable to feed it constant power from USB
With this file you will be able to print USB-C conversion / stand / backlight mod for Govee H5177 thermometer with your 3D printer. Click on the button and save the file on your computer to work, edit or customize your design. You can also find more 3D designs for printers on USB-C conversion / stand / backlight mod for Govee H5177 thermometer.