USB Camera Module Telescope Collimator
prusaprinters
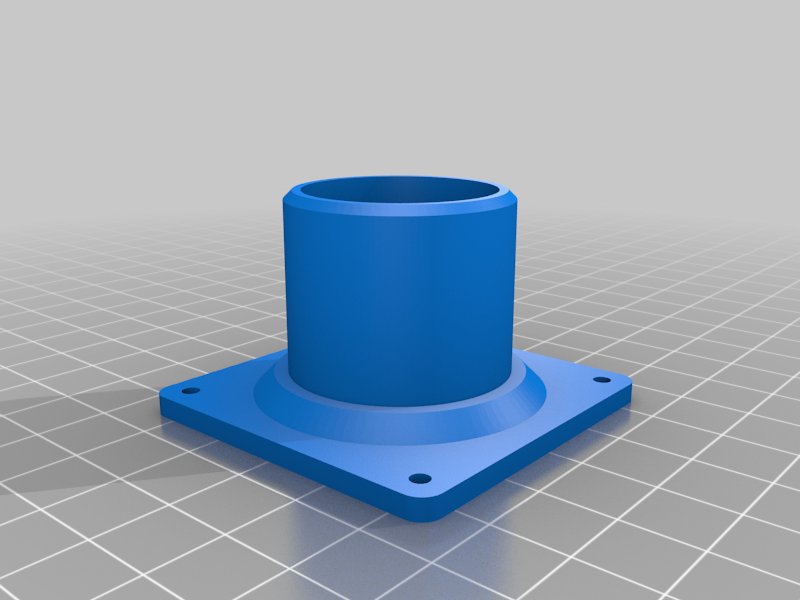
<h3>Housing and Telescope Mounts for Camera Module</h3> <h3>Intended Purpose</h3> <p>These parts are designed to work with a 38x38mm USB UVC Camera module such as those from Arducam or available online from various Asia based sellers.</p> <p>A camera module assembled with the parts below can be used to collimate a telescope, in a similar fashion to the commercially available Ocal Electronic Collimator.</p> <p>An 8MP UVC USB Webcam module using IMX179 sensor with autofocus is recommended for this project. Refer to the image for an example of what to look for.</p> <p>To collimate the telescope you'll need to use software such as <a href="https://github.com/rsarwar87/pyReflectorCollimator" title="pyReflectorCollimator">pyReflectorCollimator</a>. You may also be able achieve a reasonable result using circle overlays with <a href="https://www.sharpcap.co.uk/" title="Sharpcap">Sharpcap</a>.</p> <p>A discussion on the use of pyReflectorCollimator can be found <a href="https://stargazerslounge.com/topic/386847-yet-another-diy-electronic-collimator/" title="here">here</a>.</p> <h3>Print recommendations</h3> <ul> <li>All parts designed for FDM printing.</li> <li>Supports are not required.</li> <li>Base part has been tested with 3x walls, 3 top/bottom layers and 40% infill.</li> <li>Face parts with threads use 0.1 or 0.2 layer height for threads to print OK.</li> <li>Face and Cap parts set Z seam alignment to random to avoid a seam interfering with the final fitting.</li> <li>PLA filament is fine. Use a light colour if possible for face parts to assist with internal illumination.</li> </ul> <h3>Assembly recommendations</h3> <ul> <li>The camera module suits maximum size 2.5mm screws.</li> <li>The maximum length screws the base can accept is 15mm.</li> <li>You will need to source 8x M2.3 or M2.5 self tapping screws of length 5 to 15mm.</li> <li>If you cannot source screws you could use a glue such as hot glue or a silicone adhesive to secure the camera module. You could also glue the face to the base, a drop of CA glue should do the job.</li> <li>A cutout exists in the base to thread a small zip/cable tie through allowing you to secure the USB cable in place to provide strain relief.</li> </ul> <h3>Parts</h3> <ul> <li>You only need the Base, the Face to suit your equipment and screw type.</li> <li>The cap is optional. The cap features a small hole which may be useful for finding the centre of rotation for the finished unit. (See section below)</li> </ul> <p>| STL | Description | | --- | --- | | Base.stl | Module goes in here. | | Face_1.25.stl | For 1.25"focuser, large round opening, regular screw holes | | Face_1.25_CS.stl | For 1.25"focuser, large round opening, counter sunk screw holes | | Face_1.25_CS_SQ.stl | For 1.25"focuser, small square opening, counter sunk screw holes | | Face_1.25_SQ.stl | For 1.25"focuser, small square opening, regular screw holes | | Face_2inch.stl | For 2"focuser, large round opening, regular screw holes | | Face_2inch_CS.stl | For 2"focuser, large round opening, counter sunk screw holes | | Face_2inch_CS_SQ.stl | For 2"focuser, small square opening, counter sunk screw holes | | Face_2inch_SQ.stl | For 2"focuser, small square opening, regular screw holes | | Face_flat.stl | Flat face panel for you to DIY your own opening and attachment feature | | Face_flat_CS.stl | Flat face panel for you to DIY your own opening and attachment feature with countersunk holes | | Face_M42.stl | For M42 threaded connection, large round opening, regular screw holes | | Face_M42_CS.stl | For M42 threaded connection, large round opening, counter sunk screw holes | | Face_M42_CS_SQ.stl | For M42 threaded connection, small square opening, counter sunk screw holes | | Face_M42_SQ.stl | For M42 threaded connection, small square opening, regular screw holes | | Face_M48.stl | For M48 threaded connection, large round opening, regular screw holes | | Face_M48_CS.stl | For M48 threaded connection, large round opening, counter sunk screw holes | | Face_M48_CS_SQ.stl | For M48 threaded connection, small square opening, counter sunk screw holes | | Face_M48_SQ.stl | For M48 threaded connection, small square opening, regular screw holes | | Cap_1.25.stl | Cap to suit any 1.25"faces | | Cap_2inch.stl | Cap to suit any 2"faces | | Cap_M42.stl | Cap to suit any M42 faces | | Cap_M48.stl | Cap to suit any M48 faces | | TestPiece_M42.stl | Small part to test dimensional accuracy fro M42 threads | | TestPiece_M48.stl | Small part to test dimensional accuracy fro M48 threads |</p> <p>If using a threaded connection, it's recommended that you attach a small threaded extenstion ring to the M42 or M48 printed thread and use the ring's thread to connect to your equipment to save unecessary wear on your plastic threads.</p> <h3>Finding the centre of rotation</h3> <p>It may be useful to know the centre of rotation as when placed in a telescope focuser this point will coincide with the centre of the focuser tube. Perform this step once your chosen face has been attached as any change in position of the face will affect the result.</p> <p>Follow the steps on this <a href="https://docs.google.com/spreadsheets/d/1tURiik8llQ3Ugq45dtv_19nDx5SVUf5VVtzPg1Vr29E/edit?usp=sharing" title="Google sheet">Google sheet</a>. You'll need to take your own copy to add your own values.</p> <h3>Print Settings</h3> <p><strong>Printer:</strong></p> <p>Sidewinder X1</p> <p><strong>Rafts:</strong></p> <p>No</p> <p><strong>Supports:</strong></p> <p>No</p> <p><strong>Resolution:</strong></p> <p>See notes</p> <p><strong>Infill:</strong></p> <p>40</p> Category: Hobby
With this file you will be able to print USB Camera Module Telescope Collimator with your 3D printer. Click on the button and save the file on your computer to work, edit or customize your design. You can also find more 3D designs for printers on USB Camera Module Telescope Collimator.