USB Kryptex
prusaprinters
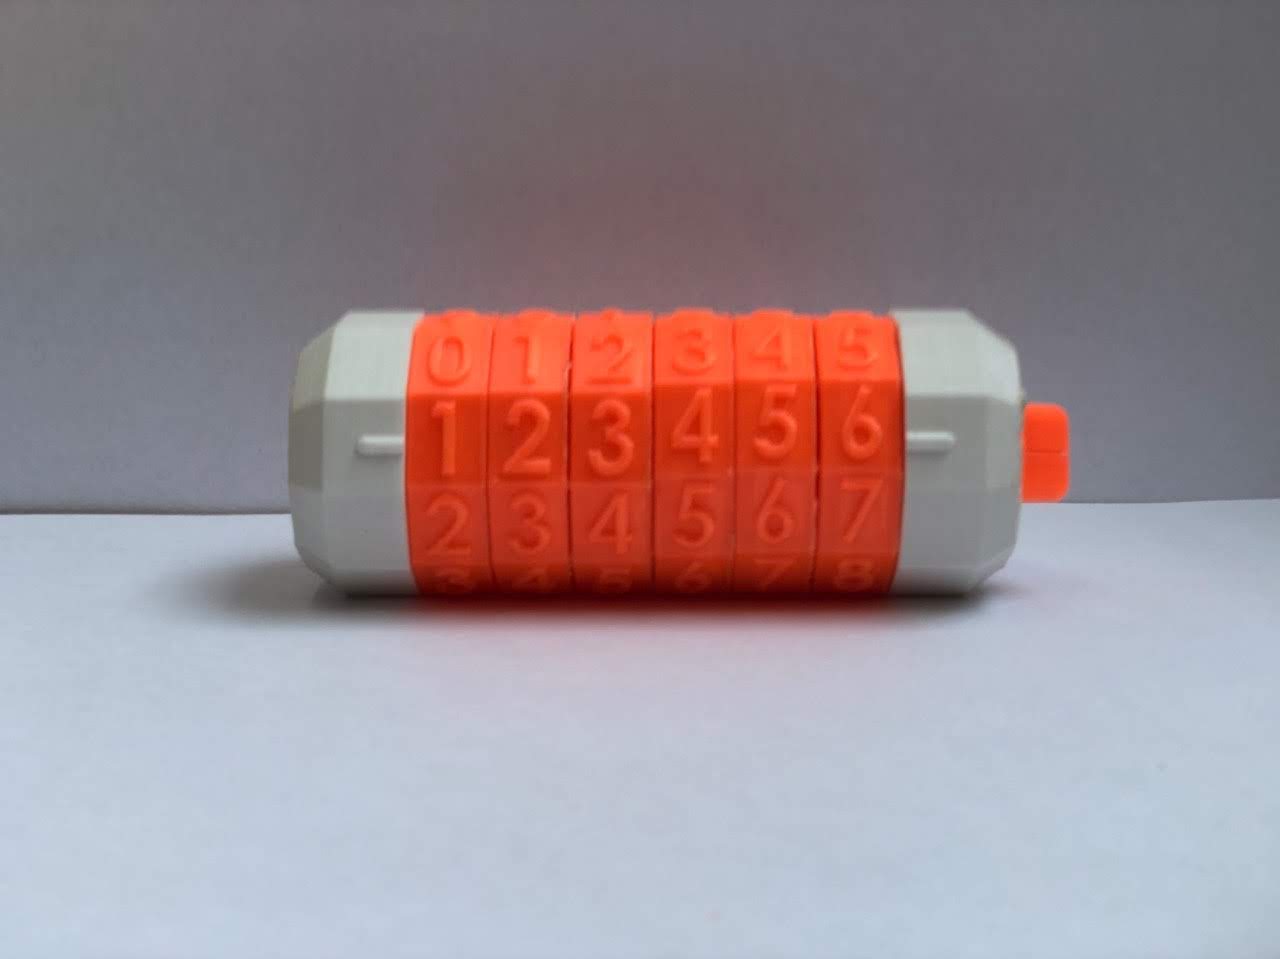
<h3>Customize the Print</h3><p><img src="https://content.instructables.com/ORIG/FKE/MPOQ/KCT3D8TB/FKEMPOQKCT3D8TB.png?auto=webp&frame=1&crop=3:2&width=800&fit=bounds&md=0bfe1215eca37f013dfb9657f5ba5676" alt="Design the Thing"><a href="https://content.instructables.com/ORIG/FKE/MPOQ/KCT3D8TB/FKEMPOQKCT3D8TB.png?auto=webp&frame=1&width=1024&fit=bounds&md=0bfe1215eca37f013dfb9657f5ba5676"> </a></p><p><img src="https://content.instructables.com/ORIG/F8S/ZKK3/KCT3D8T6/F8SZKK3KCT3D8T6.png?auto=webp&frame=1&crop=3:2&width=400&fit=bounds&md=e5e26a172779e36821ee19ff3b351af7" alt="Design the Thing"><a href="https://content.instructables.com/ORIG/F8S/ZKK3/KCT3D8T6/F8SZKK3KCT3D8T6.png?auto=webp&frame=1&fit=bounds&md=e5e26a172779e36821ee19ff3b351af7"> </a></p><p><img src="https://content.instructables.com/ORIG/FXO/FRJD/KCT3D8T2/FXOFRJDKCT3D8T2.png?auto=webp&frame=1&crop=3:2&width=400&fit=bounds&md=dcc1f5baf9a97889c1f02764cd52a69d" alt="Design the Thing"><a href="https://content.instructables.com/ORIG/FXO/FRJD/KCT3D8T2/FXOFRJDKCT3D8T2.png?auto=webp&frame=1&fit=bounds&md=dcc1f5baf9a97889c1f02764cd52a69d"> </a></p><p><img src="https://content.instructables.com/ORIG/FNK/8QYP/KCT3D8SD/FNK8QYPKCT3D8SD.png?auto=webp&frame=1&fit=bounds&md=7b422dffbacd16d0128269738f3a8945" alt="Design the Thing"><a href="https://content.instructables.com/ORIG/FNK/8QYP/KCT3D8SD/FNK8QYPKCT3D8SD.png?auto=webp&frame=1&fit=bounds&md=7b422dffbacd16d0128269738f3a8945"> </a></p><p><img src="https://content.instructables.com/ORIG/FLW/IJ7W/KCT3D8RN/FLWIJ7WKCT3D8RN.png?auto=webp&frame=1&crop=2:3&fit=bounds&md=63b4c4b0df68a1a45cc4be4119193e24" alt="Design the Thing"><a href="https://content.instructables.com/ORIG/FLW/IJ7W/KCT3D8RN/FLWIJ7WKCT3D8RN.png?auto=webp&frame=1&fit=bounds&md=63b4c4b0df68a1a45cc4be4119193e24"> </a></p><p>We only to change the mainbody and the case for the usb stick. First we adjust the case for the usb stick. Take both parts and copy each. Now cut for each part the top and the bottom part away. You have to choose how many digits you wnt to have in the end, so I decided that I want to have six so I only have to leave two teeths. Take the two fitting parts and group them. The next step is to adjust the mainbody. If we want to add to digits we need two more rings and each ring has a height of 10mm so we have to add with two digits 20mm. I seperated the middle part and the top part. These 3 parts should be grouped. Be carful that you fully overlap the original top part.</p><h3>3D Print:</h3><ul><li>1* cap</li><li>* innerRing</li><li>* outerRing</li><li>1* mainBody</li><li>1* usbStickCase1</li><li>1* usbStickCase2</li></ul><p>These parts doesn't require support, but I printed them with a brim to secure them safly to the print bed. I thought that the small bottom surface maybe case some warping. If you want to be 100 sure that the numbers are as perfect as they could be you also should use support. Print the main body with support. The other two parts doesn't require support.</p><p>*you have to print one of this for each digit. You choose the number of digits you want to have in the step before.</p><h3>Assembly</h3><p><img src="https://content.instructables.com/ORIG/F02/KJ5C/KCT3DBM6/F02KJ5CKCT3DBM6.jpg?auto=webp&frame=1&crop=3:2&width=800&height=1024&fit=bounds&md=9bdf32d0a9b24de9228c3283fe3d2f42" alt="Assembly"><a href="https://content.instructables.com/ORIG/F02/KJ5C/KCT3DBM6/F02KJ5CKCT3DBM6.jpg?auto=webp&frame=1&width=1024&height=1024&fit=bounds&md=9bdf32d0a9b24de9228c3283fe3d2f42"> </a></p><p><img src="https://content.instructables.com/ORIG/FNG/QQKG/KCT3DBL5/FNGQQKGKCT3DBL5.jpg?auto=webp&frame=1&crop=3:2&width=400&height=1024&fit=bounds&md=64a06a3e8df0b713a335a408844e854f" alt="Assembly"><a href="https://content.instructables.com/ORIG/FNG/QQKG/KCT3DBL5/FNGQQKGKCT3DBL5.jpg?auto=webp&frame=1&width=1024&height=1024&fit=bounds&md=64a06a3e8df0b713a335a408844e854f"> </a></p><p><img src="https://content.instructables.com/ORIG/FUM/2RTU/KCT3DBL8/FUM2RTUKCT3DBL8.jpg?auto=webp&frame=1&crop=3:2&width=400&height=1024&fit=bounds&md=cd394b310e6cbbac69c2323c39d032a3" alt="Assembly"><img src="https://content.instructables.com/ORIG/FLH/YL2R/KCT3DBLL/FLHYL2RKCT3DBLL.jpg?auto=webp&frame=1&crop=3:2&width=600&height=1024&fit=bounds&md=1bead9db9b31cb2b0f23ff1064bb6f9b" alt="Assembly"><a href="https://content.instructables.com/ORIG/FLH/YL2R/KCT3DBLL/FLHYL2RKCT3DBLL.jpg?auto=webp&frame=1&width=1024&height=1024&fit=bounds&md=1bead9db9b31cb2b0f23ff1064bb6f9b"> </a></p><p><img src="https://content.instructables.com/ORIG/FRI/MNZI/KCT3DBQD/FRIMNZIKCT3DBQD.jpg?auto=webp&frame=1&crop=3:2&width=600&height=1024&fit=bounds&md=ce121ad6b10cc2754777b8f19fdc371f" alt="Assembly"><a href="https://content.instructables.com/ORIG/FRI/MNZI/KCT3DBQD/FRIMNZIKCT3DBQD.jpg?auto=webp&frame=1&width=1024&height=1024&fit=bounds&md=ce121ad6b10cc2754777b8f19fdc371f"> </a></p><p>Take your usb stick and if the usb stick doesn't fiit the cryptex you have to find a way to remove the plastic case. Then put the usb stick between the usb stick case parts and glue them together with hot glue, super glue or epoxy. Take the an inner ring and put it on an outer ring. The gap in the inner ring shows on which number this ring opens the cryptex. Put all rings on the main body. Put the rings in that the inner ring could slide up. Add the cap. Put the cap in the two holes on the top on the main body and slide it in the closed position. The last step is to push the usb stick in and turn the wheels. Keep in mind that the last step could be very hard in the beginning because of tight tolarences.</p><h3>Conclusion</h3><p><img src="https://content.instructables.com/ORIG/F5I/GQ8E/KCT3DCKP/F5IGQ8EKCT3DCKP.jpg?auto=webp&frame=1&width=700&fit=bounds&md=10832d6dbb5aec3d0a59bf90294d6a52" alt="Conclusion"><a href="https://content.instructables.com/ORIG/F5I/GQ8E/KCT3DCKP/F5IGQ8EKCT3DCKP.jpg?auto=webp&frame=1&fit=bounds&md=10832d6dbb5aec3d0a59bf90294d6a52"> </a></p><p>This is a pretty cool design. The only thing I doesn't like is, that the tolarences are so tight. I had to turn the wheels for eproxemtly an hour until they spin good. I hope you enjoyed this Instractable and have fun to build it. Let me know in the comments what you think or if you have any questions? Thank you for reading.</p><p><a href="https://www.youtube.com/channel/UCKLloFoVPy84dioQ_5BPWQw">YouTube</a></p><p><a href="https://www.thingiverse.com/threed_designer/about">Thingiverse</a></p><p><a href="https://www.myminifactory.com/users/threeD_Designer">MyMiniFactory</a></p><p><a href="https://www.etsy.com/de/shop/ThreeDDesigner?ref=simple-shop-header-name&listing_id=1116874049">Etsy</a></p><p><strong>If you like to, check out </strong><a href="https://www.prusaprinters.org/social/194698-max-siebenschlafer/prints?o=liked"><strong>my other designs</strong></a><strong> too!</strong></p>
With this file you will be able to print USB Kryptex with your 3D printer. Click on the button and save the file on your computer to work, edit or customize your design. You can also find more 3D designs for printers on USB Kryptex.