Useless Machine
thingiverse
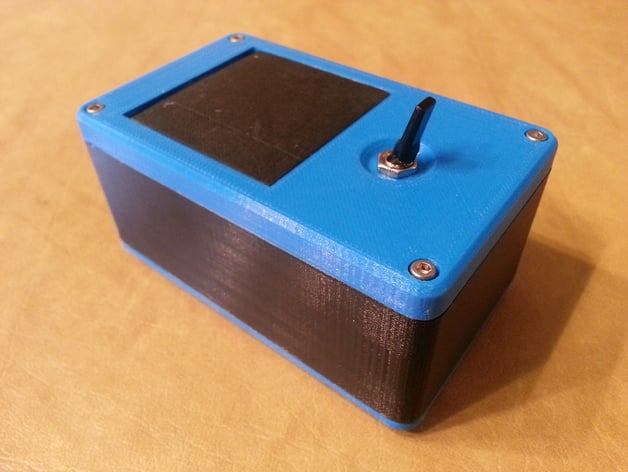
This is a 3D-printable "useless machine." Hit the switch, and the useless machine uses a tiny arm to switch itself back off instantly. These gadgets are super popular gag gifts that make for great desk toys! You can print this one yourself, and the parts are incredibly cheap. Check out the instructions for a comprehensive list of components and assembly steps. https://www.youtube.com/watch?v=z_3iLXr7oS0&feature=youtu.be Instructions: Parts List: Pololu: 1x Micro Gearmotor Radioshack: 1x DPDT Toggle Switch 1x SPDT Limit Switch 2x 1-AA Battery Box McMaster: 1x M2.5 Metric Tap 1x M3 Metric Tap 1x Tap T-Handle 10x M2.5x10mm Machine Screw 6x M2.5x8mm Machine Screw 1x M2.5x5mm Machine Screw 2x M3x14mm Machine Screw Miscellaneous Parts: 24AWG Wire Soldering Equipment Metric Hex Wrenches/Allen Keys Assembly Instructions: Note: There are two images in the gallery to help with assembly. One is for the electrical schematic, and the other shows how parts are oriented inside of the shell. Use a knife to cut out the mouse ears from the base, top, shell, and hatch. Smooth out the cuts using some high-grit sandpaper. Tap all of the 3D-printed parts using the M2.5mm Tap. The shell has through holes, but only tap about 8mm down on each side. Don't tap the holes in the top plate that will be used to attach the hatch. Tap the SPDT lever switch holes using the M3mm tap. Solder the components according to the schematic shown in the picture gallery. Attach the motor to the base plate using the motor bracket and 4 of the M2.5x8mm screws. The side of the motor with the electrical terminals should be on the same side as the slot. The shaft should be pointing inward on the base plate. Don't tighten it too much, or it will restrict the motor from turning. Attach the arm to the motor shaft using the M2.5x5mm screw as a set screw to attach the arm to the D-type shaft of the motor. Attach the SPDT Lever Switch to the Kill Switch Mount. Attach the Kill Switch Mount to the base plate slot using 2 of the M2.5x8mm screws. Adjust the position so that the motor turns off when the arm is almost touching the base plate. Attach the shell to the base plate using 4 of the M2.5x10mm screws. Attach the hatch to the top plate using 2 of the M2.5x10mm screws. Make sure these holes aren't tapped, as this allows you to tighten the screws into the holes without having the screw head be flush against the inside of the hatch. This design holds the screws in place with their threads, allowing the hatch to move freely. You might need to sand a little on the edges of the hatch to get it moving smoothly and resting flush on the top plate. Attach the DPDT Toggle Switch to the top plate. Remove the washers that come with the switch; you only need one nut to secure it to the top plate. Make sure the switch is oriented correctly. Attach the top plate to the shell, completing the assembly. Remember to put some AA batteries in the battery box and place it inside the shell beforehand.
With this file you will be able to print Useless Machine with your 3D printer. Click on the button and save the file on your computer to work, edit or customize your design. You can also find more 3D designs for printers on Useless Machine.