Using a Cheap Tire Gauge as a Probe
thingiverse
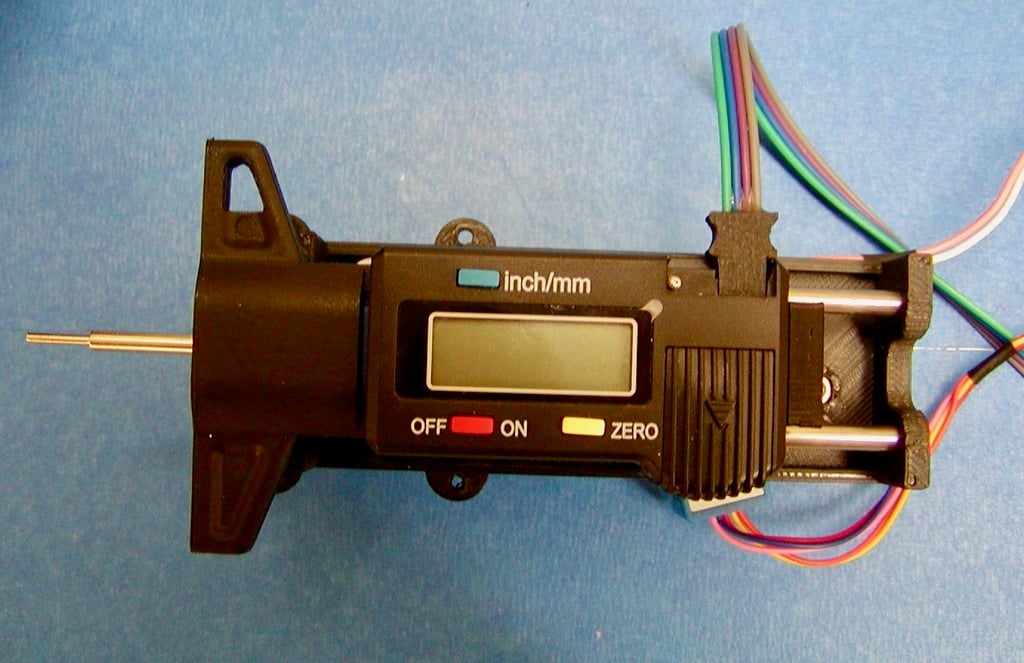
Update October 14, 2018: Added a new schematic and sketch using an ATtiny84A instead of an ATtiny85. For instructions on building the SMD version of the caliper interface, see https://www.instructables.com/id/Caliper-Data-Interface/. End of updates. https://youtu.be/TE63B3ymtIA This is a demonstration of converting a cheap tire gauge into a digital probe. I designed this to measure the cut depths of ordinary brass house keys for a key duplicating machine project I'm working on. Probe Carriage: The gauge is mounted to two 4mm x 97mm shafts, which move along the shafts powered by a cheap BYJ48 stepper. The stepper is part of a simple rack and pinion system. At one end there's an endstop used to detect when the probe is fully extended. All parts, except for the spring clip, are printed with a 0.2mm layer height, 80% fill. The spring clip is printed with a 0.1mm layer height, 100% fill. All parts are printed without support. Once the carriage is printed, the three holes to accept the LM4UU 4x8x12mm linear bearings need to be reamed to 8mm. Because it's critical that the bearings are parallel and square to the base, I performed this task using a drill press. The carriage was mounted to a square block of wood with double stick tape to hold it square and parallel while reaming. The carriage is attached to the depth gauge by removing the existing depth gauge back panel screws and replacing them with longer screws. The screws I used are pan head M2x15mm, which I had to grind down to 13mm. The endstop/Mini Micro Switch is attached using two flathead M2.3 x 12mm screws (M2 will work fine too). You should add a chamfer to the switch holes so that the screw heads are flush with the switch body. https://www.aliexpress.com/item/Free-shipping-10PCS-2pin-N-O-N-C-5A250VAC-Limit-Switch-WK11-3Z-Mini-Micro-Switch/32273563395.html The internal spring that keeps the probe extended is an 8.5 x 36.5mm extension spring. I have a few depth gauges that all look the same, but the profile of the stem that the spring clip attaches to varies. I only made a clip that fits one of these profiles. I can give you the Fusion 360 file if you need to customize it for your depth gauge. Software: The interface for the caliper/tire depth gauge is an I2C version of the interface I published for the caliper plug (https://www.thingiverse.com/thing:2477494). The new interface uses an ATtiny85 acting as an I2C slave. The interface will notify the host whenever the caliper reading changes. See the schematic CaliperDataTiny85.pdf. One of the added features is the ability to zero the caliper from the I2C master. This is done by turning the caliper off then on. In order for this to work, the caliper battery should be removed and 1.5V should be provided by the interface. The power is controlled by a 2N7000 MOSFET. One of the tricky issues with using all 6 IO pins on the ATtiny85 is that you need to set the H fuse to 0x5F (otherwise pin PB5 is the RESET pin). I did this using an easy-to-build AVR high-voltage programmer. See the included Software.zip. The file sketch AVR_HighVoltageSerialProgrammer.ino has a link to a page that describes how to build one. This sketch also contains the fuse settings for this project. Classes Caliper and BYJ48: The Caliper class deals with all of I2C communication with the ATtiny85. The BYJ48 class controls the carriage stepper. ProbeTest.ino demos the Caliper and BYJ48 classes. CaliperI2CTest.ino is a subset of ProbeTest.ino that only demos the Caliper class.
With this file you will be able to print Using a Cheap Tire Gauge as a Probe with your 3D printer. Click on the button and save the file on your computer to work, edit or customize your design. You can also find more 3D designs for printers on Using a Cheap Tire Gauge as a Probe.