UV Cure Box
thingiverse
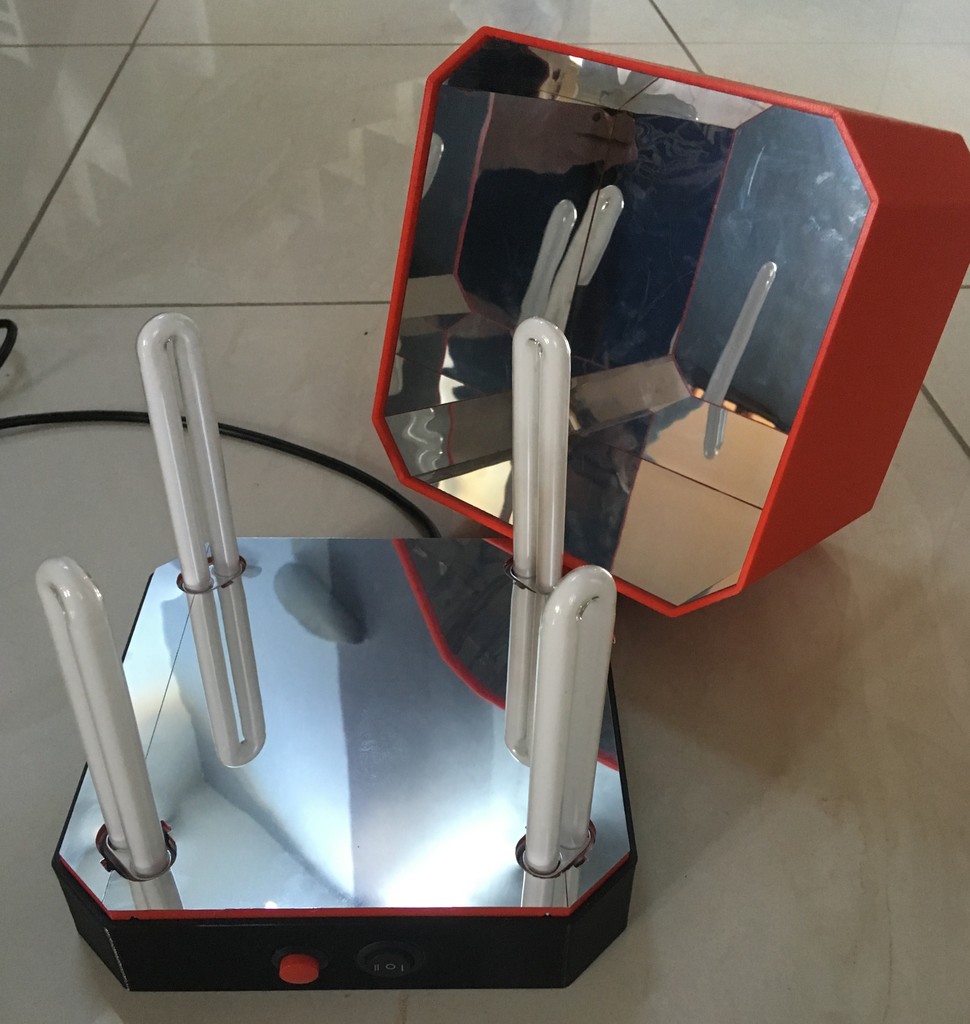
== Update == 08/07/2019- Base Plate and Base A have been updated (no recess in the first uploaded Base Plate version) ----------------------------------------------------------------------------------------------------------------------- First of all sorry for my “bad english”, I hope my instructions will be clear enough How I have converted a nail UV lamp into a Resin VU Cure Box This conversion is based on the following model which doesn’t have any power switch on the back. If you need any update of the Base model to include holes that match your nail UV lamp model, please feel free to ask https://www.amazon.fr/gp/product/B073VR5PY9/ref=ppx_yo_dt_b_asin_image_o09_s00?ie=UTF8&psc=1 I have printed them in PETG for the base and PLA for other parts (with 15% infill and 4 layers top and bottom) I have used the following plastic mirror sheets to stick inside of my cure box https://www.amazon.fr/gp/product/B07QPCJJL7/ref=ppx_yo_dt_b_asin_image_o02_s00?ie=UTF8&psc=1 Instructions : 1- Remove bubble lamp from the nail UV lamp 2- Disassemble the nail UV lamp (some unsoldering is needed) and keep everything aside (screws will be reused) 3- Remove the reflective sheet and using the Cutting Template and a good cutter, cut the 4 bubble sockets (see photos). The rectangle shape is quite important as bubble sockets should fit in the base plate rectangle recess 4- Fix the electronic board in the base using 2 small screws and sold back what you have unsoldered when disassembling 5- Put the 4 bubble sockets into dedicated slot (see photos) and check that wires are not pinched 6- Stick the reflective sheet on the base plate and using a xacto cutter cut bubble sockets holes and the 4 screw holes if you cover them 7- Cut and stick the reflective sheet inside of the lid. Keep 3 to 5 millimeters without reflective at the base of the lid to help it close correctly on the base plate (see photos) 8- Using 4 long screws, fix the base plate on the base. Screw them really gently Please tip me if you like my design, it will help me to work on my UV Cure Box V2 that will include many additional features =================================================================== Instructions en Francais Le modéle de lampe à UV utilisé est le suivant. Ce modèle ne dispose pas de bouton marche/arrêt à l'arrière. https://www.amazon.fr/gp/product/B073VR5PY9/ref=ppx_yo_dt_b_asin_image_o09_s00?ie=UTF8&psc=1 La base a été imprimé en PETG et le reste en PLA ( 15% d'infill et 4 couches top and bottom) J'ai utilisé les feuilles mirroirs autocollantes suivantes : https://www.amazon.fr/gp/product/B07QPCJJL7/ref=ppx_yo_dt_b_asin_image_o02_s00?ie=UTF8&psc=1 Instructions : 1- Retirer les ampoules de la lampe à UV 2- Démonter la lampe à UV et garder toutes les vis de cotés (elles seront réutilisé lors du montage). Certains fils doivent être désoudés lors du démontage 3- Décoller les feuilles mirroir de l'intérieur du la lampe à UV. En utilisant un bon cutter et le Cutting Template inseré dans les emplacements d'ampoule, découper les 4 culots d'ampoule. La forme rectangle sert à verouiller ces cullots dans la base de la boite a UV (Base plate) 4- Fixer la carte electronique dans la base en utilisant 2 petites vis et refaire les soudures désoudées lors du démontage 5- Inserer les 4 culots d'ampoulle dans les emplacements (voir photo) et vérifier que les cables ne sont pas pincés 6- Coller les feuilles autocollantes mirroir sur la plaque de base (base plate) et avec un petit cutter (type xacto) redécouper les trous de passage des ampoules 7- Couper et coller les feuilles autocollantes dans le couvercles. Garder 3 à 5 mm sans mirroir en bas du couvercle pour assurer la fermeture sur la base (voir photo) 8- Utiliser 4 vis longues pour fixer la plaque de base (base plate) sur la base (trou a coté de chaque ampoulle). Attention, serrer ces vis très doucement, cette partie du design est fragile Si le design vous a plus merci de me laisser un pourboire :)
With this file you will be able to print UV Cure Box with your 3D printer. Click on the button and save the file on your computer to work, edit or customize your design. You can also find more 3D designs for printers on UV Cure Box.