v1.4 Anycubic i3 Mega X Tensioner
thingiverse
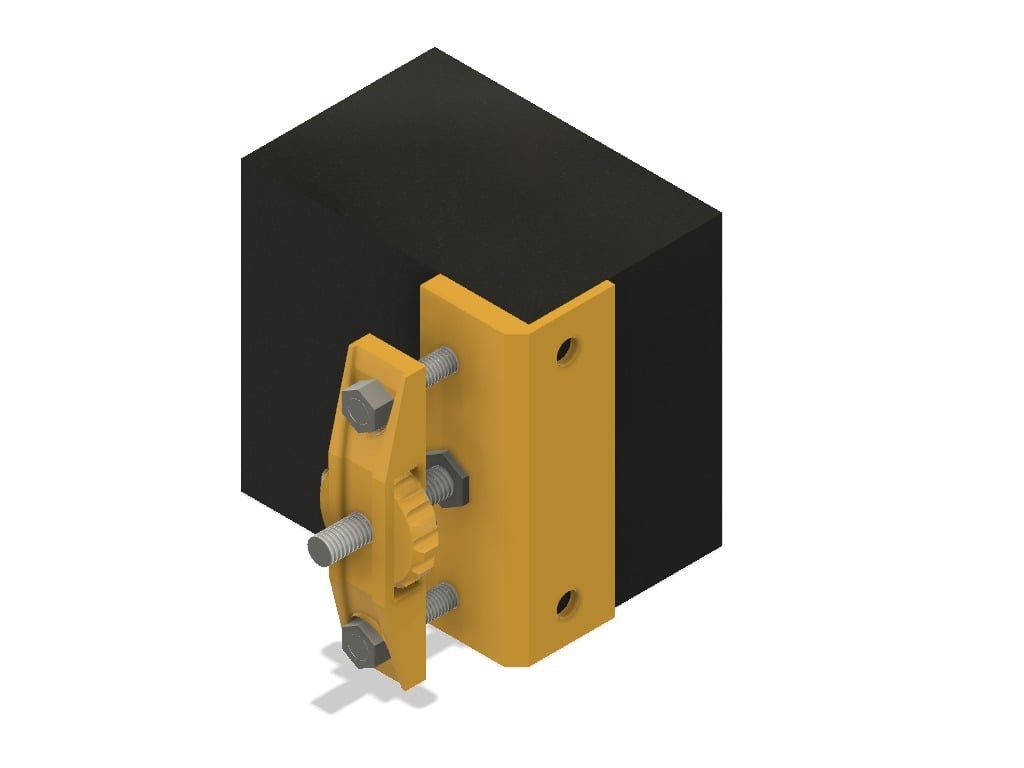
UPDATE 5: If the performance of this part doesn't satisfy you, have a look at the second, stronger and stiffer 2.0 version of this design. You'll find it right here https://www.thingiverse.com/thing:3336226 UPDATE 4: After installing a titan extruder on my i3 Mega (https://bit.ly/2EqSIBV), the wheel of the tensioner was too close to the extruder and no longer accessible. I have added a spacer that adds a little bit of distance in between the tensioner wheel and the extruder. To use it you need an additional washer (no more than 7.5 mm diameter), one M5x15 bolt and two M4x20 bolts. UPDATE 3: Today I installed the mod and it is functioning great! During installation I spotted a few problems and updated the designs accordingly. Unless your printer is put together completely different from mine this should work out without problems. Please note the installation tips and how-to further down in the description. UPDATE 2: Wheel and Main Body were of course missing a hole in the middle. Silly me. UPDATE 1: Already improved the looks a bit. That first version of the main body was just an eye sore. I couldn't let that stand. Also added a flap to the guiderail which now gets screwed into place by the extruder. A test print of the guiderail makes me confident that this entire contraption is measured correctly and fits well. This tensioner fixes the weak spots of my previous remix of mdmiko's part and is a complete redesign. This tensioner does not require a hole to be drilled into the enclosure, it does not require the belt to be shortened, and it does not require a disassembly of the pulley enclosure. As long as you manage to loosen the screw holding the pulley in place using the Miniature Allen Key through the opening of the pulley enclosure, this tensioner can be assembled as is. At the same time it straightens the path of the x-belt. Additionally you need: 2 M5x40 hex bolts 1 M6x20 hex bolt 4 M5 nuts 1 M6 nut The original M5 bolt and nut of the pulley are reusable Miniature Allen Key HOW-TO: - Print the keys - Get a loose M5 bolt from somewhere - Heat up bolt's head with a lighter - Press one of the two allen keys into bolt, let cool down and remove again - repeat with second key - Unscrew the M5 pulley bolt from underneath and the side with the modified allen key, use second key to navigate it within the enclosure - Switch allen keys with every turn Things you can do to make installation easier for yourself: 1) Unscrew the extruder and stepper motor right away. 2) Loosen the two bolts holding the upper rod of the X-axis and slide the rod about 2 cm towards the X-axis stepper motor. Slide back when installation is done. Lastly I would like to address why I designed this when there are already so many belt tensioner mods out there. Previously, I have been using the springs from laundry hanger clips to tense the belt. They are light and small. Even this small weight was enough however, to violently vibrate up and down at many moments during printing. It is generally not the best idea to introduce unsupported, moving weight to the system, no matter how small, that is carried only by the belt, which is supposed to accurately position your hotend. Improving one part of your system by worsening another doesn't sound like a great solution to me. So it had to be a system that addresses the root of the problem, the pulley distance. Although drilling into parts of your printer isn't something that sounds too appealing to me, most other designs require you to do just that. At the same time, they also require you to shorten the belt, because they take up too much space in the pulley enclosure to pull the pulley beyond it's point of origin, where it is mounted at the start. But why would you go through the trouble of installing a tensioner, when you have to shorten the belt anyhow to mount it? This is finally where this design comes in. No drilling, no belt shortening, no moving weights. Now I hope it works out for you as well as for me. Enjoy! P.S.: If you like this design and it maybe solved some of your problems, please consider leaving a small tip :)
With this file you will be able to print v1.4 Anycubic i3 Mega X Tensioner with your 3D printer. Click on the button and save the file on your computer to work, edit or customize your design. You can also find more 3D designs for printers on v1.4 Anycubic i3 Mega X Tensioner.