Vacuum Cleaner Turbine with 608 (Skateboard) Bearing
thingiverse
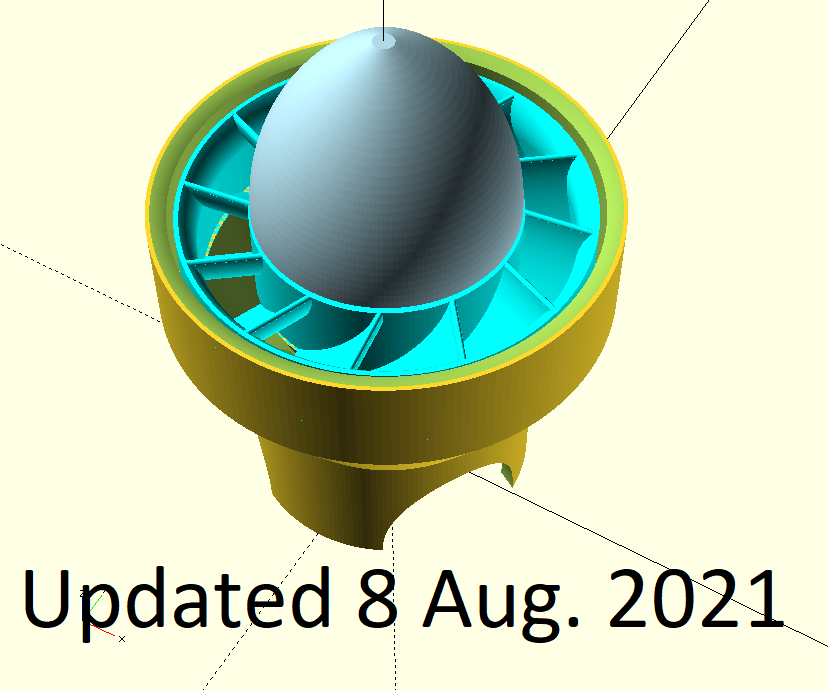
This is a relatively easy to print single stage turbine to be driven by your vacuum cleaner. It uses a single 608 skateboard bearing (22 mm outer diameter, 8 mm axle diameter, 7 mm height). I was inspired by RichMac's ingenious turbine https://www.thingiverse.com/thing:76369 but wanted to print something more basic. In contrast to RichMac's quite useful design my turbine is just a toy to demonstrate how to turn vacuum into high-pitched noise and frenetic circular motion. RichMac would probably say it's a "hand-held rotor". His turbine uses the miniature 696 bearings which may be more effective than the 608 due to smaller friction radius, but I had only the 608 bearings at hand and just wanted to flirt with physics. So descend to your basement, fetch that old skateboard and canibalize it for a 608 ! ==================================================================== Update 27 July 2021: While testing the turbine connected to a powerful industrial vacuum cleaner the cleaner simply sucked the turbine from the bearing, instantly stoping the turbine. No further damage occurred, but this incident lead me to the insight that the bearing stop on the turbine is on the wrong side. This is now fixed in the files. I added a nose cone to smoothen the airflow at the inlet. For the same reason the end of the exit cone is now much narrower, which requires a shorter screw (M8 x 25 with Allen / hexagonal Imbus head). ==================================================================== Update 28 July 2021: I uploaded an additional version of the turbine ("210728_Turbine_2.stl", but without updating the .scad file) with a more aggressive blade angle, possibly leading to higher RPMs. During one of my test runs without nose cone, when switching the vacuum cleaner off, the turbine decided to become a helicopter, broke loose and flew "over the nest". No damage occured to the turbine or anything else. During another test I used a lightly greased 608 ceramic bearing. While the turbine was running at very high RPMs I noticed red flashes inside the transparent enclosure. After disassembly the color of the ceramic balls appeared to have changed from white to gray, possibly due the grease having become very hot. ==================================================================== Update 29 July 2020: Suggested solution for the "helicopter problem": Clean the bearing's exteriors from grease and soak the turbine's bearing contact surface with acetone before inserting the bearing into the turbine. Acetone will not easily dissolve PLA but seems to etch PLA's surface to some degree, holding the bearing. Acetone may not glue the bearing to the turbine so far as you cannot remove it at a later time. I should design a bearing extraction tool (counterpart to the assembly tool) to avoid damaging the bearing race during extraction. ==================================================================== Update 8 August 2021: The "helicopter problem" (the turbine slipping off the bearing when the vacuum cleaner is turned off) is now finally solved with a bearingholder. The turbine blades are now (empirically) profiled and angled at 45 degrees which should result in nice RPMs. The enclosure now has three openings at the base allowing you to vary the RPMs a bit by varying the insertion depth of the enclosure into your vacuum cleaner's hose. In addition to the existing bearing insertion assembly tool there are now three new disassembly tools to remove (a) the bearing + bearingholder subassembly from the turbine and (b) the bearing from the bearingholder without damaging the bearing's ball race. In the OpenSCAD source there is now a "gaugingoption" adding an annex to the enclosure allowing the insertion of a 5 mm IR-LED and a 5 mm photodiode or phototransistor to measure RPMs. You will have to develop the electronic circuitry yourself. ==================================================================== Caution: - This is a toy for risk-aware grown-ups, not for childern. - This turbine is able to reach very high RPMs (tens of thousands per minute). The turbine or the ball bearing may burst. The enclosure may not be able to contain the debris. - The bearing may get hot after prolonged running. This may exceed the thermal limits of your printing material (e.g. PLA), leading to mechanical failure of the turbine at high RPM. Limit the runs to a few seconds. - Wear safety glasses and gloves while operating. - The operator of this turbine (i.e. you) is responsible for the safety of bystanders. - Don't render this turbine to somebody else without making him / her aware of all of the above. You will need - One M8 x 25 screw with Allen (hexagonal Imbus) head - Some adhesive tape, e.g. masking tape - One 608 ball bearing. For my first experiments I used ABEC-1, i.e. the cheapest quality. - The turbine wheel, the bearingholder, the enclosure, the nosecone and the assembly tool printed on your 3D printer (turbine printed at 0.15 mm layer height) - Optionally the three disassembly tools printed on your 3D printer Use the assembly tool (a) to press-fit the bearing into the bearingholder and then (b) the bearing + bearingholder subassembly into the turbine. The tool allows you to excert pressure (e.g. in a bench vise) exclusively to the bearing's outer ring, protecting the precision parts of the bearing from damage. Proceed as follows if your vacuum cleaner link-up does not match the supplied 30 mm enclosure diameter: - Download and install OpenSCAD from openscad.org. - Launch OpenSCAD. - Open the enclosed .scad source file (File/Open) - Adapt the "r_adapter_outer" (outer radius of the enclosure, default 30mm / 2 = 15 mm) at the beginning of the file according to your measurements on your vacuum cleaner. - Export the result as a .stl file (Desing/Render, then File/Export/Export .stl). - Slice (turbine at 0.15 layer height, rest at 0.30 mm or less) and print. Assembly notes: - Degrease the exterior of the ball bearing with alcohol but don't soak the innards of the bearing with the cleaning fluid. - Insert the bearing into the bearingholder using the assembly tool. It should be a thight fit. - Insert the bearingholder + bearing subassembly into the turbine using the same assembly tool. It should be a very tight fit. - Wind ca. 1.25 turns of a 7 mm wide piece of masking tape around the top threads of the screw for a slack-free fit of the screw into the bearing. Otherwise there will be strong and possibly devastating vibrations during operation. - Press the masking tape into the screw threads to facilitate the insertion of the screw. Insert the so prepared screw into the bearing. It should be a tight fit. - Turn the screw + bearing + bearingholder + turbine assembly into the central bore of the enclosure using a 6 mm Allen (hexagonal Imbus) key. An M8 x 1.25 threadcutter is not necessarily required: On the first insertion the screw will cut an insinuation of a thread into the bore who's diameter is only slightly smaller than 8 mm. Caution: Overtightening the screw with the Allen key will destroy this somewhat fragile form of a thread. - Press-fit the nose cone onto the screw head. Leave a gap of at least 0.5 mm between the nose cone and the turbine. That's all. Have fun but be careful.
With this file you will be able to print Vacuum Cleaner Turbine with 608 (Skateboard) Bearing with your 3D printer. Click on the button and save the file on your computer to work, edit or customize your design. You can also find more 3D designs for printers on Vacuum Cleaner Turbine with 608 (Skateboard) Bearing.