Vacuum Forming Box
thingiverse
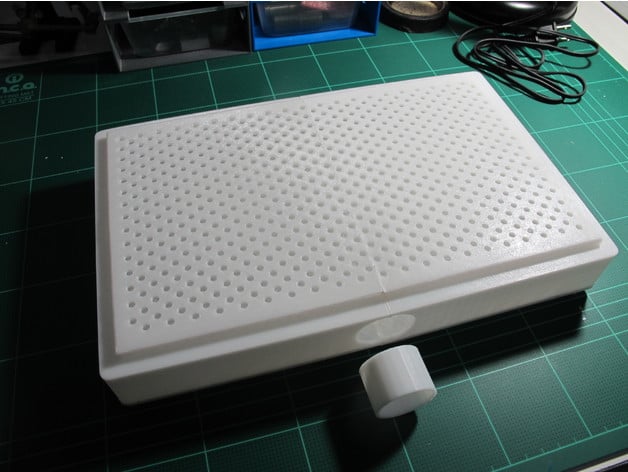
UPDATES We've found that the 3D printed platform can't handle the heat. What we did was use a piece of MDF board cut to the same size, used the 3D printed platform to mark off holes on the MDF, used a drill press to drill out the MDF, hot glued the MDF platform in place onto the box, and have been using that ever since. It works just as well in terms of creating suction, but with no problems handling heat. We've also learned that it is better to make 3D printed molds for clay or plaster to then be used on the vacuum forming box. 3D printed pieces also melt under the heat, even if it's just for a few seconds. Introduction This is a 300 x 190 mm vacuum forming box. Included is the SketchUp file so you can resize parts as needed as well as take a look at how it all fits together. Also included is a joint you can use to create a heat box. If you're using a heat gun, the gun alone will not evenly heat up your plastic. With a heat box, you can heat up your plastic faster and more evenly. Printing & Assembly We printed the main sections in halves and friction welded them together. We also added feet that you can add hot glue to in order to give it some grip on the table. There's also braces inside the box to give the table extra support. The box section with the vacuum port is included in two files. The box bottom and the bed top are single files that you must print twice each. You must also print the support twice and place them so it divides the box's interior into thirds. For the heat box, we used foil tape on art store 5mm thick MDF board, 22mm PVC pipes, and the 3D printed joints included in this project. The PVC pipes were hot glued into place. 3mm bolts were used to connect the boards and the joints (holes were drilled in the MDF board). Use We have already tested it and it works great with our Panasonic 1600 W - 410 W vacuum cleaner. Heat was provided by a 2000 W Stanley heat gun. We're using HDPE sheets made from milk containers. Vacuum forming takes practice and patience to master. Do some reading before you dive into it. Making your own hobby rig is so easy, with or without 3D printing, you should definitely try it before purchasing a larger, more complex system. Print Settings Printer: ExtraBot 3020 Rafts: No Supports: Yes Resolution: low Infill: 30-100% Notes: Supports are needed for the box sections with the vacuum port to prevent drooping. All other parts can be printed without supports. Extensive friction welding is required to seal the box, add the feet to the bottom, as well as the supports inside. You could probably glue it, but we prefer friction welding. For more information, please see this Hackaday article: http://hackaday.com/2014/12/30/3d-printing-technique-friction-welding/
With this file you will be able to print Vacuum Forming Box with your 3D printer. Click on the button and save the file on your computer to work, edit or customize your design. You can also find more 3D designs for printers on Vacuum Forming Box.