Variable Grip Robotic Hand
thingiverse
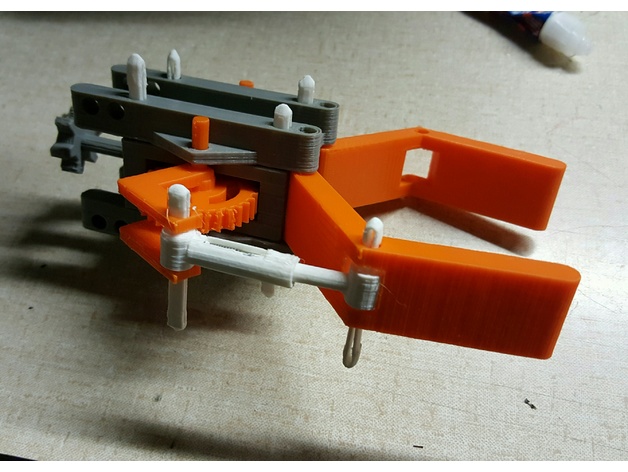
As a result of this activity, students should develop an understanding of design concepts, teamwork needed in the design process, impact of technology in manufacturing, and explore design, construction, teamwork, and mechanical movement. This Hand can be used with LEGO Mindstorms robot and is compatible with LEGO Technics pieces. Print Settings Printer Brand: MakerBot Printer: MakerBot Replicator Rafts: Yes Supports: Yes Resolution: Standard Infill: 10% How I Designed This The 3D printed parts were designed in Tinkercad. Standards CCSS Overview and Background Build A Robotic Hand Participating teams of three or four students are provided with a bag of printed robotic hand parts, pins, and springs. Each team must use the given materials to build a working robotic hand that can pick up a small container such as an empty pill bottle. Teams of students must agree on the proper construction of the hand and identify what materials will be used. Students will draw a sketch of proper parts placement prior to construction. Resulting robotic hands will then be tested and checked for range of motion and successful completion of the given task. Special note should be made of the pistons and springs as this is the component that gives this "Hand" its variable grip. Unlike many other designs, this is not an "All or Nothing" approach to grabbing an object and maintaining a grip. This design gives some leeway as to the grip pressure and the movement range where an object can still be successfully secured and carried. Through this lesson, students will learn design concepts, teamwork, problem-solving techniques, and about simple machines. Lesson Plan and Activity Instruct students to examine the materials provided and work as a team to build a robotic hand out of the given materials. Provide students with the following parameters: The robotic hand must be able to pick up and hold an empty pill bottle. Teams of students must agree on the proper design for the robotic hand and identify what materials will be used. Students should draw a sketch of proper parts placement prior to construction. You should explain that teamwork, trial, and error are part of the construction process. Questions for Students Did you use all the materials provided to you? Why, or why not? Which item was most critical to the robotic hand design? How did working as a team help in the process? Were there any drawbacks to working as a team relating to construction? Name three industries that could make use of a robotic hand like this? Materials Needed To prepare for this lesson, you will need the following supplies: Various printed appendage pieces A few dozen connector pins Small springs such as those found on ballpoint pens Duration of Lesson 2 - 60 minute periods Rubric and Assessment These reflective questions will help assess student understanding: What was one thing you liked about your hand? What is its main weakness? How can you change the attachment point to be compatible with other robots? Are there algebraic and physical principles that can be applied to this activity? How would you modify the design to create a better robotic hand? References TryEngineering (www.tryengineering.org) Design Your Own Robot (www.mos.org/robot/robot.html) FIRST Robotics Competition (www.usfirst.org) ITEA Standards for Technological Literacy: Content for the Study of Technology (www.iteaconnect.org/TAA) NSTA National Science Education Standards (www.nsta.org/publications/nses.aspx) NCTM Principles and Standards for School Mathematics (http://standards.nctm.org)
With this file you will be able to print Variable Grip Robotic Hand with your 3D printer. Click on the button and save the file on your computer to work, edit or customize your design. You can also find more 3D designs for printers on Variable Grip Robotic Hand.