Velleman Vertex K8400 Front Hatch
thingiverse
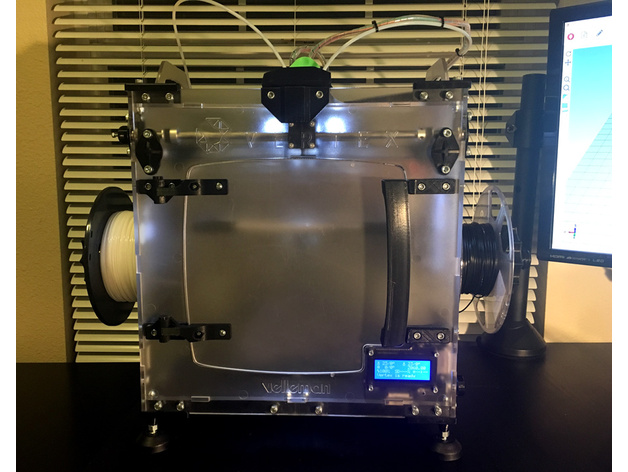
This is a front hatch for Velleman Vertex K8400 printer. Not sure if it adds any value in terms of noise reduction, or dust protection, but I had a piece of 4mm acrylic and, after discovering Tomas Kruger's hatch published here, I decided to use it and make my own hatch. Unlike Tomas' design, mine does not require drilling additional holes in printer's front panel, i.e. you can remove it at any time without a trace. Another difference is - I use 2 pairs of magnets instead of a single pair, which should hold the hatch in closed position better. List of materials: 274mm x 250mm x 4mm sheet of acrylic (preferably transparent) Six M5x12mm machine screws Four self-locking M5 nuts Four cylindrical magnets with 8mm diameter and 2mm height Print Settings Printer: VERTEX K8400 with E3D print-heads Rafts: No Supports: No Resolution: 0.2mm Infill: 15% Notes: Use 96% infill and brim when printing pins. Handle thing needs touch-bed support. Post-Printing The hardest part of this project is filing down the shape of the hatch, which should have even 1 mm gap from each side when placed inside the opening. Start with cutting acrylic into rectangular piece 274mm by 250mm. Apply painter's masking (blue) tape to the areas where you need to drill. Measure and mark on the masking tape the centers of all 11 holes. Drill 10 of them with 5.5mm diameter drill bit. The last, 11th hole should have 6.5mm diameter. See the drawing for hole locations and the measurements. Move the print bed to the very bottom to get access to the front opening from inside the printer. Remove 4 screws from the positions marked with white arrows on the drawing. Place acrylic piece at the front of the printer and make sure outside 4 holes are aligned with the holes of the screws you just removed. The head of LCD's upper left mounting screw should appear in the center of 6.5mm hole. If all the holes are in correct positions, remove the hatch and apply masking tape along its edges from inside. Place the hatch back and mount it to the front panel with four M5 screws and self-locking nuts. You may need to use the longer screws for this purpose. Use sharp pencil, or a pen and mark from inside the printer the edge of the opening on the masking tape. Don't use markers, especially the permanent ones, as you end up painting the edge of the opening. Remove the hatch and cut it along the marking with jig saw. Using file and sanding paper smooth the edges of the hatch. Mount all the parts as shown on the image. Slide 4 magnets into corresponding openings in handle and holder pieces before mounting them. You may need to glue the magnets if they move inside the openings, otherwise there will make clicking sound. Orientation of the magnets matters, so don't forget to check it before applying a glue. Tomas published a video that contains few other valuable advises of how to work with acrylic. To watch it follow the link in the section above.
With this file you will be able to print Velleman Vertex K8400 Front Hatch with your 3D printer. Click on the button and save the file on your computer to work, edit or customize your design. You can also find more 3D designs for printers on Velleman Vertex K8400 Front Hatch.