Versalino Rove 2 Wheel Drive Laser Cut Rover Platform 1.0.8
thingiverse
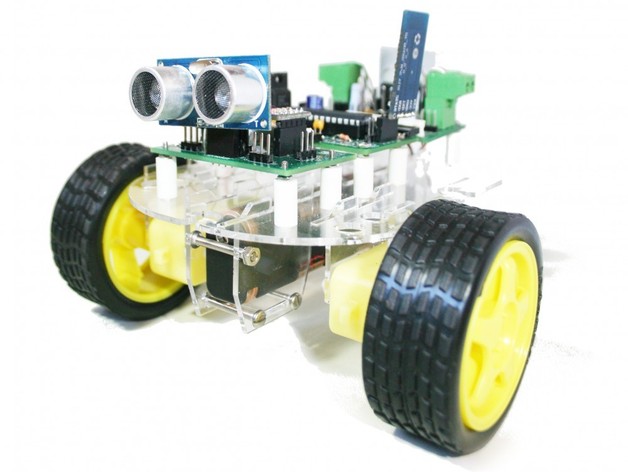
The Versalino Rove 1.0.8 is the culmination of two years of careful planning, and engineering. What we have done is combined almost every single electronic device that we have meticulously selected/designed and developed over the years into a single cohesive Robotics platform. This platform is designed to work with the Versalino Uno and our Yellow Gear-motor & Wheels. The whole body can be laser cut if you have access to a laser cutter, or you can pick up the kit from Virtuabotix.com . Instructions (If you can't laser cut your own don't worry we have pretty much all of the parts you need https://www.virtuabotix.com/?page_id=2905) Heres a video of me putting one together:http://www.youtube.com/watch?feature=player_embedded&v=cTFq_QYP4zc Parts you will need to get the minimum build working: Acrylic or other 2mm thick laser cuttable material. 7 x 20 mm long 2mm bolts and 14 2mm nuts 7 x 2mm board risers 10 x 25mm long 3mm bolts and 10 3mm nuts 1 x Versalino Uno (https://www.virtuabotix.com/?page_id=3117&productid=0609224531828) 1 x Versalino MotorMaster(https://www.virtuabotix.com/?page_id=3117&productid=0609224531873) 2 x Yellow Gearmotors and Wheels this version is designed specifically for these (https://www.virtuabotix.com/?page_id=3117&productid=0609224532009) 2 x small ball wheels 4 wires 3 inches or so should be plenty. Start putting it all together! 1.) Laser cut the design file out of Acrylic or any other material that you fancy (we recommend 2mm thickness). 2.) Assemble the Main Chasis. The board was designed so it doesn't matter what orientation you have it at, but once you pick one stick with it. I would hold the Versalino Uno and MotorMaster over the chasis to make it easier to put the 2mm bolts in the right spot. Put the risers and one of the 2mm nuts on top to keep each one in place (don't bother mounting the boards yet). 3.) Attach Gearmotors (I recommend soldering wires on before you do this even though its not what I did in the video). All of the mounts are designed with a locking system I came up with so you should put the cutouts in their slots first before using two 3mm bolts (a piece) to secure the motors in place. 4.) Add the front ball wheel assembly. First put the two ball wheels into the cutouts (be careful its a tight fit!) Then lock the front assembly the same way you did with the Gearmotor assembly and put the three 3mm bolts in. 5.)(optional) if you are going to use a AA battery pack put the rear holder on the same way you did the ball wheel assemble (but it doesn't have wheels and it is shorter). 6.) Attach wheels, and mount Versalino Uno and MotorMaster, and then connect the motors to the MotorMaster. 7.) Connect up the wires, and load the Arduino Sketch to get up and rolling in no time (get the sketch and the control application https://www.virtuabotix.com/?page_id=3117&productid=versalino_rove_basic).
With this file you will be able to print Versalino Rove 2 Wheel Drive Laser Cut Rover Platform 1.0.8 with your 3D printer. Click on the button and save the file on your computer to work, edit or customize your design. You can also find more 3D designs for printers on Versalino Rove 2 Wheel Drive Laser Cut Rover Platform 1.0.8.