Vertical Adjustable Opto Z Endstop Holder
thingiverse
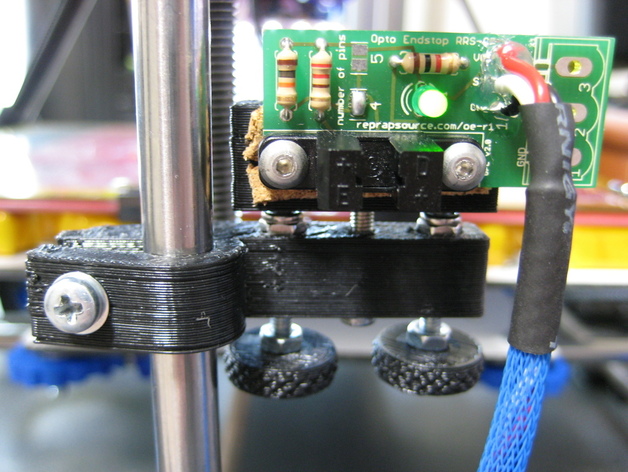
I found it difficult to adjust my z-axis endstop precisely (fractions of a mm) once it was close. I could only find one other adjustable endstop for opto switches, however it mounted the switch horizontally, which wouldn't work with my printer, so I've modified it to mount vertically instead. I've also made it a bit more stable than the original design and it's very parametric. This is a derivative of: http://www.thingiverse.com/thing:15448 It also uses the awesome knurled surface library: http://www.thingiverse.com/thing:9095 The library is embedded into the .scad file so you won't need to download it separately. Instructions 1) Print 1x endstop arm, 1x opto block, and 2x thumbscrews. 2) Clean the holes out so the screws barely fit. This is important! The more the screws wobble in their holes, the more the entire opto switch will wobble. They will move just a bit in the holes, but once assembled it should stiffen up significantly. 3) Put a M3x25 hex bolt through each of the thumbscrews, then screw a nut down to keep the thumbscrew on the head of the bolt (I would also add a drop of threadlock to keep the nut on, nylocks are a bit too tall to use here). 4) Put a M3 nylock into the top 2 nut traps on the endstop arm. Screw the thumbscrews in, from the bottom, until the ends of bolts stick out 2mm from the top of the nylocks. 5) Put the spring on the M3x35 hex (or regular head) bolt. Depending on your spring, you might need a washer. Install an M3 nylock on the bottom of the endstop arm (between the thumbscrews) and screw the spring laden bolt through the both the opto block and arm and into the nylock, making sure the tips of the thumbscrew bolts go into the guide holes on the bottom of the opto block. 6) Turn the thumbscrews until they start to lift the opto block. 7) Install your opto switch, then install onto your rods. I put a small piece of cork sheeting behind the PCB on mine so it would sit flatter (due to the solder joints on the back). 8) Install your endstop flag. If you haven't made one yet, here's how I made mine. I took some thin plastic sheeting from the hobby store, cut a strip off, heated it, then put a 90° twist in the middle. After it cooled I painted it black (don't paint where you're going to glue it or sand that area afterwards, it won't hold for long if it's painted) then hot glued it the x-end-motor. 9) ??? 10) Profit!
With this file you will be able to print Vertical Adjustable Opto Z Endstop Holder with your 3D printer. Click on the button and save the file on your computer to work, edit or customize your design. You can also find more 3D designs for printers on Vertical Adjustable Opto Z Endstop Holder.