Vertical box for SKR 1.4 board & Raspberry Pi
prusaprinters
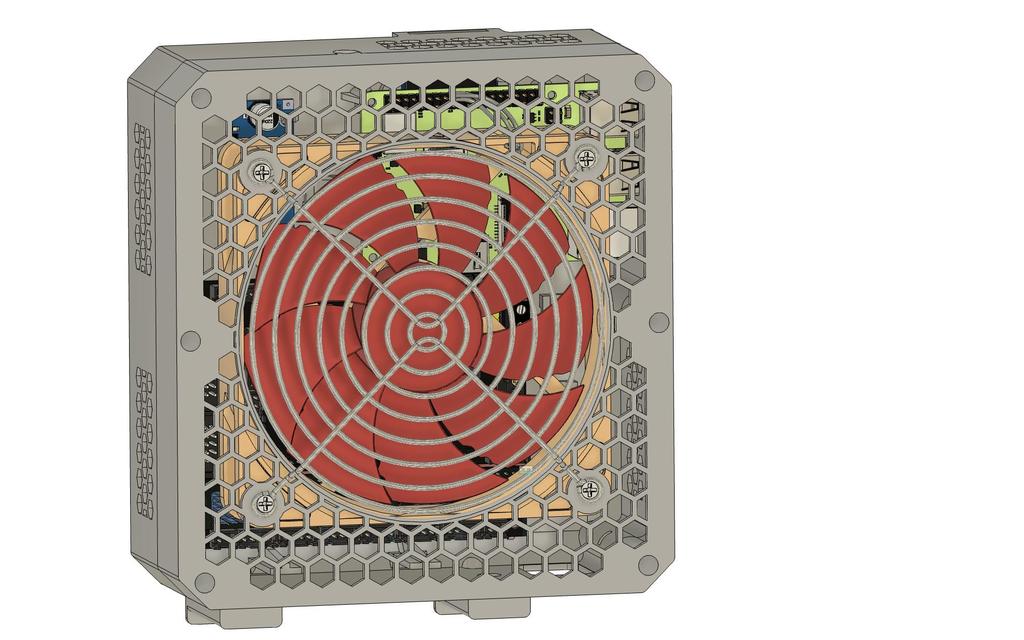
<p>*<strong>Rev 02 @ 13.2.2021: I fixed faults and little bit modified cable holders inside of the box. Covers remains as were.</strong>*</p> <p>Box for SKR 1.4 (Pro) logic board + Raspberry Pi + slim microSD to SD adapter + 5VDC step down buck converter for Raspberry + 3x step down buck converters for fans. All in one box, cooled by 120 or 80 mm fan.</p> <p>I wanted to put all electronics in to one box and cooled by one quiet fan. I also wanted to have easy access inside the box. In this case is necessary to extend horizontal profile 4040, because part of the box is over the original aluminum profile.</p> <h3>WARNING: I have this electronic box on the RIGHT side of the printer (where the power supply is originally placed). For placing on the left side please look at the .STL files that have "left" word in the names. The design is little bit changed.</h3> <p>The profile extender is prepared for my printer's tolerances so you may need to use the right tool (really biiig hammer :-)).</p> <p>Electric connection between logic board and Raspberry is made by three internal wires (GPIO14, GPIO15 and GND) connected to proper pins on the SKR board. External USB cable isn't necessary.</p> <p>STEP and F3D files are included for all parts.</p> <p>*<strong>Rev 01 @ 27.1.2021</strong>*</p> <p>I added small box for Step down buck converter which is mentioned below. Connector is JST XH 2 pin.</p> <p><strong>Box is prepared for following hw:</strong></p> <blockquote> <ul> <li>Logic board SKR 1.4/Pro or compatible.</li> <li>Raspberry Pi 3B+ or compatible (not for Pi 4).</li> <li>5V Step down buck converter for Raspberry Pi</li> </ul> <p><a href="https://www.ebay.com/itm/3-40V-3A-Step-Down-DC-to-DC-Voltage-Regulator-Module-Inverter-Power-Supply/283572698875?hash=item42063ffefb:g:RjYAAOSw46Fb2~Oy">https://www.ebay.com/itm/3-40V-3A-Step-Down-DC-to-DC-Voltage-Regulator-Module-Inverter-Power-Supply/283572698875?hash=item42063ffefb:g:RjYAAOSw46Fb2~Oy</a></p> <p>or <a href="https://www.gme.cz/napajeci-modul-3-40v-3a-step-down">https://www.gme.cz/napajeci-modul-3-40v-3a-step-down</a></p> <ul> <li>SD card Female to TF micro SD Male</li> </ul> <p><a href="https://www.aliexpress.com/item/4001203159338.html?spm=a2g0s.9042311.0.0.4bcd4c4dTuGgYx">https://www.aliexpress.com/item/4001203159338.html?spm=a2g0s.9042311.0.0.4bcd4c4dTuGgYx</a></p> <ul> <li>Up to three pcs of Step Down Buck Converters for fans.</li> </ul> <p><a href="https://www.ebay.com/itm/XL1509-Spannungsregler-2A-DC-DC-in-4-5-40V-out-1-27-37V-Step-Down-Buck-Converter/282268640167?ssPageName=STRK%3AMEBIDX%3AIT&_trksid=p2057872.m2749.l2649">https://www.ebay.com/itm/XL1509-Spannungsregler-2A-DC-DC-in-4-5-40V-out-1-27-37V-Step-Down-Buck-Converter/282268640167?ssPageName=STRK%3AMEBIDX%3AIT&_trksid=p2057872.m2749.l2649</a></p> <p>or <a href="https://www.gme.cz/step-down-napajeci-modul-1-17v-2a-miniaturni">https://www.gme.cz/step-down-napajeci-modul-1-17v-2a-miniaturni</a></p> <ul> <li>Fan 80x80 or 120x120 (80x80 for "guardless" version only)</li> </ul> </blockquote> <p>Maybe will be necessary to replace original ribbon cable between board and LCD to the new one - longer.</p> <blockquote> <ul> <li>2pcs PFL10 connector for ribbon cable (cable between logic board and LCD)</li> </ul> <p><a href="https://www.gme.cz/konektor-pfl10">https://www.gme.cz/konektor-pfl10</a></p> <ul> <li>Ribbon cable, 10 wires AWG28 FBK10H</li> </ul> <p><a href="https://www.gme.cz/fbk10h">https://www.gme.cz/fbk10h</a></p> </blockquote> <h3>Screws / nuts:</h3> <p>Logic board: 4pcs M3x4 ISO7380, you could use screws from original box.</p> <p>Raspberry: 3pcs M2,5x6 ISO7380/DIN912. Could be used longer.</p> <p>Cover: 6pcs M3x12 (up to 25) DIN912 with or without nuts. Both variants are possible. If you prefer nuts, you have to use longer screws (ca 20 or 25 mm).</p> <p>Box: 4pcs M4x10 DIN912 + T-nuts.</p> <p>5V Step down converter: 2pcs M3x4 ISO7380.</p> <p>You can use for fixation of the MicroSD extender either attached SDclip or heat both pins and "melt" them on the position.</p> <h3>Note:</h3> <p>For better print quality all screws holes in the Cover (and also above the nuts holes in the main body) are covered by thin layer (0,24mm). For better understanding please look at Cover in your slicer (level +24 mm). Just use drill or proper screw driver to cut it off.</p> <h3>Print Settings</h3> <p><strong>Printer Brand:</strong></p> <p>Creality</p> <p><strong>Printer:</strong></p> <p>Ender 3 Pro</p> <p><strong>Rafts:</strong></p> <p>No</p> <p><strong>Supports:</strong></p> <p>No</p> <p><strong>Resolution:</strong></p> <p>0.2-0,24</p> <p><strong>Infill:</strong></p> <p>15-20%</p> <p><strong>Filament:</strong> Prusament PETG</p> <p>Up to you</p> <p><strong>Notes:</strong></p> <p>Why I proposed so big fan? I use Noctua NF-S12A ULN at 6-7V. It's inaudible and it still has enough flow.</p> Category: 3D Printer Parts
With this file you will be able to print Vertical box for SKR 1.4 board & Raspberry Pi with your 3D printer. Click on the button and save the file on your computer to work, edit or customize your design. You can also find more 3D designs for printers on Vertical box for SKR 1.4 board & Raspberry Pi.