Vertical Filastruder Hopper Shaker
thingiverse
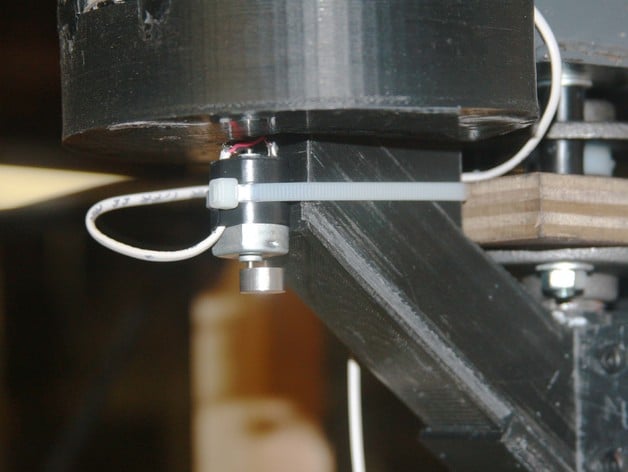
I prefer extruding filament with the Filastruder mounted vertically. This way it can be left permanently mounted on a wall taking up essentially zero floor space. This configuration however is more prone to pellet feed problems because the hopper feeds in from the side. To eliminate any pellet holdup or jams I fitted a vibrating motor to the hopper that shakes the feed hopper at regular intervals. It seems to work quite well and kept the hopper feed tube properly filled during a five hour 1.75 mm filament run at 30 inches a minute. I fitted the shaker to Ian Johnson’s excellent Vertical Filastruder Hopper found here on Thingiverse. Alternatively, I think it can easily be fitted to any vertical hopper of your choice. Instructions I soldered a length of 2-conductor #22 stranded wire to the vibration motor and then taped it to the body of the motor with vinyl electrical tape. This provides strain relief to the motor terminal solder connections. The motor is fastened to the hopper using a 12 inch cable tie as in the photos. I built the circuit from the kit and it took less than an hour to solder in the components. Instead of soldering the LED to the PCB I soldered two extension wires to it so that it could be glued into the hole in the front control panel. After printing I needed to drill out the holes in the enclosure base with a 5/64 inch diameter drill bit to properly accommodate the #4 screws. The PCB is fastened to the printed enclosure base with the #4 sheet metal screws with the printed standoff washers between the PCB and the base. The electronics enclosure top is fastened to the enclosure base also with #4 sheet metal screws The control dial graphic needs to be printed in 8.5 X 11 inch letter format so that it will scale properly. It was cut out and then glued to the enclosure front with rubber contact cement. The vibration motor is connected to the PCB in the manner shown in the circuit diagram photo. I put the ON jumper in the low ( L ) position and the OFF jumper in the high ( H ) position. During the extrusion run the vibration motor was on for 14 seconds and off for 1 ½ minutes. This seemed to be sufficient to keep up with the 30 inch per minute extrusion rate ( 1.75 mm filament ). Parts List: 1- 12V DC Vibration Motor found here on eBay: http://www.ebay.com/itm/231020661488?ssPageName=STRK:MEWAX:IT&_trksid=p3984.m1423.l2649 1 – FK432 Repeat / Cycle Timer Kit (Unassembled) found here on eBay:http://www.ebay.com/itm/140877442473?ssPageName=STRK:MEWAX:IT&_trksid=p3984.m1423.l2649 Assembled timer can be purchased here: http://thaikits.com/index.php/timer-and-counter/fk432-repeat-cycle-timer-1-180-minutes-on-off-relay-12v-10aOnline%20Electronic%20Kit%20Store.html 1 – 12V DC power supply rated at least 2.0 amps. Can be found here on eBay: http://www.ebay.com/itm/141107192898?ssPageName=STRK:MEWNX:IT&_trksid=p3984.m1497.l2649 1 – 12 inch Cable Tie 8 - #4 X 3/8” Sheet Metal Screws Stranded hookup wire #22 gauge
With this file you will be able to print Vertical Filastruder Hopper Shaker with your 3D printer. Click on the button and save the file on your computer to work, edit or customize your design. You can also find more 3D designs for printers on Vertical Filastruder Hopper Shaker.