Vibration absorbing Sorbothane printer feet
prusaprinters
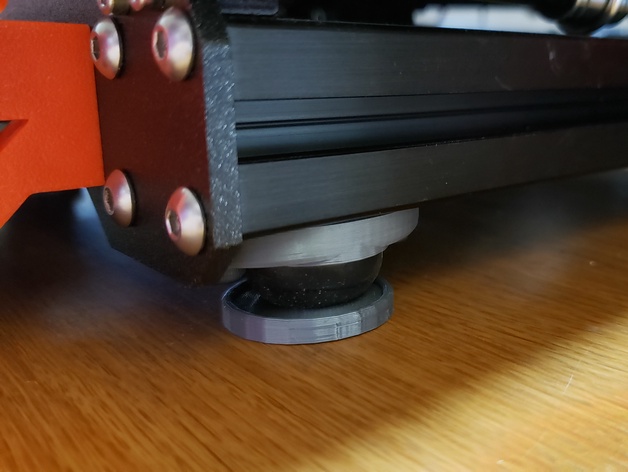
<p>These are effective vibration damper and noise reducer feet for any 3D printer using 3030 extruded aluminum beams as the frame, like the Prusa i3 MK3S.</p><p>This isn't exactly a remix, but it was inspired by <a href="https://www.prusaprinters.org/prints/83918-prusa-mk3s-anti-vibration-noise-sorbothane-feet">Plaidbear's design</a>. My reasons for making my own design:</p><ul><li>I wanted to do something similar that minimized the amount of filament used.</li><li>I wanted more thickness under the screw heads.</li><li>I wanted the foot mounts to fit perfectly under the 3030 beams without sticking out on the sides.</li><li>I didn't want to remove end plates or otherwise disassemble anything on the printer. I had a bunch of 3030 T-nuts that I wanted to use up.</li></ul><p>It was easy to do in Tinkercad. Plaidbear has <a href="https://www.prusaprinters.org/prints/83918-prusa-mk3s-anti-vibration-noise-sorbothane-feet">an excellent technical description</a> of the properties of these feet and why you need six of them, so I won't repeat it here.</p><p>I did observe, however, that while these feet completely absorb the vibrations that the printer would otherwise transmit into my desk, the printer does wobble slightly as the extruder and bed accelerate back and forth. As far as I can tell, this actually helps reduce ringing. If the extruder does a hard acceleration in the positive X direction, it is helped along by the printer giving way a bit in the negative X direction, making for a cleaner acceleration, and the printer's motion is then absorbed and heavily damped by the feet.</p><h3>Print Settings</h3><p><strong>Printer Brand: </strong>Prusa</p><p><strong>Printer: </strong>I3 MK3S</p><p><strong>Resolution: </strong>0.4mm nozzle, 0.2mm layers</p><p><strong>Infill: </strong>20% gyroid</p><p><strong>Filament:</strong> Prusament PLA or PETG</p><p><strong>Notes:</strong></p><p>I printed the foot mounts with 3 perimeters, archimedian chord pattern for the top and bottom layers.</p><p>The movements transmitted into the feet are shear forces. Gyroid infill is as good as solid infill for transmitting these shear forces, so that is what I used to save material.</p><p>With Prusa's powder-coated sheet (which has trouble adhering to PLA), one of the footpad disks lifted off the build surface during the print and ended up warped, so I had to re-print one disk.</p><h3>Post-Printing</h3><h4>Materials</h4><p>When using those half-round roll-in sliding T-nuts, it is best to use a reusable threadlocker compound to force the nuts to turn as you turn the screw, or else you'll get frustrated that the nuts won't rotate.</p><p>Here's what I used:</p><ul><li>12 10mm M5 socket cap hex drive screws (12mm screws would work too)</li><li>12 T-nuts, 3030 M5 thread roll-in<br>If you don't want to buy them, you can try adriansihikawa's <a href="https://www.thingiverse.com/thing:2762571">drop-in M5 T-nut for 3030</a>, which you could modify to insert a regular nut. With a printed t-nut you won't need threadlocker if the hole is nice and snug.</li><li>1 <a href="www.amazon.com/gp/product/B0088YEGXM">Vibra-TITE 213 VC-3 Threadmate Threadlocker</a> -- this is the only re-usable threadlocker that I would recommend. You want something to gum up the threads that cures clean (not sticky) without getting brittle and without coming off easily.</li><li>8-pack (you need only 6) <a href="https://www.isolateit.com/hemispheres/sorbothane-1-hemisphere-0510115-0510116.html">1-inch hemisphere 50-durometer Sorbothane bumpers</a> </li></ul><h4>Installation</h4><h5>Foot preparation:</h5><ol><li>Insert the M5 screws into the printed foot mounts. The holes will be tight. Screw them in all the way so the screw heads sink into the indentations.</li><li>Apply the threadlocker around the circumference of the screws, covering 3 threads or so.</li><li>Let them sit for about 10 minutes.</li><li>Screw a T-nut partway down each screw as shown in the picture above. There should be a gap of about a millimeter between the plastic foot mount and the flat surface of the nut.</li><li>Align the T-nuts so they are inline, to slide into the 3030 aluminum extrusion slot. \</li></ol><h5>Printer preparation:</h5><ol><li>Remove the filament reel from the printer. You don't have to remove the filament from the extruder, just put the reel aside.</li><li>Tilt the printer over to rest on its side with the power supply.</li><li>Remove the original rubber feet.</li></ol><p>Don't put the Sorbothane bumpers on the mounts yet. The bumpers are kind of sticky and if you save them for last, the mounting is easier to handle. Two feet go on each of the long beams, and one foot goes on each short beam.</p><h5>Fasten the foot mounts:</h5><ol><li>Place a foot mount on the beam so the T-nuts slide into the slot.</li><li>Holding the foot, gently turn each screw so that the T-nut rotates.</li><li>Gently tighten. The T-nuts generally over-rotate, so the "nut" side pulled into the slot doesn't get seated in the slot (unless you managed to seat them properly using exactly the right amount of gap when you inserted the nuts). To ensure good seating, turn the screw a little backward (rotating the nut backward) and re-tighten (rotating it forward). You may notice now that you can turn the screw a few more times. This means the nut is seated properly in the 3030 extrusion slot.</li><li>Once seated, loosen the screws slightly to allow you to slide the feet into position. The middle and rear feet should be at the extreme ends of the beams.</li></ol><p>The front feet should have about the same spacing from the middle as the rear feet (although it isn't shown that way in the picture). This should distribute the weight of the printer fairly evenly, and the printer's balance point should be approximately at the middle feet, which is where you want it.</p><h5>Install the feet:</h5><ol><li>Peel the adhesive backing off a sorbothane bumper.</li><li>Holding it about a millimeter from the foot mount, center it on the ring.</li><li>Press the bumper on the foot mount. Repeat for all 6 feet.</li><li>Turn the printer upright.</li><li>Optional: Lift one side of the printer slightly to slide a foot pad (the disks) under each foot. You don't need these pads if your surface won't get stained by the Sorbothane, or if you don't care if it stains.</li></ol><h3>How I Designed This</h3><p>Designed in Tinkercad.</p>
With this file you will be able to print Vibration absorbing Sorbothane printer feet with your 3D printer. Click on the button and save the file on your computer to work, edit or customize your design. You can also find more 3D designs for printers on Vibration absorbing Sorbothane printer feet.