Vibration tumbler - Vibratory tumbler machine frame(needs non-printed parts)
thingiverse
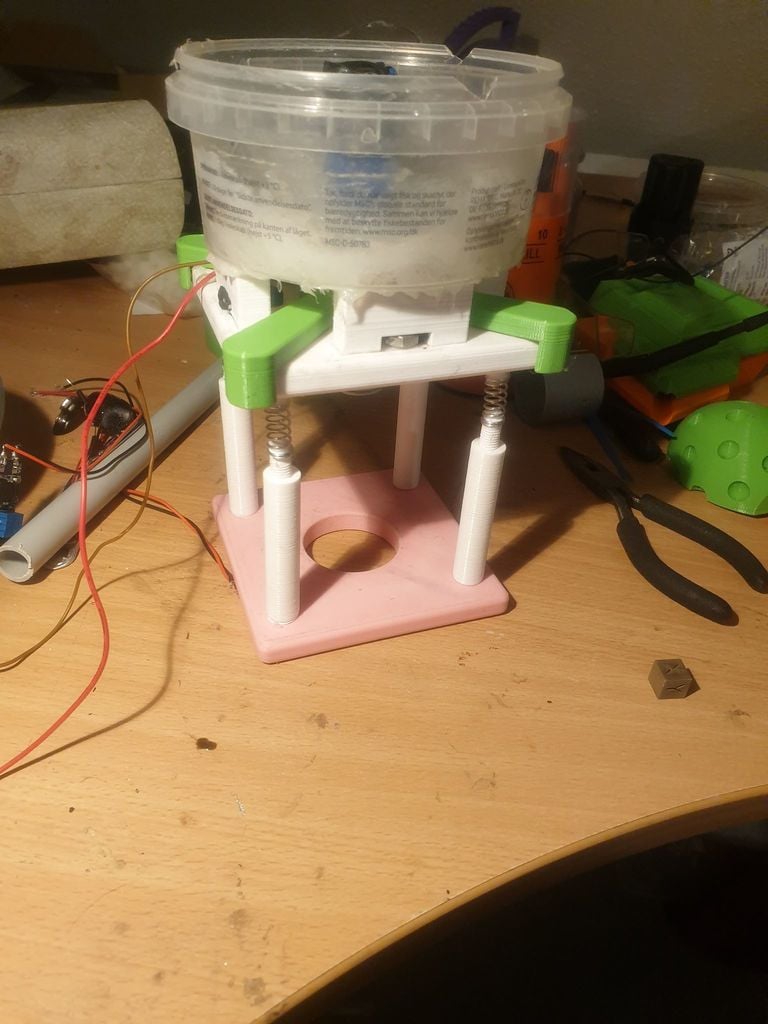
<b>Version 2.5: </b> TL:DR: I added a new claw design motor stop to add more safety in case the motor stop rips itself loose from the vibration Version 2.5 is basically Version 2 with a different motor stop. Depending on the motor you use and how fast it runs, it shakes very violently(kinda the point of a vibratory tumbler ;) ). I upped my voltage to the full 18v my power supply could supply it with, creating a MUCH stronger(and therefore also more effective) vibration, and then I went to the restroom. When I came back, the motor stop had torn itself loose despite glue, the motor had turned around and around, twisting wires around itself, crossing wires and causing a short. Thank God I only lost the motor(and I assume power switch, I discarded that at least). This led to a new kind of motor stop that's more expensive to print(although still not expensive to print) but will actually theoretically keep the motor in place even without glue. It is a cross-shaped claw-like design that the motor goes into and then it grabs on to all 4 corners of the platform, and I tested it with 9v and it kept the motor in place without glue. I still suggest gluing it down, but the claws will act as an extra safety measure. The original ring design is still in here for those who just want to nuclear glue this stuff together and save on filament. <b>Version 2: </b> Version 2 is up pretty fast. V1 worked fine, but in V2 I fixed some of the design issues I had in V1. For instance, the distancers now screw into the bottom so you don't need to glue them - this makes for easier repair in case a distancer(or less likely, the bottom block) breaks, and less glue is less work. The distancer is also 2mm thicker now because it no longer sits in a glue slot, so it is now a bit more sturdy. I also rounded most of the edges. Mostly this is for aesthetic reasons, but the motor stop will now be easier to fit on the motor. The tumbler blocks should also fit into their slots easier now because the slots have been rounded slightly. The tumbler blocks now have a bit more space for the head of the machine bolt. This allows you to hold them with pliers or other tools so you can tighten the nuts more. <br /><br /><br /> <h1>Vibratory tumbler - vibration tumbler</h1> Vibratory tumblers are expensive. Let's be honest about that. Good thing you can build your own with almost no work and close to no electronics skill needed! The sad truth of this Thing is that you need parts that aren't 3D printed. But most of them are pretty cheap or can be scavenged from broken tech that you may have access to. <br /> <b>Components needed </b> - 3D printed parts for the frame. You're here because you want to 3D print this, but you CAN also make a frame out of wood if you have tools and prefer to save your filament - A DC motor I scavenged mine from a busted HP printer. A printer has 2 of them and some other nice goodies that can be scavenged for tech projects. You can also just get a DC motor from any source you can find, just make sure it's powerful enough for the job. The spare DC motors are cheap online if you don't happen to have a broken printer lying around somewhere - A couple of off-balance weights to put on the DC motor The off-balance weight on the spinning axis is what turns the motor into a vibrator. I scavenged mine from a busted PS3 controller which has weak vibration motors you can snag the weights from. The motors themselves are probably too weak for this. The Playstation controllers have had vibration all the way down to the vibrating PS1 controllers, and all of them have weights on the motors. But you can also make weights with basically any heavy thing you can put on the axis to make for unbalanced weight on the axis - 4 compression springs strong enough to keep your tub and motor up without crumbling. I used some spare bed springs from my Ender 3 because they're too weak for the printer, but they're strong enough for this. Any tough compression spring will do as long as it has a little give but is strong. If you don't have spare bed springs, your local hardware store likely has compression springs - A plastic shrimp tin. Any round plastic container that fits will work, so get to eating :D Or buy a food storage container for this. As long as your tub is round to allow for the tumbling medium to swirl around and move - Machine bolts to keep the tin onto the frame and one to put a conic center on. I made my conic center from a nut for my bolt, a plastic syringe and a lot of electrical tape. The cone in the center is important because it makes the medium swirl around in a circular pattern - Something to make the entry holes watertight. I just poured liquid moldmaking silicone in mine, but something as simple as silicone caulk should work if you make sure to get it really sealed. - Some sort of power source. Theoreticaly it can run on a simple 9V battery, but it can't run for long because it swallows the battery quick. What I did was take an old laptop power supply, crimp JST connectors on there and connect it to a buck converter to step the voltage down to around 10v. The amount of vibration you should get depends on the size of your tub I imagine. Start low and work your way up to just before you're afraid your tumbling medium will shoot out over the edges of your tub - A soldering iron and solder, some wire, and if you want to step down voltage, a buck converter. Optional but recommended is JST connectors or similar so you can pull out your power supply and use it for something else too, but you can also just permanently attach the power supply to the tumbler - A glue clamp or some other way to keep the tumbler down on a surface. If you do not fixate it, it will jump off the end of the table quickly - HIGHLY RECOMMENDED, but not totally needed, is a craft foam mat or something else to absorb excess vibration. This quiets the tumbler a TON and also prevents it from shaking the tumbling medium out of the tub. You can also use a bit of craft foam or soldering sponges to put between the tub and the blocks to further dampen the noise. Rubber mats probably work too. Bonus tip: This works with your 3D printer too - craft foam under the legs and you absorb some vibration going out through the bottom - Optional: A toggle switch so you don't have to pull out the plug every time you want to turn the tumbler off. But you can forego this if you don't have one lying around. I also suggest using electrician's tape or, even better, heat shrink tubing, to protect your solder joints to prevent them touching and shorting out or to protect if you spill some water or touch the wire. <br /> <b>Simple instructions in bulletpoints: </b> - Print the frame. All parts can be done at 20% except the threaded rods. They are so small you need to print them tougher. I suggest 100% - Attach the motor stop to your motor. This prevents the motor from simply falling through the motor hole. This is a snug fit, so you may need to use a hammer or mallet to make it go on the motor. You can add a bit of glue if you're afraid the motor will fall out. - Screw the distancers in the slots on the bottom frame part. No need to glue. - Attach the threaded rods and springs to the top block and distancers. This can be a bit tricky - Put bolts in the tumbler tub blocks and glue the blocks on the top frame. I suggest 2-part epoxy or an ultra strong glue that holds very well - Put the motor in the motor hole and arrange the wires. Optionally, tape them down. - Make holes in your tub to fit the 4 bolts and one hole in the middle for the bolt that will hold your cone. Make your cone by building it on a bolt for the screw you put through. I made my cone from a plastic syringe, the nut and electrician's tape, but get creative. Seal the cone so it's water tight. Silicone caulk works well, but if you're good with hotglue, that CAN work in a pinch but I don't suggest it - Put the tub on the 4 bolts, attach the nuts and make a water tight seal. Same method as the cone. - Let the caulk set if you used that to make a watertight seal. Test your tub with water to make sure it's water tight. Let the water sit a couple of minutes and see if any drizzles through - OPTIONAL: Put soldering sponges or some craft foam in between your tub and the tumbler blocks to quiet the tumbler a bit. - Attach all the electronics as you please. The simplest working curcuit is getting a power source with the desired amount of voltage and solder it directly on the motor wires. I suggest a toggle switch and you will probably need to step down the voltage to match your desired motor power. Buck converters off Amazon or eBay are good for this. - OPTIONAL: Put your tumbler on a craft foam mat to quiet it down. This is a very good idea. Silicone or rubber mats can work too, and you can get legitimate vibration dampening mats for this sort of thing. - Put a clamp on the bottom of the frame to keep the tumbler in place. Add tumbling medium, your choice of lubricant and/or solution and turn on your tumbler. Let the tumbler mix your medium and lubricant/solution and then add whatever you need to tumble. As for what tumbling media, solution, lubricant and tumbled material is good, that is not something I can guide on too much. Google has a lot of info on this topic and you know your needs best.
With this file you will be able to print Vibration tumbler - Vibratory tumbler machine frame(needs non-printed parts) with your 3D printer. Click on the button and save the file on your computer to work, edit or customize your design. You can also find more 3D designs for printers on Vibration tumbler - Vibratory tumbler machine frame(needs non-printed parts).