Virtual Boy Controller Extension Cable
thingiverse
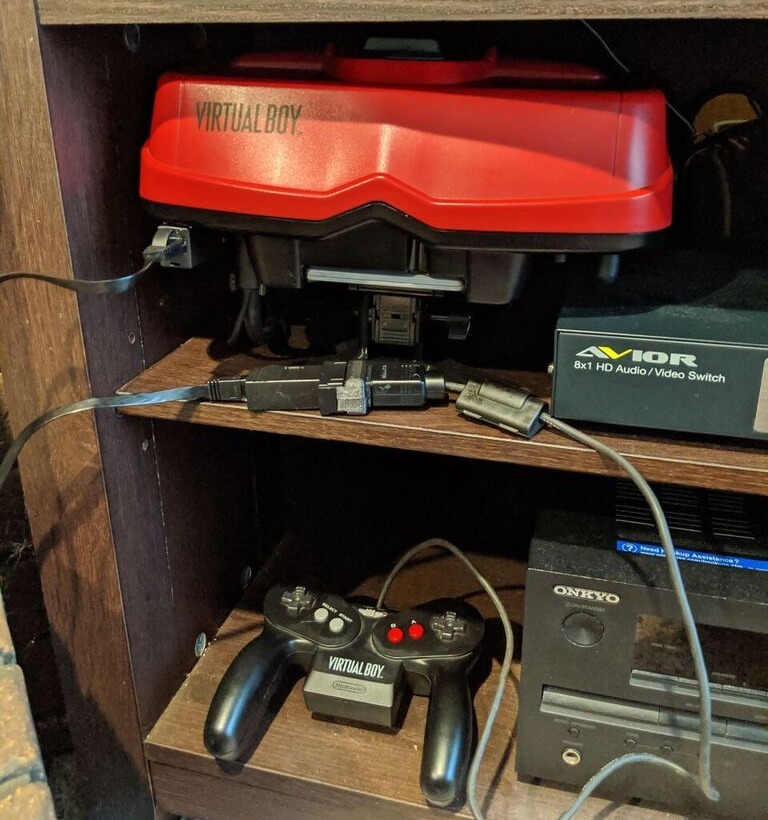
Now that the Virtual boy can be modded with the VirtualTap and plugged into a TV, the extremely short controller cable makes it very annoying to actually use. Mellott32 on the VB forums designed a set of plugs that you can use to make your own extension cable and it is awesome: https://www.planetvb.com/modules/newbb/viewtopic.php?post_id=41671#forumpost41671 Only problem is, the BOM is $10 for male pins, $10 for female pins, $10 for the cable itself, and $30 for a set of crimpers or the ability to solder them to the wires. Additionally, the end of the cable that connects to the headset is too fine detailed to reliably print with a regular .4mm FDM machine, so you probably need to get at least one part printed in SLS or SLA. Since the VB uses standard VGA-style pins, I started looking around for other options and came across some DB9-to-RJ45 adapters. This has a nice little plastic shell and the pins are already attached to the leads. Technically, all you have to do is stick the right colored pins into the corresponding holes on the VB and controller, and you could use these with no modification whatsoever. But as you can see, the [gaffer tape proof of concept](https://imgur.com/a/yYaEk1t) wasn't pretty. So I decided to make some adapters to allow Mellott32's plug models to attach directly to these. This should allow for a much easier, no-tool no-solder solution. <h1>BOM:</h1> * 1x DB9-RJ45 M/F adapter - https://www.amazon.com/gp/product/B00066HL3W - $5.19 * 1x DB9-RJ45 F/F adapter - https://www.amazon.com/gp/product/B00006IRQA - $3.55 * 1x Ethernet cable - Anywhere you can find one. I usually make my own, but this 15 footer on Amazon is much easier to wind up when not in use - https://www.amazon.com/gp/product/B008NCCZV - $0-5 * 1x Mellott's male plug - https://www.planetvb.com/modules/newbb/dl_attachment.php?attachid=1541121921&post_id=41752 - Difficult to print, may need to order in SLS or SLA. Can work with FDM with a small nozzle and good printer. I got mine from Shapeways for $5+shipping - $5-15 * 1x Mellott's female plug - https://www.planetvb.com/modules/newbb/dl_attachment.php?attachid=1541121918&post_id=41752 - FDM friendly, just print your own. <h1>Prints from here:</h1> * 2x controller adapters * 2x headset straight adapters **OR** 1x each of the headset angle adapters. Straight will point directly down from the bottom of the VB, angled will allow it to face the front or rear of the VB. <h1>Assembly:</h1> Unscrew the silver screw/posts from the adapters and discard. Insert the male pins into the controller connection, and the female pins into the headset end. Color doesn't matter as long as they are correctly matched. Just make sure they're mirrored left-to-right on the two plugs. It should look something like this: (WUBRGY for white blue black green yellow, [image](https://imgur.com/yJVhQ7O)) Controller | Headst, looking at the front of the plug, flat side of connector is down: RGY | YGR BUW | WUB Once the pins are securely inserted to the plugs, I recommend testing prior to final assembly. If the test isn't successful, make sure the pins are fully inserted into the 3D plugs. There's a little "shoulder" on each pin that should be a snug press-fit into the part and all that should stick out is the crimped tail. If your printed part is too tight to fit them in correctly, you can use a T8 torx bit and press it into each hole, then pull it straight out. I found this opened my holes from the FDM print up to exactly the right size to take the pins with a snug press-fit. The SLS printed one fit perfectly without assistance. If all goes well, you can put a drop of superglue at the back of each pin to prevent them from pushing out over time or just trust the press-fit. Next, use the printed parts from here as collars around the plug prints then snap them directly into the tabs on the adapters. There are two unused leads on each end, which you can either clip off or just tuck back into the shell. Since these are all just snap/slide fit you might find them to have a little bit of movement between the printed parts. They'll still work fine, but you can also put a few drops of superglue between the 3D printed parts during assembly to take out any looseness. I haven't glued either my pins or adapters and haven't experienced pin push-out or issues with looseness, but it's worth looking out for. And that's all there is to it! For about $15 you can now play your consolized Virtual Boy from the comfort of your sofa. <h1>Other notes:</h1> If you can't print the plug for the headset and don't want to order a SLS/SLA part, you can also just mount the female end directly to the headset with a command strip or double sticky tape, and plug the pins in directly. Since my console is just sitting in my entertainment center, I decided this would be easier and more robust than constantly plugging/unplugging such a potentially fragile 3d printed part (Also I put my RGB port in a funny spot that this overlaps with). [Here's my solution](https://imgur.com/a/QhpEmXt) for reference, and you can make it look pretty seamless. I cut off most of the shell of that plug, tucked in the wires, and stuck it on facing forwards so that it's easily accessible in my entertainment center. https://www.youtube.com/watch?v=Ar4W9kwx9nk
With this file you will be able to print Virtual Boy Controller Extension Cable with your 3D printer. Click on the button and save the file on your computer to work, edit or customize your design. You can also find more 3D designs for printers on Virtual Boy Controller Extension Cable.