Vitamin Free z-probe for Automatic Bed Levelling
thingiverse
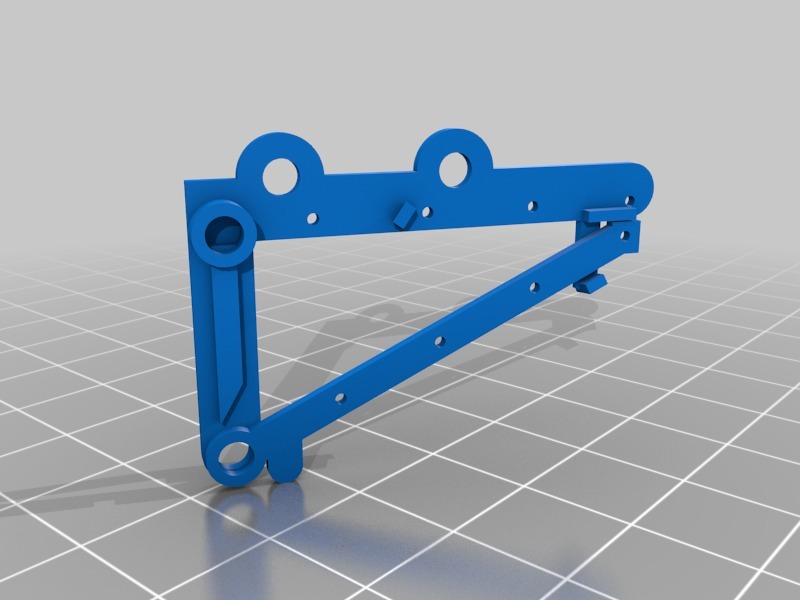
Just had my printer TOTALLY REVOLUTIONISED by setting up autolevelling. Thus I wanted to share the joy for those who didn't want to wait for a microswitch to arrive, or really wanted to just make their own. See the link below for setting up the autolevelling (+/- servo if you wish) I'm hoping someone will remix this idea but the current files will provide a good start to (I haven't got time at the moment). The critical features are: 1. rigid arms 2. low friction fulcrum/hinge (NB insulation stripped off lower wire left of hinge to optomise this in toothpick version) 3. Bed probe contact point must be close to the fulcrum and distant from the switch contacts (see Note below) The optional features are: 4. rotatable probe contact point so this tip could be elevated above the nozzle. This would enable permanent installation of the system without without having to recalibrate each time. NB my tip rotates but not repeatably :-p For a servo-compatable version 5. direct attachment to servo (ie include a parametric socket so servo horn not required) 6. strain relief to prevent servo rotation pulling the wires too much Probably not required 7. Lateral movement restricter for lower arm - this wouldn't be required if the hinge was stable. Note this design uses mechanical advantage, so small movements at the bed contact-point will move the switch contact a large distance. It therefore has the potential to be accurate as a commercial microswitch while remaining very light and printable. I installed my z-probe on a 3.7 servo, but if the "rotatable probe" works well enough that recalibrate wasn't required every print then that would probably be redundant for most home users. If you want to set up auto-levelling +/- install a servo just follow the instructions on http://lokspace.eu/adding-9g-servo-based-autolevel-sensor-to-your-3d-printer/ The marlin documentation is: http://marlinfw.org/docs/features/unified_bed_leveling.html I'd also strongly recommend buying a feeler gauge to measure nozzle height rather than using a sheet of paper (eg https://www.aliexpress.com/wholesale?SearchText=feeler+gauge) If you use "G1 Z0.2" or manual jog to lift the nozzle to 0.2mm above the bed when the system is at print-ready temperature you can then step it up or down to find exact the height the 0.2mm gauge just slides in and out (this means you won't need to bother with any of the other gauges). Sliding this in and out repeatedly (and wiping any cooled plastic off) will then allow you to establish the height difference between the nozzle tip and the z-probe tip (which you can then permanently set in the firmware. Don't bother with a "paper gauge". Remember your printer nozzle should just be touching the bed when z-height is 0. Visually checking when plastic is oozing or guesstimating the thickness of paper makes setting this accurately almost impossible!!!
With this file you will be able to print Vitamin Free z-probe for Automatic Bed Levelling with your 3D printer. Click on the button and save the file on your computer to work, edit or customize your design. You can also find more 3D designs for printers on Vitamin Free z-probe for Automatic Bed Levelling.