Volcano Direct Mount for CR-10 printer
thingiverse
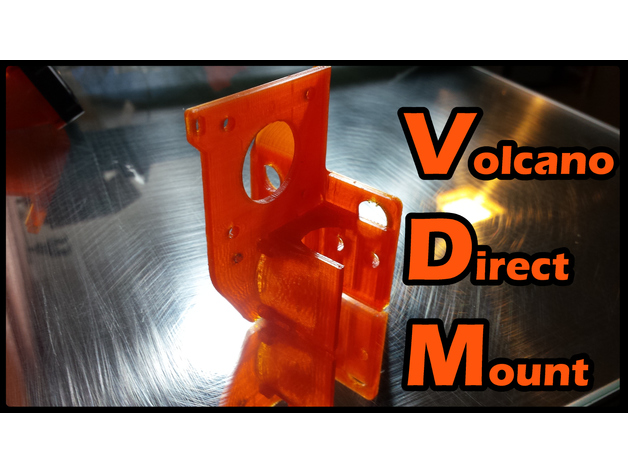
These parts are designed to mount an E3D Titan with pancake stepper motor, with a v6 heat sink and volcano hot end to the CR-10 family of printers. Once assembled and mounted this will place the nozzle in the same position as the original hot end. It is designed to go onto the carriage taking as little space as possible so that no printing space is lost in any axis. The parts for my build were ordered of AliExpress (Trianglelab) and can be seen in one of the stock pictures except that I swapped the hot end with a volcano. You can choose to go with a 40mm fan, 80mm fan, or add a part cooling fan of your design. I added an improved 40mm which leaves a bit more room between the build surface and it. The original one can sometimes rub/catch on your prints depending on your layer height. 31/5/2017 Update: The 30mm fan that comes with the E3D works well but is loud. It is even louder when running the printer at 13v (for better heated bed performance). In order to deal with that I've added an adapter that lets you mount a 40mm fan in place of the 30mm one. It mounts at a 45 degree angle so that the fan body clears the left side of the gantry. Mount a 40mm fan with at least 7cfm and enjoy a much quieter printer. Print Settings Rafts: No Supports: No Resolution: .1mm Infill: 15% Post-Printing Parts In addition to the titan, v6, volcano, and other associated parts you will need either: a) 4x 10mm M3 and 3x 12mm M3 socket head screws or b) 7x 12mm M3 socket head screws Step 1 Remove the stock housing and hot end from the carriage. Place aside and keep all the screws together to be able to re-use this part in the future. Step 2 The pegs used to attach the stock heat sink are used as locator/support pegs with the mount but will not be screwed in. Check now that those pegs fit in the matching two holes of the mount. If your printer made the holes a bit too small, which is common, simply enlarge the holes very slightly with a 7/32 drill bit. Don't go fast and let the bit do the work. The mount slip onto the pegs without much effort yet be nice and snug with no play. Step 3 Use four screws (1 or 1.2mm, depending on the fan) to mount your part cooling fan to the funnel (either 40mm or 80mm). Screw directly into the plastic which will squeek as you do it but will hold nicely. Step 4 Use one 1.2 mm screw to attach the part cooling funnel to the mount. Again screw directly into the plastic. Don't make it too tight at this point. Step 5 Attach the stepper motor, titan, and v6 heat sink to the mount using the supplied hardware and following the instructions found here: https://wiki.e3d-online.com/wiki/Titan_Assembly Step 6 Attach the mount to the carriage by slipping it onto the pegs. Use two 1.2mm M3 socket head screws to secure the mount to the carriage by the holes used to mount the stock metal housing. Note that one screw is recessed into the mount and will stick out the back more - this is normal. Tighten the screws well but be careful not to damage the plastic mount. Step 7 Attach the 30mm heat sink fan to the mount using the supplied screws. Three holes are provided in the mount but I just used the top left and bottom right ones. Pointing the part cooling fan With the 40mm fan there is little adjustment to be done but with the 80mm fan you need to get the right angle. In both cases lower your newly attached assembly to the print surface (make sure your printer is off when you do this) and adjust the fan so that the tip is a mm or two off the print surface. Once there you can tighten down the fan funnel mounting screw used in step 4. Getting it connected Once all attached you will still need to wire up the new parts to your printer. There are many options there so I'll leave you to use the one you like best. I chose to cut the stock cable half way to the controller box and put in an 8 pin Molex connector. This way I can swap this VDM print head or the original print head by turning a few screws and plugging a few connectors, no soldering each time. Stepper motor You'll need to connect the pancake stepper motor to the controller box as well. I made a connector that the original cable plugs into so that I just unplug the original extruder motor and plug in the new one. Read up on four wire stepper motors and polarity when doing this so that you do it right. I had to correct the steps per mm of my extruder since the stepper motor is different. At time of writing I'm still running the stock firmware on my CR-10 so I cannot permanently update it on the controller. Instead I added this line to my start Gcode in my slicer: M92 E418; set steps per mm of extruder to 418 How I Designed This Credits I'd like to give credit to Donovan Bisharat for creating and sharing a model of the stock carriage and hot end assembly with the Facebook CR-10 group. I used this model when designing the mount. I designed this to allow me to do large prints rapidly which requires extruding a large volume of plastic quickly, with no snags in the filament, and with plenty of cooling. Because some of these prints will be done in TPE and TPU a direct drive solution seemed appropriate. Also the design of the titan, used in this way, makes it very quick to switch between 1.75mm and 3mm filament, another requirement when pushing out lots of plastic quickly.
With this file you will be able to print Volcano Direct Mount for CR-10 printer with your 3D printer. Click on the button and save the file on your computer to work, edit or customize your design. You can also find more 3D designs for printers on Volcano Direct Mount for CR-10 printer.