VR stock "the Talon" lightweight/simple
thingiverse
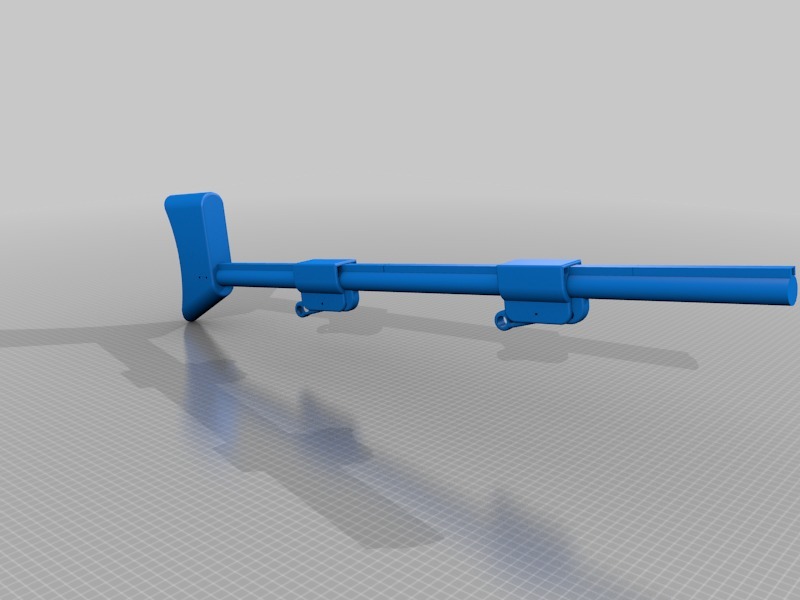
A custom lightweight stock for VR FPS games. (I used it for Onward and Stand out and it works great) Print the following: 1 Butt 2 Base blocks 2 Latches 2 guide rails 1 Tube end 1 drill guide (used to make even marks on tube for drilling retention holes, you do not have to print the entire thing, you can print only half of it but I suggest at least 3 holes) You will also need to find some grips on Thingiverse for whatever type of controller you have. There are plenty out there. Just be sure that the bottom is FLAT so that you can glue it to the base blocks. You will need the following items to complete the stock: 2 springs (sold in packs https://www.amazon.com/gp/product/B06XPG813G/ref=oh_aui_detailpage_o05_s01?ie=UTF8&psc=1 24 inch aluminum or CF tube 1" outer diameter. I bought this and cut it. You can make this as long as you would like, just print out an extra guide rail if you are really tall. If you go with a 2 foot tube, you can make 3 stocks with this https://www.amazon.com/gp/product/B005IZ37HU/ref=oh_aui_bia_detailpage_o03_s00?ie=UTF8&psc=1 Two of these https://www.lowes.com/pd/Hillman-8-x-0-75-in-Flat-Head-Aluminum-Standard-Phillips-Drive-Interior-Exterior-Standard-SAE-Binding-Post-Screw/3012651 and 2 of these https://www.lowes.com/pd/Hillman-8-x-1-5-in-Flat-Head-Aluminum-Standard-Phillips-Drive-Interior-Exterior-Standard-SAE-Binding-Post-Screw/3702838 assembly is fairly strait forward. Push the butt onto the aluminum tube and drill through the two holes. Install the long threaded post to hold butt on. You may have to lightly sand the hole in the butt to accommodate your tube, alternatively you can sand the tube. Go slowly as a tight fit is preferred. Glue the two guide rails together with super glue. Once dry lay the flat side on a table and put super glue in the trough that faces upwards. Then put the rail guide nipple into the recess in the butt and push the tube down onto the guide rails. Doing this with the guide rails flat on the table ensures the guide rails glue to the tube strait. You can put a lot of pressure on the tube to get a good bond. Now trim the excess Guide rail off the end of the tube, make it flush and neat looking. Use the Drill guide by putting it over the tube. Use a punch in each hole on what will be the bottom of the tube, then move the guide and repeat. This will give evenly spaced holes. I didnt do the entire length of the tube, but you certainly can if you want more adjustment points. Once all the holes are marked drill them out with a 1/4 inch drill bit. Best if you have a drill press but not necessary if you used a good center punch. Now take the base block and latches and drill out their holes to the same size as the threaded post. Put a spring in the top hole of the latch. Put the latch in place and put the shorter threaded post through the holes and tighten. Finally, glue your grips to the base blocks. Lightly sand the areas that will come in contact before you glue. I used gorilla super glue and it makes an extremely strong bond with PLA. If you print in ABS I do not know what would be best. Slide the base block onto the tube and You are all set!
With this file you will be able to print VR stock "the Talon" lightweight/simple with your 3D printer. Click on the button and save the file on your computer to work, edit or customize your design. You can also find more 3D designs for printers on VR stock "the Talon" lightweight/simple.