Vvroom Bike Motor(izer)
prusaprinters
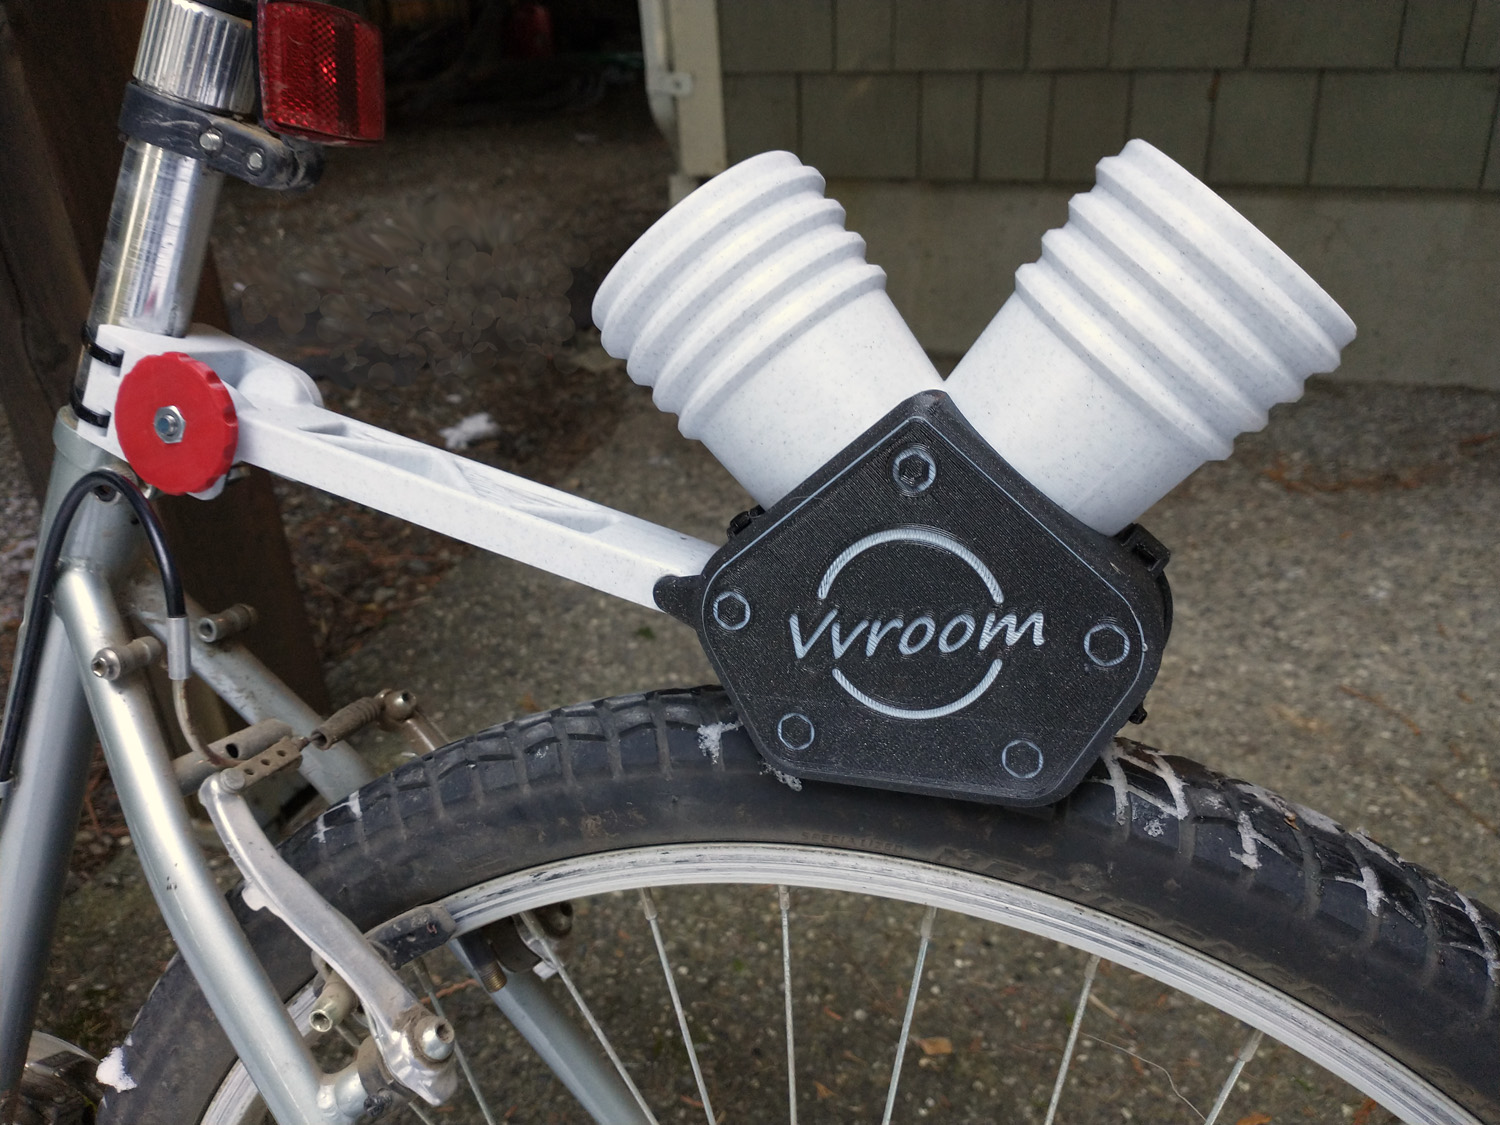
<p>When I was a kid, I had to beg my mom to get me a Mattel V-RROOM motorizer for my bike. This is my take on that vintage toy, but purely mechanical – it's powered off the back wheel of your bike. Now, I know noise-making toys are a tough sell with parents, which is why this is the ideal toy for <i><strong>grandparents </strong></i>to make for their grandkids. Just zip-tie it to the seat post and you are ready to roar! </p><figure class="media"><oembed url="https://youtu.be/z11-38xgh8Y"></oembed></figure><p><strong>How it works:</strong></p><p>The top surface of each cylinder head is a thin membrane that acts like a snare drum. There is a thwacker post that snaps into a clip on the underside of this membrane, and the tips of the thwackers engage notches in the rotor wheel. The rotor wheel then rides on the back wheel of your bike. As the rotor spins, each thwacker get thwacked 7 times per revolution, for a total of 14 thwacks per rev. Quite a racket.</p><p><strong>What you'll need: </strong></p><p>1 - each of all the model parts listed, <i>except</i><br>2 - each of the Cylinder part<br>1 - ¼-20 x 2.5" hex bolt (or 6mm x 65mm metric hex bolt)<br>1 - ¼-20 hex nut (or 6mm hex nut)<br>6 - medium sized nylon zip-ties</p><p><strong>Printing:</strong></p><p>Print all parts with a 0.4mm line width, 3-perimeters, 20% infill, and 0.2mm layer height. No supports are needed for any of the parts. All parts print in the orientations shown and are pretty easy to print without brims or rafts. After printing, sand or scrape off any nits, lumps or strings from all of the parts. <i>(Pro tip: to make the graphics pop, print layers 3 & 4 of the case parts in a contrasting color filament.)</i></p><p><strong>Assembly:</strong></p><p>Follow along from photos 3 through 10:<br>1. Place each cylinder head down on a flat, rigid surface. The non-pointy end of each thwacker post should click into the clip on the underside of the cylinder head inside the cylinder.</p><p>2. Place one side of the case on a flat surface. Fit one of the cylinders into the groove in the case. There is a small flat on the bottom edge of the cylinder that should be facing the opposing cylinder. Place the other cylinder in the second groove.</p><p>3. Assemble the rotor onto the axle so that it is pressed up against the flange so that the rotor is centered on the axle. If the axle doesn't fit snugly in the hole, use a little superglue to hold the parts together, or else add a thin wrap of tape to the axle to get a snug fit.</p><p>4. Tilt the axle into place in the case half. You may have to rotate the rotor a little to work it past the thwackers. Also place the arm part on the pivot boss on the outside of the case.</p><p>5. Carefully slide the other case half over the entire assembly, making sure neither cylinder or the arm has flopped out of place.</p><p>6. There are 4 sets of slots around the perimeter of the case. Use 4 of the zip ties to secure the case halves together.</p><p>7. Press the ¼-20 nut into the knob. Assemble the bracket to the other end of the arm using the bolt and knob/nut.</p><p>8. Use the final 2 zip ties to strap the bracket to the back of your seat post.</p><p>9. Tilt the arm down so that the rotor is resting on your back wheel and so that the case is not rubbing on your wheel. Tighten the knob, and you are ready to ride!</p><p> </p><figure class="media"><oembed url="https://youtu.be/kLZe3LzHQVY"></oembed></figure>
With this file you will be able to print Vvroom Bike Motor(izer) with your 3D printer. Click on the button and save the file on your computer to work, edit or customize your design. You can also find more 3D designs for printers on Vvroom Bike Motor(izer).