Wall-e Eyes from Adafruit
thingiverse
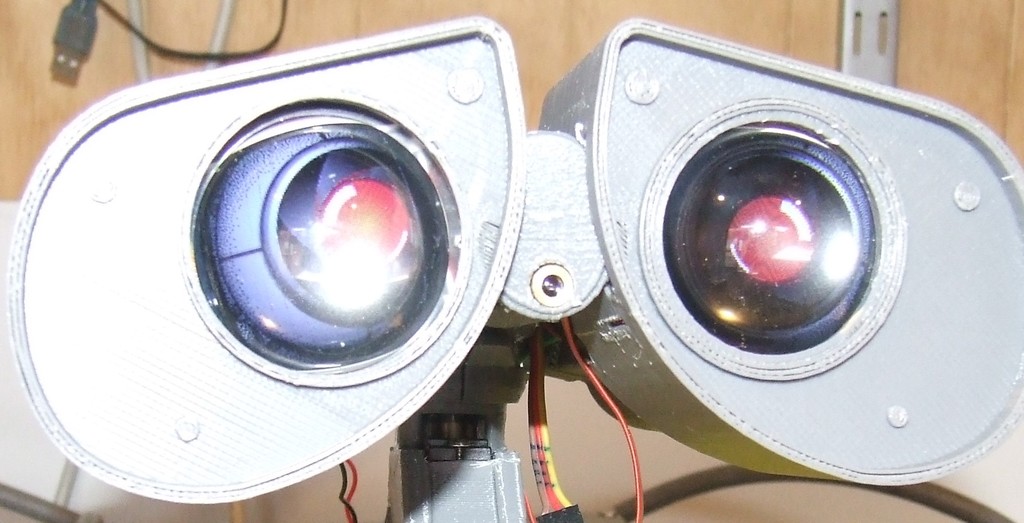
Wall-e eyes for chillibasket Wall-e I’ve used: Spooky Arduino Halloween Eyes At https://www.youtube.com/watch?v=uYIc1pLO6Xk by Werny Circuit for wiring the ItsyBitsy is from 2 min 30 – 3 min 10 of the video Werny is running two screens off each CS pin, and we want one screen of each CS Pin. So CS1 is for the Left Eye (Pin 12) and CS2 is for the Right Eye (Pin 10) He also changes the resistor to 68 Ohms so you can run the LED off 5 volts (Why? But do it anyway) I used the Adafruit ItsyBitsy M0 To get the ItsyBitsy working go to: https://learn.adafruit.com/introducing-adafruit-itsybitsy-m4 Make sure you get the “Blink” code working on the ItsyBitsy before you carry on. Use Adafruits code Uncanny eyes https://learn.adafruit.com/animated-electronic-eyes Follow the instruction to the word. Do not try and take short cuts. When you download the code and run it on the Arduino IDE, open the “config.h” second tab and change: { 12, 0, 1 }, // LEFT EYE display-select and wink pins, no rotation { 10, 2, 3 }, // RIGHT EYE display-select and wink pins, no rotation Comment out the “single eye” stuff with “//” and rotate the screens to fit. When the code first starts check the Adafruit logo is the right way around. The first number is the CS pin The second number is the blink pin (not used) The third number is the rotation from 0, 1, 2, 3. In the same file, you can select the eye you want. I prefer the terminatorEye.h // Enable ONE of these #includes -- HUGE graphics tables for various eyes: //#include "graphics/defaultEye.h" // Standard human-ish hazel eye -OR- //#include "graphics/dragonEye.h" // Slit pupil fiery dragon/demon eye -OR- //#include "graphics/noScleraEye.h" // Large iris, no sclera -OR- //#include "graphics/goatEye.h" // Horizontal pupil goat/Krampus eye -OR- //#include "graphics/newtEye.h" // Eye of newt -OR- //#include "graphics/terminator.h" // Git to da choppah! //#include "graphics/catEye.h" // Cartoonish cat (flat "2D" colors) //#include "graphics/owlEye.h" // Minerva the owl (DISABLE TRACKING) //#include "graphics/naugaEye.h" // Nauga googly eye (DISABLE TRACKING) //#include "graphics/doeEye.h" // Cartoon deer eye (DISABLE TRACKING) That was all I changed to get it too run. This is what is needed: Adafruit ItsyBitsy M0 Express - for CircuitPython & Arduino IDE https://www.adafruit.com/product/3727 Convex Glass Lens with Edge - 40mm Diameter https://www.adafruit.com/product/3853 or Convex Plastic Lens with Edge - 40mm Diameter https://www.adafruit.com/product/3917 Use this LCD screen because the screen goes to the edges so it fits into the eye. Replace 5110 LCD 1.44" Red Serial 128X128 SPI Color TFT LCD Display Module https://www.aliexpress.com/item/2055105403.html?spm=a2g0s.9042311.0.0.6c2a4c4dfS30OS I just hot glued the screen in
With this file you will be able to print Wall-e Eyes from Adafruit with your 3D printer. Click on the button and save the file on your computer to work, edit or customize your design. You can also find more 3D designs for printers on Wall-e Eyes from Adafruit.