Wall Following Car Chassis
thingiverse
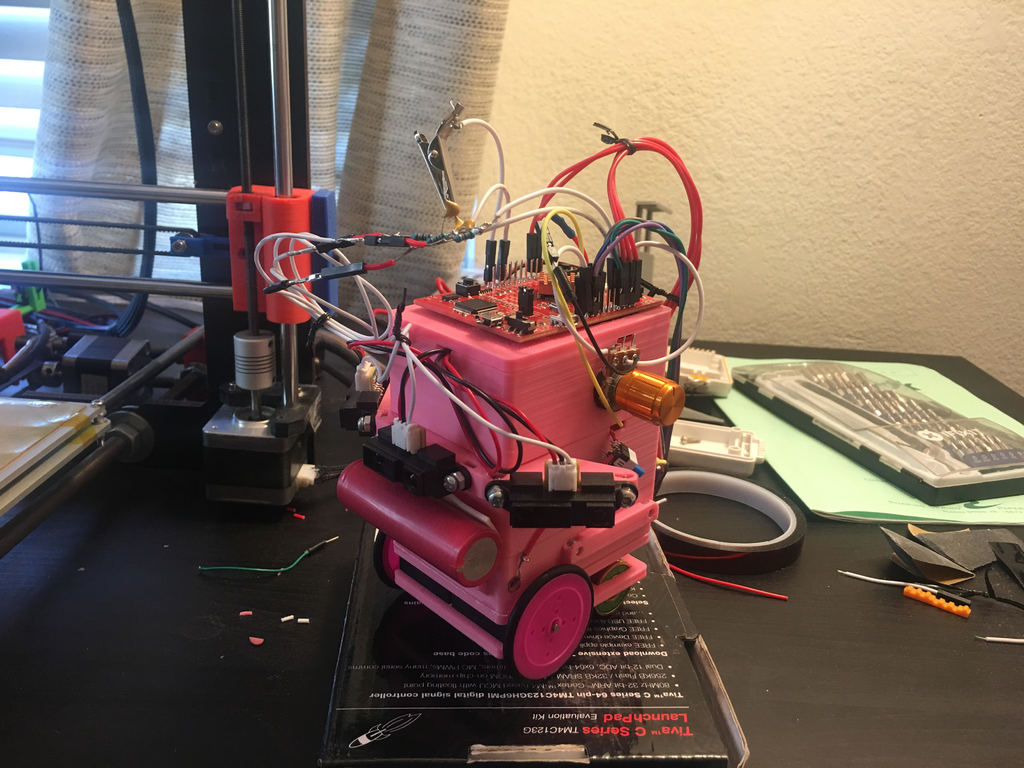
////////// Final Update: Wall Follower in action: https://www.youtube.com/watch?v=5gEb-GcvHyk This is the final version of the 3d printed chassis that I used for my embedded systems Wall Following Robot project. It was built on top of the DC Motor Car Chassis that I originally submitted. The motors linked below will still work with the full design but they had since been replaced by smaller and higher voltage alternative motors. Wall Follower is meant to follow a track 70cm wide but should work with thinner or wider. DC_Motor_Layer1 and DC_Motor_Layer2 are now legacy files but still take the place of DC_Motor2_Bottom and DC_Motor2_Top if you have the yellow motors linked bellow. PARTS LIST: (You can probably find most of this stuff for cheaper but amazon links for the lazy) TI Board: https://www.amazon.com/Development-Boards-Kits-TIVA-LaunchPAD/dp/B00HKIDHI2/ref=sr_1_1?s=sporting-goods&ie=UTF8&qid=1513359836&sr=8-1&keywords=tm4c123 IR SENSOR: https://www.amazon.com/GP2Y0A21YK0F-Sharp-Distance-10-80cm-Compatible/dp/B00IMOSEJA/ref=sr_1_7?ie=UTF8&qid=1513359677&sr=8-7&keywords=IR+sensors Lithium Batteries: https://www.amazon.com/EBL-Lithium-ion-Discharge-Rechargeable-Batteries/dp/B016ZPBHAK/ref=sr_1_3?ie=UTF8&qid=1513359753&sr=8-3&keywords=lithium+ion+batteries Nokia LCD: https://www.amazon.com/DAOKI-Display-backlight-adapter-Arduino/dp/B01EE4VQYG/ref=sr_1_1?s=sporting-goods&ie=UTF8&qid=1513359807&sr=8-1&keywords=nokia+5110+lcd POT: https://www.amazon.com/Linear-Taper-Rotary-Potentiometer-Panel/dp/B01M2ZY3EH/ref=sr_1_18?ie=UTF8&qid=1513359957&sr=8-18&keywords=potentiometer+5v H-Bridge: https://www.amazon.com/gp/product/B00NN6EB3U/ref=oh_aui_detailpage_o00_s00?ie=UTF8&psc=1 Bearings (back wheels): https://www.amazon.com/uxcell-8mmx22mmx7mm-Shielded-Miniature-Bearing/dp/B075CL1FVN/ref=sr_1_4?s=hi&ie=UTF8&qid=1513359993&sr=1-4&keywords=608zz+bearing ////////// I used this chassis for a school project of a DC motor car. The chassis works with those yellow project DC motors that are popular in kits (link below for reference). In my particular model, a 6V battery back is mounted below using screws that go the the rail in the center of the first layer. The DC motors are mounted using 30mm screws the feed through the posts on the first layer. The first layer also features a grove that a 608zz bearing can be inserted into. The motors should sit flush in the groves of both the first and second layer. The second layer snaps in onto the posts that protrude slightly above the DC motors. The second layer also features groves that a TI ARM Cortex tm4c123 board can sit in. The second layer also features groves on the end of the board that m3 screws can be inserted into for mounting purposes. The goal of this chassis was to be as compact as possible. Using the appropriate tires and 608 bearing, the car should be a couple of mm from dragging against the floor. In addition, the DC motor's inner wheel mounts need to be trimmed in order to fit into the chassis. (they weren't being used in my project and seemed like a waste of space. This print is super specific so I doubt anyone will be using this in the future. But if you do send me a message if you have any questions or whatever! Thanks for reading all of this and have a good day! //DC motors and wheels that this chassis was designed for: https://amazon.com/Smart-Chassis-Motors-Encoder-Battery/dp/B01LXY7CM3/ref=sr_1_3?ie=UTF8&qid=1508818927&sr=8-3&keywords=dc+motor+chassis //Tolerances were adjusted for my printer (about 0.5mm) so results may vary.
With this file you will be able to print Wall Following Car Chassis with your 3D printer. Click on the button and save the file on your computer to work, edit or customize your design. You can also find more 3D designs for printers on Wall Following Car Chassis .