Wandering Hour Clock
prusaprinters
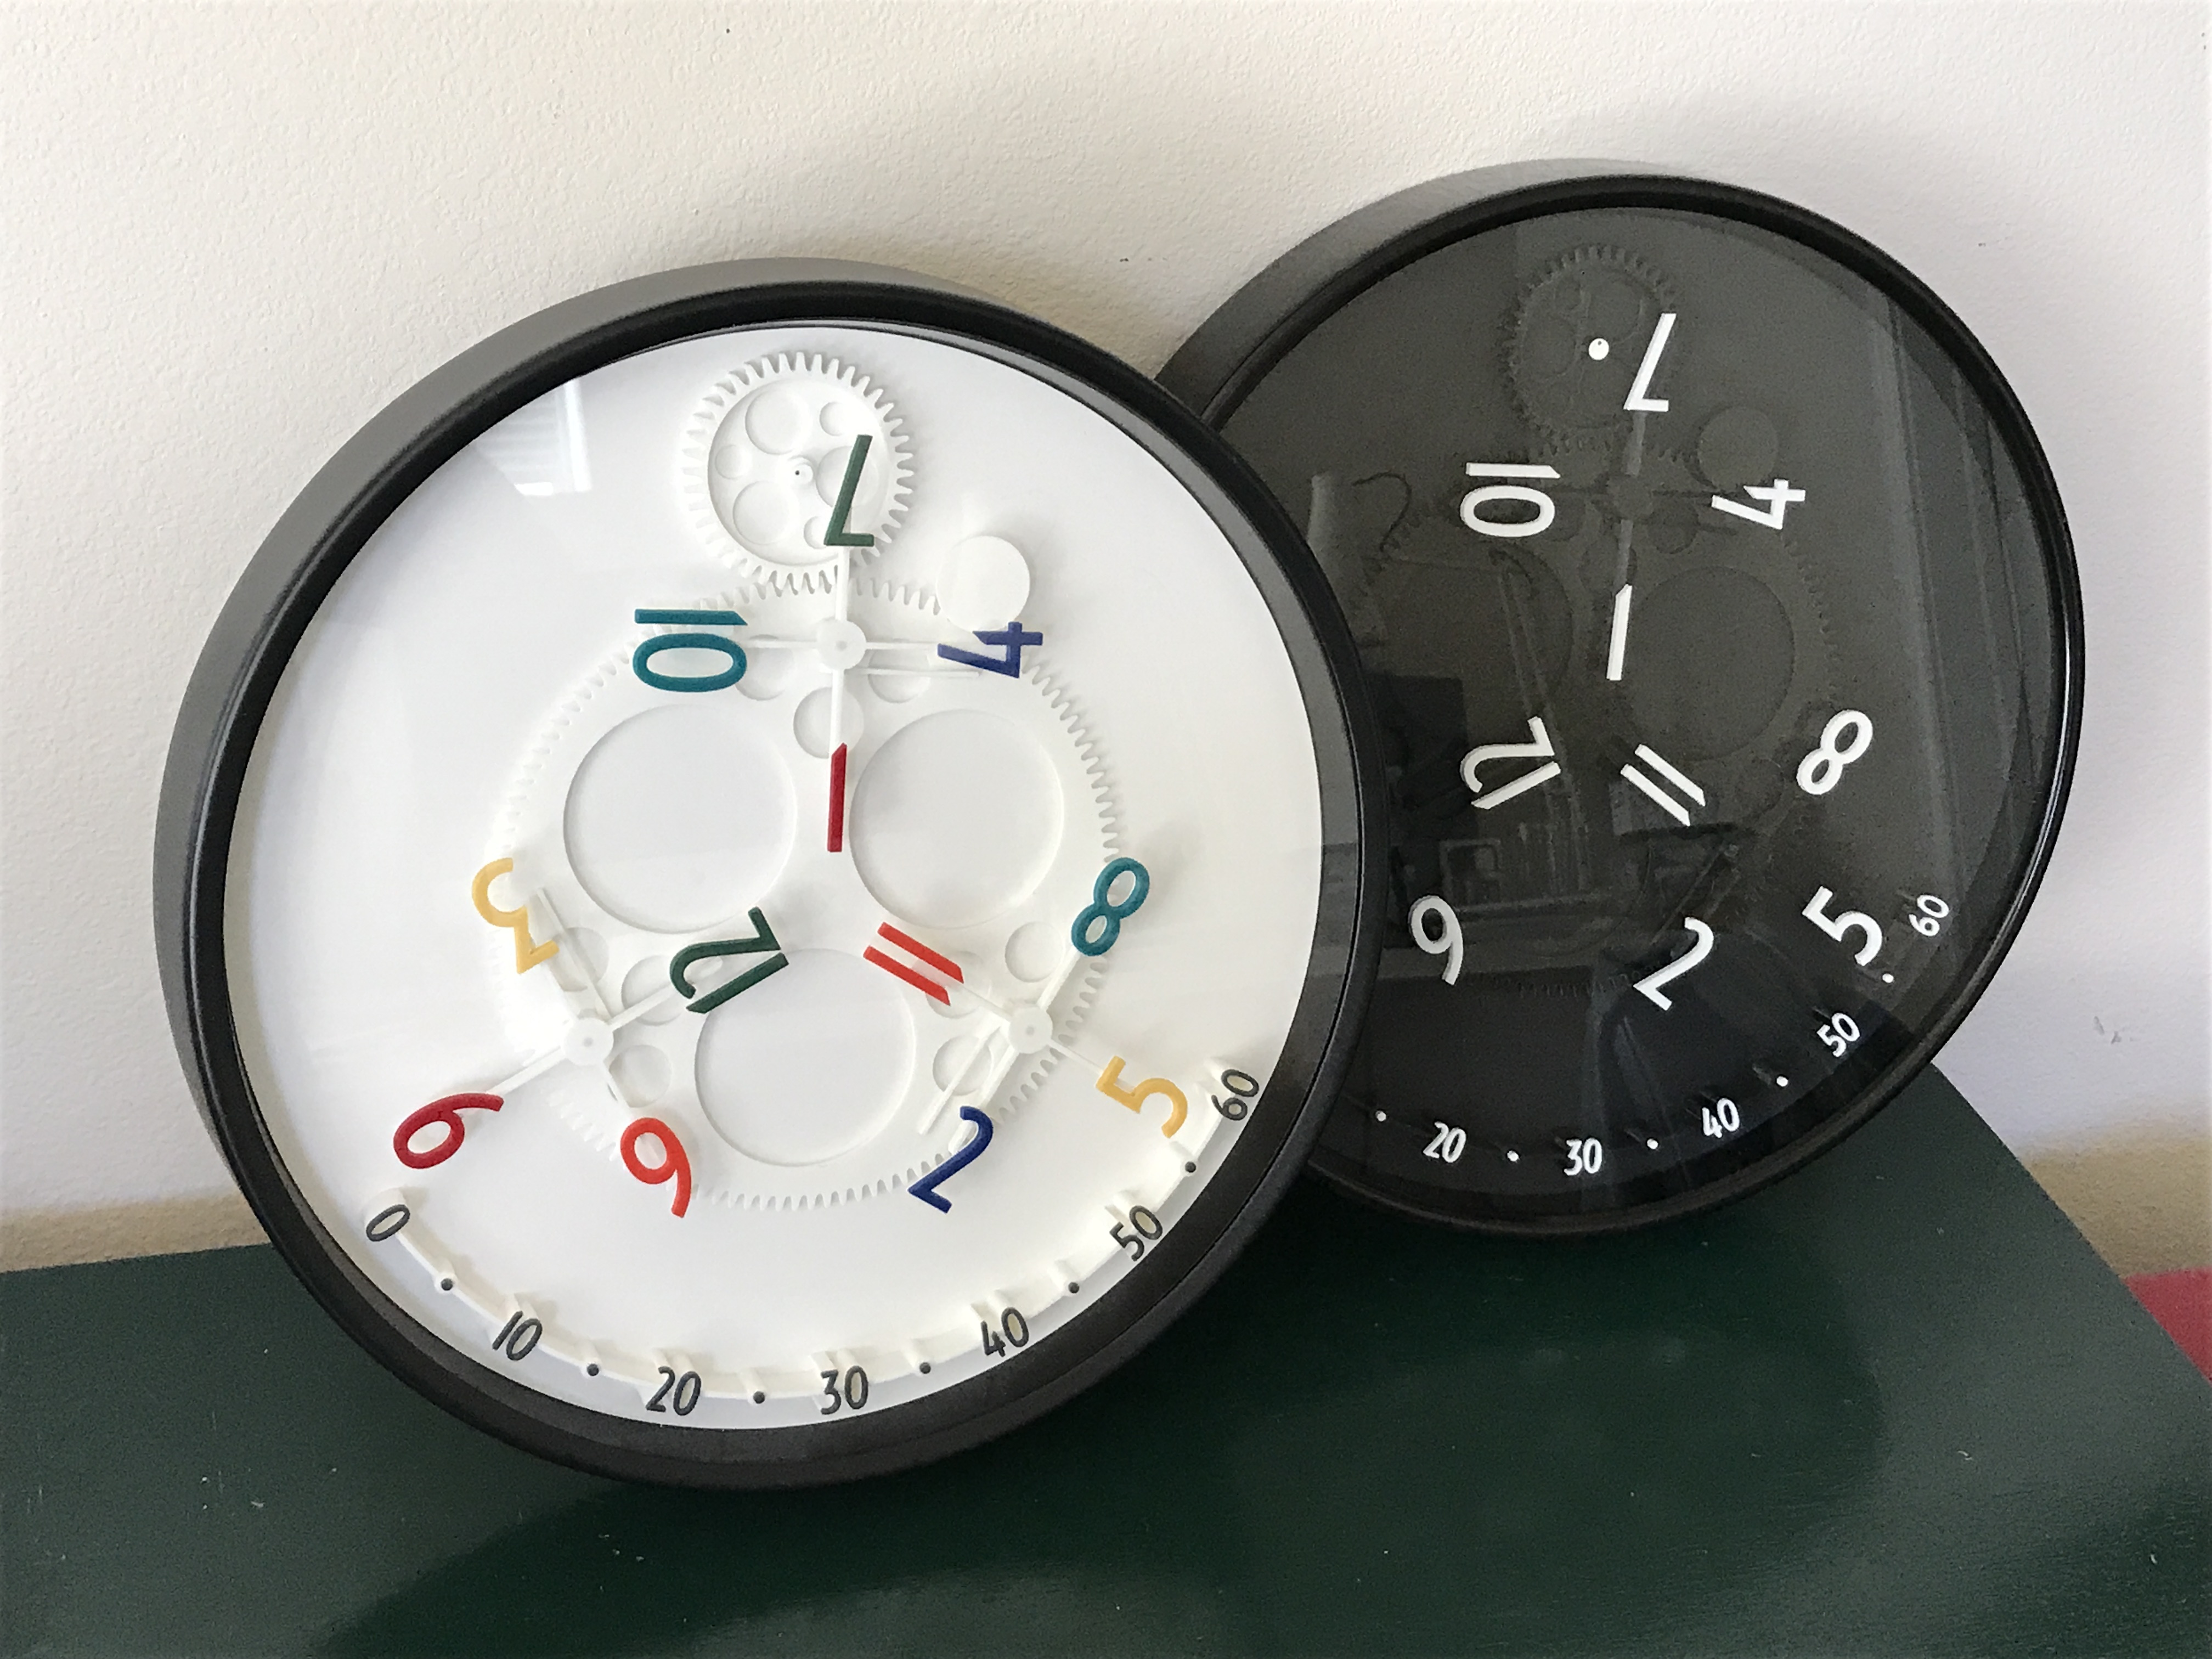
<p><i><strong>Updated 2021-07-15:</strong> Remastered in OpenSCAD; adjusted to fit redesigned BONDIS and to use metric screws; updated build instructions.</i></p><p>In a wandering hour clock, the hours themselves point to the minutes. At the top of the hour, the outgoing hour points to minute 60, and the incoming one points to minute 0. Wandering hour clocks have been around <a href="https://www.watch-wiki.net/index.php?title=Wandering_hour">since the 1600s</a>, but this one implements the concept in 3D printing!</p><p>This example uses the case, dial pan, glass, and movement from an <a href="https://www.ikea.com/us/en/p/bondis-wall-clock-black-70152467/">IKEA BONDIS</a>, but the model could be scaled on the X/Y axes to fit almost any wall clock case. The movement is relocated to the top, and a 608 bearing is mounted in the middle to carry the central gear, which rotates counterclockwise once every three hours. This gear carries the three cross pieces, which in turn carry four hours each. An arc of minutes is installed along the bottom, and a bumper is installed near the top to rotate each cross piece 90º every three hours to bring the next set of hours into position.</p><p>The central gear and cross pieces print face down, and all other parts print face up. Nothing requires supports. The minute arc is designed to have the filament color changed near the end of its print (included in gcode), so the minute figures stand out. The typeface is the excellent <a href="https://fonts.google.com/specimen/Voltaire">Voltaire</a> by Yvonne Schüttler.</p><p>For drilling holes in the dial pan, PDF templates are provided in both letter and A4 sizes.</p><h5>Parts and tools required</h5><ul><li><a href="https://www.ikea.com/us/en/p/bondis-wall-clock-black-70152467/">IKEA BONDIS</a></li><li>7× M3×10mm screws</li><li>Plastic epoxy</li><li>608 bearing</li><li>Drill with ~3mm and ~6mm (~1/8" and ~1/4") bits</li><li>Optional: Paper for a new dial, 35mm (14") minimum dimension</li></ul><h5>Build instructions</h5><ol><li><strong>Take apart the BONDIS.</strong><ul><li>Remove and discard the hands.</li><li>Peel the original dial away from the plastic dial pan. Replace it with paper (tip: lay the original dial face down and trace around it to make a cutting pattern), or simply clean the adhesive off the dial pan and leave it bare.<ul><li>Alternatively, you could leave the original dial in place and paint it, or perhaps use rubbing alcohol to remove the markings.</li></ul></li><li>Remove the movement from the rear of the dial pan by releasing it from the top and bottom clips.</li></ul></li><li><strong>Modify the movement.</strong><ul><li>Disassemble the movement as pictured.</li><li>Carefully cut the hour shaft down to 1–2mm (as it is no longer used, but its gear needs to remain in place for spacing purposes).</li><li>Optionally, trim 3mm off the tip of the minute shaft to make room for the seconds nub.<ul><li>Alternatively, with care, you may be able to do this with the movement intact. In this case, cut the hour shaft as close to the movement body as possible, and take care not to damage the minute shaft at that point.</li></ul></li></ul></li><li><strong>Install the 608 bearing.</strong><ul><li>As pictured, install it in its bracket, and install the bracket on the back of the dial pan.</li></ul></li><li><strong>Drill holes in the dial pan.</strong><ul><li>Print one of the PDF templates (they are the same, just different paper sizes) and measure the rulers to ensure it printed at 100% scale.</li><li>Cut a hole in the center, so that you can center it over the 608 bearing.</li><li>Mark the holes to be drilled, and then drill them.<ul><li>Note that the original hanger will no longer be usable, because the movement will be reinstalled roughly in that location (the clock can hang from the rim of the case instead) – so be sure to align the drill holes such that the hanger is not in the way, as pictured.</li></ul></li></ul></li><li><strong>The epoxy step.</strong><ul><li>Epoxy each hour figure to its matching cross piece.</li><li>Epoxy the leaf springs to the front (flat) side of the central gear. The two tabs on each spring should fit inside the small holes on the gear.</li><li>Epoxy the movement to the back of the dial pan, so that the shaft extends through the 6mm drilled hole as pictured.</li><li>Wait for all epoxy to cure.</li></ul></li><li><strong>Assemble the central gear.</strong><ul><li>Mount each cross piece to the central gear using a screw from the back (shaft) side of the gear.</li><li>Mount the 1/4/7/10 cross piece first; then clockwise from that, install 2/5/8/11, then 3/6/9/12.</li><li>The screws should be loose enough that the cross pieces spin freely, but tight enough that they do not wobble excessively. The leaf springs should force each cross piece to settle into place with an hour facing (more or less) directly out.</li></ul></li><li><strong>Mount the minute track.</strong><ul><li>Secure it in place using two screws from the back of the dial pan.</li></ul></li><li><strong>Install the central gear.</strong><ul><li>Insert its stem into the 608 bearing, and secure it in place using the cap and a screw from the back side (as pictured).</li><li>Ensure the hours don't come into contact with the minute track.</li><li>Rotate each cross piece until they match the pictured example.</li></ul></li><li><strong>Install the bumper.</strong><ul><li>Secure it in place using a screw from the back side.</li><li>Test by rotating the central gear counterclockwise, and ensure the bumper rotates each cross piece 90º at a time.</li><li>If the hours do not proceed in order, rotate the central gear and cross pieces manually until they match the pictured examples.</li></ul></li><li><strong>Install the minute wheel.</strong><ul><li>While holding the back side of the movement for stability, press the minute wheel into place. Try to get it as close as possible to the dial pan without it rubbing excessively.</li></ul></li><li><strong>Install the seconds nub.</strong><ul><li>If desired (and if you trimmed the minute shaft), install the new seconds nub on the movement shaft, and mark it with a small dot, which will help visually indicate that the clock is running.</li></ul></li></ol>
With this file you will be able to print Wandering Hour Clock with your 3D printer. Click on the button and save the file on your computer to work, edit or customize your design. You can also find more 3D designs for printers on Wandering Hour Clock.