Wanhao i3 Backplate with Dual 50mm fans
thingiverse
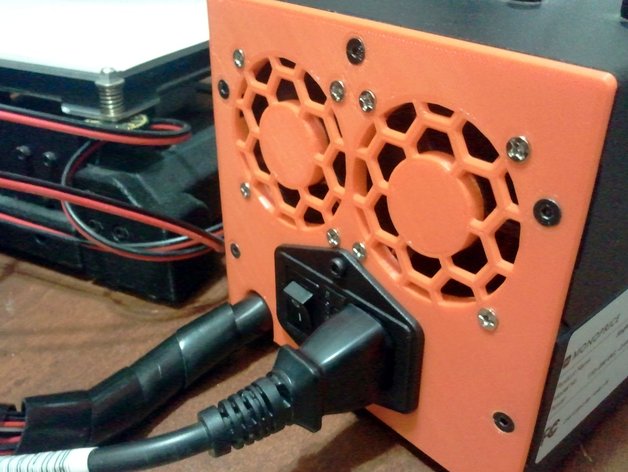
I started with chinkel's replacement backplate to get basic dimensions and tab placement, but this geometry is all new. The main improvements in this one are a stiffer part overall, cleaner power plate placement, and more protection for the fan blades. The fan openings also continue the hex pattern of my extruder fan grille, thing:1504489. Strength comes from 2mm high, 2mm wide ribs all around the perimeter/tabs and to the power opening. Since the tab and power plate screws are all m3 threaded, the power plate is positioned to make the bottom hole dual purpose: the screw goes through the power plate all the way into the bottom tab. The fan grilles are quite strong, with openings that prevent fingers going through to contact the fan blades while groping for the power switch. The grille bars are also beveled in an attempt to reduce noise. The difference between the two files is in the fan mounting holes, m3 or m4. Use the one that fits your screws. All fan and tab holes (except the bottom tab) are pre-countersunk. M4 fan screws may have clearance issues with the power plate. Installation does not require bending the plate, but is a bit more involved. See below. I keep my power box on the left side of my printer, so the plate lets the cable bundle exit on the side nearest the printer frame. If you keep yours on the right side, mirror the part side to side before generating gcode. Hardware required: (2) x m3x10 hex cap screws (1) m3 locknut Five of the six original m3 countersink screws are reused. The two m3x5 hex cap screws originally in the power plate are not reused. The fans I used are 50x20mm and move 16CFM each. I installed them as exhaust (the stock fan is installed as intake). I have lots of airflow through the control box now, even with the mess of wiring inside. Print Settings Printer: Maker Select Rafts: No Supports: No Resolution: .2mm Infill: 10% Notes: Printed with 3 shells using the stock .4mm nozzle (1.2mm walls), and 1.2mm top/bottom thickness. I wouldn't recommend reducing this, as the install procedure can be tricky. Post-Printing Installation Before installing, turn off the printer and unplug the power cord. After the first beauty picture, the rest follow these instructions in order. Remove existing back plate from controller box and take note of how the power plate is wired; you'll need a reference later. Place the m3 locknut into the capture hole in the center of the plate. Mount the fans to the printed plate. If your fan chassis aren't rounded at the corners, you'll need to modify them to allow for the top power plate screw to come through past the captive nut. Remove the original backplate. Remove and save all the screws, even though not all of them will be reused. Last chance to take note of the power wiring. Unplug the red, black, and yellow wires from the blades in the power plate that connect to the power supply. Remove the power plate from the stock backplate. Place the power plate in the printed backplate. Insert and tighten one m3x10 cap head screw through the captive nut on the inside. Make yourself a Y-cable to power the fans. Remove the connector for the stock 40mm fan and connect the single end of the Y-cable in its place. Replace the tape on this connection with new tape. Plug the new fans into the other ends of the Y-cable. Reconnect the power wires to the power plate as they were. The power plate in this position makes it difficult to accommodate the plug terminals on the plate and the power supply terminals. I bent the ring connectors on the power supply up to make more room. Yes, I realize this is unconventional. Now the involved step. Remove the screws on the sides of the control box, as well as those on the top half of the front plate. Remove the top half of the control box. Slide the plate up into rear of the top box half while flexing the box part wide to clear the fan chassis until the tabs settle into their slots. The box edge should be flush with the backplate edge, completely covering the perimeter ribs. Do whatever cable management you feel necessary and get everything back inside. Replace the countersink screws on the top half of the plate, then replace the screws on the sides and front of the box. Make sure no wires are caught between the box halves. Position the cable bundle to exit the arch, and position the plate. The backplate should be flush with the box edge. The wiring inside will probably push back at you. Put the second m3x10 hex cap screw through the remaining open hole in the power plate, through the bottom tab. Finally, replace the remaining countersink screws. Installation complete. The original 40mm fan can be kept as a replacement/spare for the extruder fan.
With this file you will be able to print Wanhao i3 Backplate with Dual 50mm fans with your 3D printer. Click on the button and save the file on your computer to work, edit or customize your design. You can also find more 3D designs for printers on Wanhao i3 Backplate with Dual 50mm fans.