Warhammer 40k Magnet Bases and Movement Trays
thingiverse
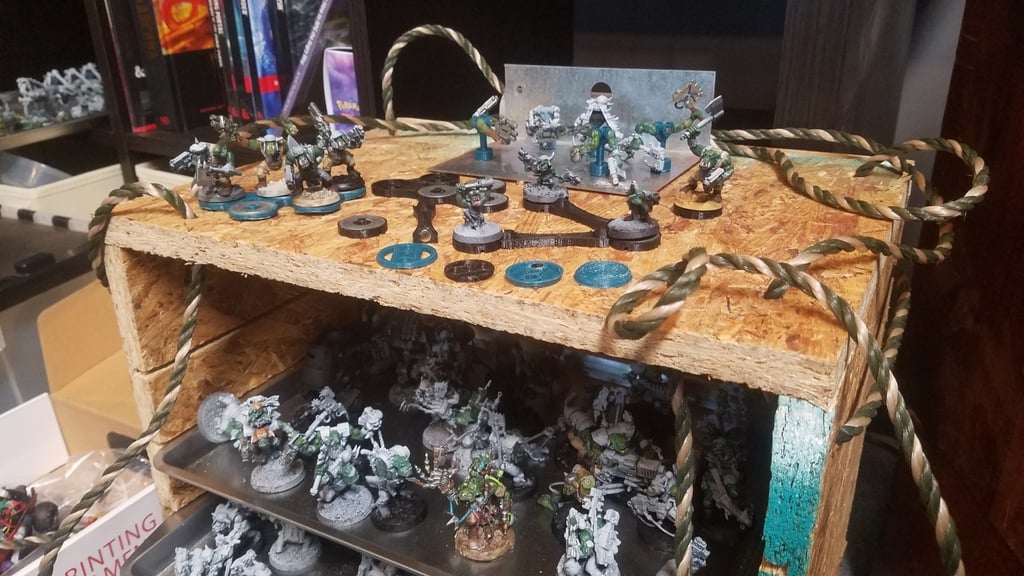
** UPDATE 12/28/2019 ** * New base sizes coming soon - any requests? * These were sized so magnets and base inserts would "fit" based on my printer which wasn't quite calibrated. New versions should be set up to just work IF your printer and settings are calibrated properly. If you've printed these, how did they fit? ****************************** These are from a system of magnetized bases and movement trays I've been working on for my Warhammer 40k models. This is still very much a work in progress, but I intend to keep posting updates here as it moves forward. **I plan on adding a LOT more tray options that will work with this system**. The base and insert pieces are mostly done - I'm already using them for dozens of models - but I'll probably add in more base sizes and options for other magnet sizes at some point. There are two parts to the system : providing a place to glue the magnets, and providing a center hole for pins in the movement trays to align the models. When using the trays, you can rotate the models in place in their position on the tray, but they won't slide out of place - and this is done with zero overhang (there is no "lip" needed to catch and hold the edge of the base). These are configured to use use 6x2mm magnets. I have used quite a few of [these magnets from Amazon]( https://www.amazon.com/gp/product/B07GKXW7DB/ref=ppx_yo_dt_b_search_asin_title?ie=UTF8&psc=1). I created a little reference jig I created with a magnet in it, so that I can make sure that all the base magnets are oriented with the same polarity. I drop a magnet onto that jig (it will flip itself to the "correct" polarity if necessary) and mark the bottom with a Sharpie. Then I put a bit of super glue in the hole, put the magnet (with the Sharpie marked side facing out ) on to one jaw of a pair of pliers, position it over the hole and squeeze until it is flush with the bottom edge. If you see the Sharpie marks, then the magnet flipped. The extra steps to make sure all the magnets have the same polarity won't matter much if you're just using ferrous metal trays, but if your trays are magnetic they all need to be consistent or some will actually push away instead of sticking. Also, if you get into using magnets in the models (so you can swap arms, weapons, etc.) then consistent polarity becomes very important, so this is good practice. I would have waited until it was a bit more refined, but I'm putting it up a little early because it's actually already working well, and I expect there will be more interest in movement trays soon with the impending release of Apocalypse. I now store & transport my armies on cheap metal cookie sheets, in a box which they can slide into. With these bases (and magnets), I can turn the tray of models upside down and nothing falls off. Keeps them quite happy and secure. There are 25 and 32 mm "base" files, which simply replace the GW bases. If you plan on doing some basing work which covers the top surface (sand, rocks, baking soda, ...) they should be fine. This is especially helpful for people running horde armies, when GW switches the base size (i.e. ork boyz - first few boxes I bought were 25mm bases, but now they ship with 32). The "insert" files are designed to fit inside the actual GW bases. These should work if you want to upgrade existing models already on 25m or 32mm GW bases, or want to leave your bases raw where some of the top surface remains visible. TEST THEM FIRST - print just a few and see if they fit. I had to fiddle with the sizing quite a bit, and the insert files included work on my printer with the bases that came with my Orks - your mileage may vary. There are two types of movement trays included - a 5 unit squad (25mm) and a single unit tray. Both use 5/16" cut washers (from Home Depot). The single unit trays can be joined together with the 25_connector part (which also uses 6x2mm magnets). I created all these using OpenScad. The scripts are a bit hacky. I plan on cleaning them up a little and posting them here but they are NOT set up to work with Customizer (everything would have to be combined in one file, and some way to select the target part / settings would need to be added). Once those files are up, it should be fairly easy for anyone with basic OpenScad skills to make parts with different base or magnet sizes, tray layouts, etc. The brave among you will even have the option of tweaking sizes if the inserts don't quite fit.
With this file you will be able to print Warhammer 40k Magnet Bases and Movement Trays with your 3D printer. Click on the button and save the file on your computer to work, edit or customize your design. You can also find more 3D designs for printers on Warhammer 40k Magnet Bases and Movement Trays.