Water Time Clock
prusaprinters
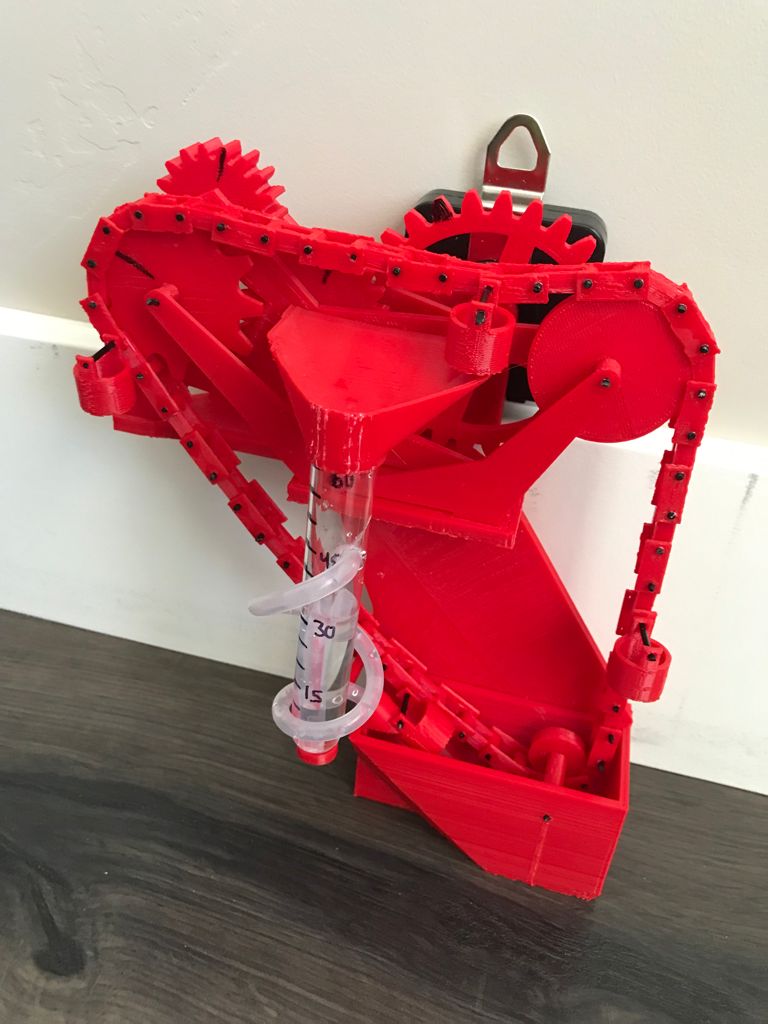
<p>NOTE: IMAGES MAY NOT DISPLAY- PDF IS ATTACHED</p><p>When I saw the topic of this competition, I immediately thought of designing a water-based clock. I have always been fascinated by running water, and specifically, water driven devices. As a matter of fact, in my very first CAD class, I started the design for a water wheel that would lift water from a reservoir. While the work I did got me an A in the class, it has always irked me that I never finished my idea. As such the design presented here is essentially the culmination of 7 years of work and thought. </p><p>Initially, I conceived of water being drawn up into a trough via waterwheel (following my original drawings from 7 years ago) with a clock mechanism providing a constant, measurable amount of water. I quicky discovered, however, that most clocks aren’t strong enough to lift even a milliliter of water if the weight is not balanced. Thus, the idea of using a chain came to light. While the bucket full of water rises vertically, the other buckets combine their weight to compensate due to the angle of the chain return, allowing the mechanism to haul the water up. I then realized that if I can use the minute hand of the clock as opposed to the second hand, I gain even more torque. The mechanism I ended up using can be found here:</p><p><a href="https://www.amazon.com/gp/product/B075ZXKL9T/ref=ppx_yo_dt_b_asin_title_o08_s00?ie=UTF8&psc=1">https://www.amazon.com/gp/product/B075ZXKL9T/ref=ppx_yo_dt_b_asin_title_o08_s00?ie=UTF8&psc=1</a></p><p>To accomplish the goal of delivering a constant flow of water, however, I couldn’t rely on one turn of my spur gear every hour, and so I had to develop the gearing required to complete one revolution every 5 minutes. This enabled me to put one bucket every turn, which empties into the trough and filles a vial, which in turn is marked with 5 minute volume increments which allow the user to discern how much time has passed. The vials I used can be found here: </p><p><a href="https://www.amazon.com/gp/product/B07FVJZH6D/ref=ppx_yo_dt_b_asin_title_o04_s00?ie=UTF8&psc=1">https://www.amazon.com/gp/product/B07FVJZH6D/ref=ppx_yo_dt_b_asin_title_o04_s00?ie=UTF8&psc=1</a></p><p>The next issue I ran into however, was what to do once an hour had gone by and the vial was full of water. This one took a little more brain power, but eventually I gained inspiration from teaching my 3-year-old son how to flush a toilet. I realized that, in essence, my vial was just a holding tank, and when the time came, all the water needed to be drained. And so for about a week I was looking up how different toilets work, and designing prototypes. I eventually realized however, that just using simple parts from amazon would enable me to build a watertight siphon system that would use the static pressure of the water to empty the vial at a specific interval. The end result was extremely simple, as you can see, and all you need is some tubing, which you can find here: </p><p><a href="https://www.amazon.com/gp/product/B07PPWJYQZ/ref=ppx_yo_dt_b_asin_title_o08_s00?ie=UTF8&psc=1">https://www.amazon.com/gp/product/B07PPWJYQZ/ref=ppx_yo_dt_b_asin_title_o08_s00?ie=UTF8&psc=1</a></p><p>At this point, I had designed everything I needed for counting the minutes of an hour. Unfortunately however, I had run out of time to design counting how many hours have passed, and so this project is being submitted half done. I hope you enjoy building and watching this hour timer work as much as I enjoyed designing and testing it, and I fully intend to determine a way to increment a counter each time the vial discharges. Ideally, it won’t take me another 7 years to figure out how to count the hours- so if you have any ideas, please let me know in the comments!</p><p> </p><p>Thank you!</p><p> </p><p>-Ricky D.</p><p> </p><p> </p><p><strong>Building Instructions:</strong></p><p> </p><p>NOTE: all tolerances are extremely close, so depending on your printer you may need to file and/or drill out holes for the axis. This entire build is designed to work with press fit parts only, although depending on your printer, some adhesive may be necessary to keep parts together.</p><p>NOTE: All axles are made of 1.75mm filament, cut to length and straightened as much as possible from the spool. For each spinning part (gears, pulleys, inner chain workings) it is important that the filament can turn freely. For all other parts (supports, stands, outer chain), the filament should fit snugly.</p><p> </p><p><strong>Step 1: Print and clean all parts</strong></p><p>Print one of each part, with the following exceptions:</p><ul><li>Print 4 copies of the “Water Bucket”</li><li>Print 24 copies of the “Inner Chain”</li><li>Print 48 copies of the “Outer Chain”</li></ul><p>I used .3mm layer height, 3 shells, 15% infill for everything. The only piece you need supports on is the trough, all others can be oriented to print without any supports. Pay special note to the Drive Gear orientation as one side has a pocket. </p><figure class="image"><img alt="Icon Description automatically generated" src="file:///C:/Users/Ricky/AppData/Local/Temp/msohtmlclip1/01/clip_image002.png"/></figure><p>Tip: when printing the Inner Chain, the axles should be parallel to the print surface, as shown.</p><p> </p><p> </p><p>The only piece that is different is the Basin. To make it waterproof, I printed it with 7 perimeter layers, following the advice from this article: <a href="https://blog.prusaprinters.org/watertight-3d-printing-pt1-vases-cups-and-other-open-models_48949/">https://blog.prusaprinters.org/watertight-3d-printing-pt1-vases-cups-and-other-open-models_48949/</a></p><p><strong>Step 2: Test Fit</strong></p><p>Ensure each piece will fit appropriately with the next. This is especially important with the Gear Base, Clock Mech Support, Inner Gear Support, Outer Gear Support, Trough, Basin Support, Basin, Vial Holder, and Tube Guide. Every contact point is unique to each object to avoid confusion and improper placement. NOTE: Do not attach everything yet- just make sure it all fits snugly.</p><p>Each Th</p><p><strong>Step 3: Attach clock mechanism. </strong></p><p>The STL file “Clock Mech Support” will screw on over the threaded portion of the clock mechanism (if you purchased the same one from amazon). Make sure you tighten the provided nut over it so that it wont spin. Then attach the “Drive Gear” to the minute hand, and again tighten the nut over it. I also placed the second hand cover in its usual place, just for looks.</p><p><strong>Step 4: Attach Gear Supports</strong></p><p>Attach the Clock Mech Support to the Gear Base, along with the inner and outer gear supports. Attach the trough to the inner gear support.</p><figure class="image"><img alt="A picture containing tool Description automatically generated" src="file:///C:/Users/Ricky/AppData/Local/Temp/msohtmlclip1/01/clip_image004.png"/></figure><p><strong>Step 5: Attach Gears and Upper Chain Pulley.</strong></p><p>Insert axels from the back of the Clock Mech Support through each gear, and into the correct support. The gear orientation is shown here from the back:</p><figure class="image"><img src="file:///C:/Users/Ricky/AppData/Local/Temp/msohtmlclip1/01/clip_image006.png"/></figure><p>Attach the Upper chain pulley in between the inner and outer gear supports.</p><figure class="image"><img src="file:///C:/Users/Ricky/AppData/Local/Temp/msohtmlclip1/01/clip_image008.png"/></figure><p> <strong>Step 6: Attach Basin Support, Pulley, Standoffs, and Vial Holder</strong></p><p>Attach the Vial Holder to the Basin Support.</p><figure class="image"><img src="file:///C:/Users/Ricky/AppData/Local/Temp/msohtmlclip1/01/clip_image010.png"/></figure><p>Attach the Basin support to the Basin, and push a filament axel through the support side, into the small pulley standoff, through the pulley, the big stand off, and into the other side of the basin.</p><p> </p><figure class="image"><img src="file:///C:/Users/Ricky/AppData/Local/Temp/msohtmlclip1/01/clip_image012.png"/></figure><p><strong>Step 7: Build the Chain</strong></p><p>This is the most tedious part of the assembly. Using Filament axels, assemble all links of the chain, with two outer chain links for each inner chain. Note that the orientation of the outer links does matter- one side will extend past the inner chain links, enabling the chain to hold onto the two pulleys. Every 12 axels should be left long to allow for a bucket to be mounted. The best way to hold the bucket in place is to heat and mushroom the end of the axle enough that the bucket doesn’t slip off. This should result in 4 long axels with buckets. Ensure each joint can turn freely. DO NOT close the chain yet. Shown below is the chain and bucket (no axle shown).</p><p> </p><figure class="image"><img src="file:///C:/Users/Ricky/AppData/Local/Temp/msohtmlclip1/01/clip_image014.png"/></figure><p> </p><p><strong>Step 8: Prepare the Vial Siphon.</strong></p><p>Punch a hole through the vial about 1 inch down from the top. Cut about 1 foot of tubing off, and insert the tubing through the hole. The tubing should fit snugly through the hole and go all the way to the bottom of the vial. Next, fill a water bucket with water and dump into to the vial 12 times. Mark the water level after each dump. Finnally, place the tube guide over the tube.</p><figure class="table"><table><tbody><tr><td> </td><td> </td><td> </td><td> </td><td> </td></tr><tr><td> </td><td style="vertical-align:top;"><figure class="image"><img alt="A picture containing wooden Description automatically generated" src="file:///C:/Users/Ricky/AppData/Local/Temp/msohtmlclip1/01/clip_image017.jpg"/></figure></td><td> </td><td rowspan="2" style="vertical-align:top;"><figure class="image"><img alt="A picture containing ground Description automatically generated" src="file:///C:/Users/Ricky/AppData/Local/Temp/msohtmlclip1/01/clip_image018.jpg"/></figure></td><td> </td></tr><tr><td> </td><td> </td><td> </td><td> </td></tr></tbody></table></figure><p><br/> </p><p> </p><p><strong>Step 9: Attach basin, vial, and chain.</strong></p><p>Place the vial into the receptacle on the trough, then insert the basin support into the gear base. Add an additional filament length to the inner gear support to provide the tipping point for the buckets.</p><figure class="image"><img src="file:///C:/Users/Ricky/AppData/Local/Temp/msohtmlclip1/01/clip_image020.png"/></figure><p>Run the chain over the spur gear and both pulleys, then attach the final link.</p><figure class="image"><img src="file:///C:/Users/Ricky/AppData/Local/Temp/msohtmlclip1/01/clip_image022.png"/></figure><p>Lastly, wrap the siphon tubing around vial to shorten the tube, and then snap the tube guide onto the edge of the basin, under the chain where it wont interfere with the buckets.</p><figure class="image"><img src="file:///C:/Users/Ricky/AppData/Local/Temp/msohtmlclip1/01/clip_image024.png"/></figure><p><strong>Step 10: Fill and Use</strong></p><p> </p><p>Fill the basin with water and ensure all moving parts can do so freely. Turn the spur gear by hand to fill the buckets, cause them to tip, filling the vial. ensure the siphon works correctly and will drain the water after filling up 12 times. </p><p>NOTE: If the vial requires more than 12 times to activate the siphon, the hole the tube is through is to close to the top. Use another vial and punch a hole slightly lower until the siphon will activate on the 12th bucket drop. </p><p> </p><p> </p><p> </p><p>Thank you for trying out the Water Time Clock, I hope you enjoyed it! I would love to see pictures of your prints, and any improvements you can think to make.</p><p> </p><p>Cheers!</p><p> </p><p>Ricky D.</p><figure class="table"><table><tbody><tr><td> </td><td> </td></tr><tr><td> </td><td><figure class="image"><img alt="A picture containing red, indoor, toy Description automatically generated" src="file:///C:/Users/Ricky/AppData/Local/Temp/msohtmlclip1/01/clip_image027.png"/></figure></td></tr></tbody></table></figure><p><br/> </p><figure class="table" style="float:left;"><table><tbody><tr><td> </td><td> </td></tr><tr><td> </td><td><figure class="image"><img alt="A picture containing indoor, red, floor, wall Description automatically generated" src="file:///C:/Users/Ricky/AppData/Local/Temp/msohtmlclip1/01/clip_image029.jpg"/></figure></td></tr></tbody></table></figure><p><br/> </p>
With this file you will be able to print Water Time Clock with your 3D printer. Click on the button and save the file on your computer to work, edit or customize your design. You can also find more 3D designs for printers on Water Time Clock.