Watercooling reservoir
prusaprinters
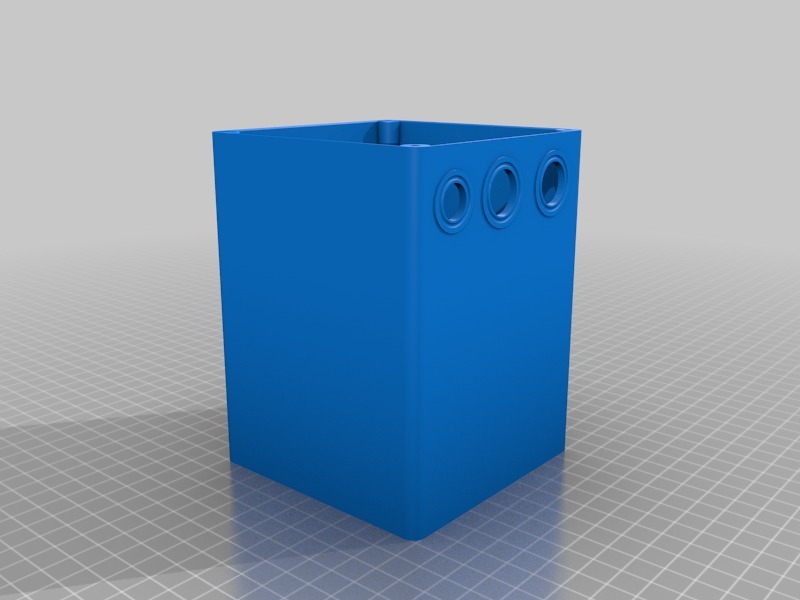
<p>Needed to upgrade watercooling setup for couple of my PCs and thought that why not design my own reservoir? So this is the first design and I printed couple of these using PETG and Filaflex for gaskets.</p> <p>Designed for immersive pump, Im using Eheim Compact 600. Has 2 16mm holes for passthrough tube adapters and 1 12mm for pump wire passthrough (see pics).</p> <p>Models include gaskets which I printed using Filaflex.</p> <p>After fixing the leaks and observing two reservoirs running on my bathroom for a couple of weeks, I installed the to 2 PC's. Still running fine after a couple of months. Just need to add water twice a month or so, seems evaporation is happening. Probably the top lid isn't that tight...</p> <h3>Print Settings</h3> <p><strong>Printer Brand:</strong></p> <p>Prusa</p> <p class="detail-setting printer"><strong>Printer: </strong> <div><p>Prusa Mk2</p></div> <p><strong>Rafts:</strong></p> <p>No</p> <p class="detail-setting supports"><strong>Supports: </strong> <div><p>No</p></div> <p><strong>Resolution:</strong></p> <p>0.2-0.3mm</p> <p class="detail-setting infill"><strong>Infill: </strong> <div><p>20%-100%</p></div> <p><strong>Notes:</strong></p> <p>Problems: as 3D printed parts aren't that solid, I had some small leaks here and there, mostly on the seams. With leaks I mean a very slow trickling, kind like sweating. So here are a couple of tips for getting watertight parts:</p> <ul> <li>randomize seam position. I had seam on one corner -> leak</li> <li>use multiple perimeters, at least 3</li> <li>over-extrude a bit so less small gaps between perimeters. I bumped mine to 105% in Slic3r</li> <li>set perimeter/infill overlap to higher number, like 30% or more</li> <li>use larger nozzle. Bigger paths, less gaps. Second reservoir I printed with 0.8mm nozzle and it leaked only at the seam</li> <li>vase-mode with large nozzle. Won't work with this model (at least haven't tried)</li> </ul> <h3>Post-Printing</h3> <p><strong>Post-processing for fixing leaks</strong></p> <ul> <li>use soldering iron to melt the problematic parts. Careful not to mess the parts too bad. In my experience melting only to top most layers is enough.</li> <li>glue. I tried hot glue, but not sure if it's a good long term solution. Some kind of silicone might work better.</li> </ul> <h3>How I Designed This</h3> <p>OpenSCAD. Source here: <a href="https://github.com/spegelius/3DModels/tree/master/Watercooling">https://github.com/spegelius/3DModels/tree/master/Watercooling</a></p> </p></p></p> Category: Computer
With this file you will be able to print Watercooling reservoir with your 3D printer. Click on the button and save the file on your computer to work, edit or customize your design. You can also find more 3D designs for printers on Watercooling reservoir.